Rose: Answers to Exercises: Unterschied zwischen den Versionen
Admin (Diskussion | Beiträge) (Die Seite wurde neu angelegt: „{|style="width: 100%;" | colspan="2" style="text-align:right;"|Klicke hier für '''Deutsche Version''' 30px|link=Rose:_Antworten|Deutsche Sprache |- | style="width: 60%"| '''Navigation: Main Page > Book Rose''' | style="width: 40%" style="text-align:right;"| '''<< previous chapter << - >> next chapter >>''' |} ---- = '''Answer…“) |
Keine Bearbeitungszusammenfassung |
||
| Zeile 2: | Zeile 2: | ||
| colspan="2" style="text-align:right;"|[[Rose:_Antworten|Klicke hier für '''Deutsche Version''']] [[Datei:ger.png|30px|link=Rose:_Antworten|Deutsche Sprache]] | | colspan="2" style="text-align:right;"|[[Rose:_Antworten|Klicke hier für '''Deutsche Version''']] [[Datei:ger.png|30px|link=Rose:_Antworten|Deutsche Sprache]] | ||
|- | |- | ||
| style="width: 60%"| '''Navigation: [[Hauptseite|Main Page]] > [[Othello_Book_of_Brian_Rose|Book Rose]]''' | | style="width: 60%"| '''Navigation: [[Hauptseite|Main Page]] > [[Othello_lernen|Learn Othello]] > [[Othello_Book_of_Brian_Rose|Book Rose]]''' | ||
| style="width: 40%" style="text-align:right;"| '''[[Rose:_Appendix|<< previous chapter <<]] - [[Rose:_Glossary|>> next chapter >>]]''' | | style="width: 40%" style="text-align:right;"| '''[[Rose:_Appendix|<< previous chapter <<]] - [[Rose:_Glossary|>> next chapter >>]]''' | ||
|} | |} | ||
| Zeile 459: | Zeile 459: | ||
---- | ---- | ||
{|style="width: 100%;" | {|style="width: 100%;" | ||
| style="width: 60%"| '''Navigation: [[Hauptseite|Main Page]] > [[Othello_Book_of_Brian_Rose|Book Rose]]''' | | style="width: 60%"| '''Navigation: [[Hauptseite|Main Page]] > [[Othello_lernen|Learn Othello]] > [[Othello_Book_of_Brian_Rose|Book Rose]]''' | ||
| style="width: 40%" style="text-align:right;"| '''[[Rose:_Appendix|<< previous chapter <<]] - [[Rose:_Glossary|>> next chapter >>]]''' | | style="width: 40%" style="text-align:right;"| '''[[Rose:_Appendix|<< previous chapter <<]] - [[Rose:_Glossary|>> next chapter >>]]''' | ||
|} | |} | ||
Aktuelle Version vom 23. Dezember 2023, 16:40 Uhr
| Klicke hier für Deutsche Version | |
| Navigation: Main Page > Learn Othello > Book Rose | << previous chapter << - >> next chapter >> |
Answers to exercises
Chapter 2
Exercise 2-1 White should play e1, capturing the disc at e4, which will provide access to the h1 corner.
Exercise 2-2 Black should play a2. Although this is a C-square, there is no danger of White gaining access to the a1 corner. Further, this move flips the disc at d5, which will allow Black to take the h1 corner.
Exercise 2-3 White should play a7, using the a8 corner to build more stable discs.
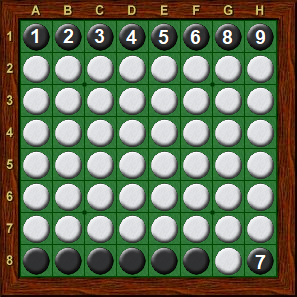
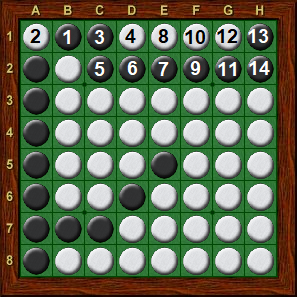
Exercise 2-4 This is an extreme example of building up stable discs. The correct sequence of moves is shown in the diagram.
Exercise 2-5 Black should fill in the hole at e1. Since White can not capture this disc, Black will be able to take the a1 corner.
Exercise 2-6 White should play h4, threatening to take the h1 corner. If Black tries to prevent this by playing h5, the white disc at h6 still allows White to take the corner.
Chapter 3
Exercise 3-1 This is a possible continuation of Diagram 3-13. Here Black should play a6, leaving White with no safe response.
Exercise 3-2 Black should play c7, flipping three internal discs. Note how this move does not flip horizontally or vertically. Such moves are often strong as the disc played is usually the only new frontier disc created.
Exercise 3-3 Here again Black should take the very quiet move g6, offering White no new options.
Exercise 3-4 White should simply play h8, leaving Black with no safe options. With perfect play, White can completely wipeout Black.
Exercise 3-5 As in Exercise 3-4, h8 might appear to be the obvious play, but this would leave Black with several quiet options. Instead, White should play the quiet move g4, and save h8 for later in the game.
Exercise 3-6 Black should play g5. Not only is this a quiet move, but it also prevents White from taking a quiet move at g5 himself.
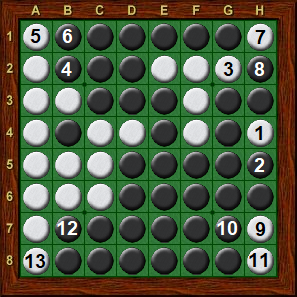
Exercise 3-7 The diagrams below show examples of sequences which force White to concede all four corners to Black.
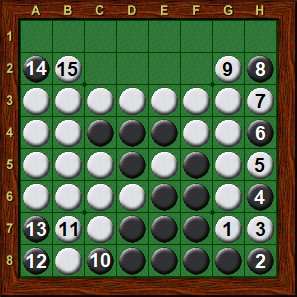
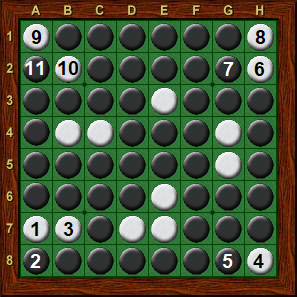
Exercise 3-8 The diagram below shows one sequence, with Black winning 55-8.
Chapter 4
Exercise 4-1 Black should take the quiet move at f3.
Exercise 4-2 White’s highest priority here is to prevent Black from taking an excellent move at c4. The best move is f6, flipping e6 and denying Black access to c4.
Exercise 4-3 f3 is White’s quietest move, but allows Black a strong response at c4. It is better to play d7, denying Black access to c4.
Exercise 4-4 This is a position which has occurred many times in expert play. White has a large number of frontier discs, but has control of the center. White should play a3, leaving Black with only 3 options, c6, f7, and g7, all of which are loud.
Exercise 4-5 e6 may appear to be the obvious move, but White can play f6 in response, leaving the same position as Diagram 4-8. Better is for Black to play f3, leaving a position similar to Diagram 4-9.
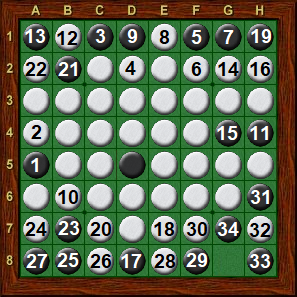
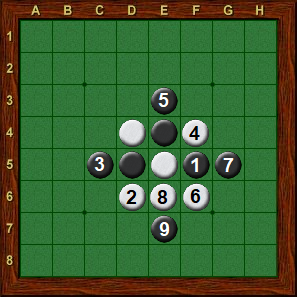
Exercise 4-6 g6 or c6 are two good choices. If you chose e6, you would regret it when Black replies e7!!, completely wiping you out. This is the prettiest of the many 9-move wipeouts, which is the shortest possible game of Othello. Being wiped out is always a danger that must be guarded against when playing opponents who grab many discs in the opening.
Chapter 5
Exercise 5-1 h5 represents a good quiet move for both sides, and both players want to grab this spot as soon as possible. Since it is Black’s turn, he should move to h5. If he moves somewhere else, White will take h5.
Exercise 5-2 In this case, if Black plays h5, it flips the disc at g6. White will take the edge with h2 and be left with a free move at h7. Black’s best move here is to play a6, taking away White’s access to h5.
Exercise 5-3 This position is taken from Diagram 5-18, with White playing the next move at h5. Since h4 and h5 form a pair, Black wants to take theother half of the pair and play h5. If Black moves elsewhere, White can play h5 or h7, gaining a tempo.
Exercise 5-4 Black is out of safe moves, but can stay alive by taking advantage of White’s wing formations. Before deciding which wing to attack, Black should examine which corner (a1 or h8) is more valuable to him. In this case, a1 is more valuable, since Black will be able to extend out along the left edge. Thus, Black should begin his attack with h2. White’s best response is h1, after which Black wedges at g1, gaining access to a1.
Exercise 5-5 White should play h6, leaving a 2-square gap at h4/h5. Black is already in danger of running out of moves.
Exercise 5-6 Black’s move to g6 gives White an opportunity to pull off a major coup with h7!! This is safe because Black does not have access to h4. White will later be able to gain tempos by playing both h2 and h4 (I would recommend playing this out on a board if it is not obvious to you).
Chapter 6
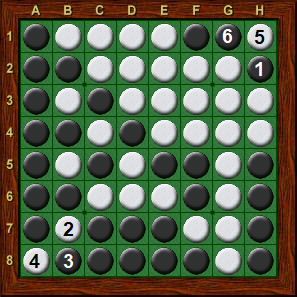
Exercise 6-1 Black should begin an interior sweep by playing b1. The perfect play sequence is shown in the diagram, with Black winning 35-29. Purists (purists with computers, that is) might note that Black can also win by an identical score by playing c1. However, I would prefer b1, as it leaves White with only one choice (a1), while Black starting with c1 allows White to choose between a1 and b1.
Exercise 6-2 White has many ways to win, but White’s best move is b2, taking control of the diagonal. Black will be forced to flip b2 on his next turn, allowing White to take the a1 corner.
Exercise 6-3 White should begin by playing h4. Black has little choice but to reply with h5, his only safe move. White can then play g2, taking control of the diagonal and running Black out of moves. This is another example of how it is often possible to exploit a pair, in this case setting up a move to grab the diagonal. The entire perfect-play sequence is shown in the diagram, with White winning 42-22.
Exercise 6-4 a7 is White’s only winning move, breaking the diagonal and gaining access to h8. Although Black can secure two edges by taking the a8 corner, White will fill in at b7, and Black passes. White will then be able to capture the right and top edges with the sequence shown in the diagram. Note that if White starts with b2 or g2, Black simply takes the adjacent corner, and White can not wedge.
Exercise 6-5 Black should play a1. This is a swindle, as White does not have access to b1. Black will later move to b1 himself, creating many stable discs.
Exercise 6-6 Black should play h7. White can take h8, gaining many stable discs. However, this creates the position in Exercise 6-5! This example demonstrates that it can be worth making a significant sacrifice in order to set up a swindle.
Chapter 7
Exercise 7-1 Black is threatening to make a good move at f4, so White should play to d2, flipping the disc on d6. Not only does this take away Black’s access to f4, but now it is White that threatens to make a quiet move to f4.
Exercise 7-2 Black should prevent White from making a quiet move to f3. Black could deny White’s access to f3 by playing c6 or f7. While these moves are reasonable, in the case the best move is for Black to play f3 himself.
Exercise 7-3 Black threatens to make a quiet move to g4, and White should prevent this by playing b5! Although very loud, this is easily the best move available for White.
Exercise 7-4 Even in the endgame, it is often more important to consider defense rather than offense. In this case, both players can make a quiet move to b4. Since it is Black’s turn, he should play b4. If he plays f2 instead, White takes b4 and Black will run completely out of moves.
Exercise 7-5 In this case, Black threatens to make a quiet move to g4, as well as a strong move to h6. White could play g4 himself, but this would give Black a good move to g3. Better for White is to play h6! While Black can get a good move in at g4, with h6 already occupied, this still leaves White with a solid lead.
Exercise 7-6 In this position, White appears to be winning easily. White has already taken a corner, and has good move available at h2 and c7. However, Black has the powerful threat of grabbing the diagonal with g2, after which White can not break the diagonal. White’s only winning move is to prevent Black from grabbing the diagonal by making the defensive move b7!
Chapter 8
Exercise 8-1 White should play to b2, creating three 2-square regions. Black must initiate play into each of these regions, and White simply follows Black by taking the last move in the region.
Exercise 8-2 White should play to a1. White could play into the odd region at b7, but this concedes the entire bottom edge and Black wins. Since Black does not have access to the a1-a2 region, no matter how White proceeds he will eventually have to initiate play into the region. It is far better is to play a1 first, let Black wedge at b1, and then play into the odd region at a7 rather than b7.
Exercise 8-3 Without access to the odd region (h2) it appears that Black has parity. However, if White begins with a8, then Black’s only move in the lower-left is b7, which flips the long diagonal and gives White access to h2. Thus, Black’s best response is h2, and White will get the last move in the lower-left (after Black h2, White’s best move is b7).
Exercise 8-4 If White play’s to a1, then Black passes, and White must initiate play into an even region, losing the game. White’s winning move is a3, feeding Black two moves (a2 and b3) in the region. Regardless of the order in which Black takes his moves, White plays a1 and then gets a good final move at b2.
Exercise 8-5 This is an example of using hyper even number theory. Black should play h2, sealing himself off from the region in the upper-right. No matter how White plays, White must eventually initiate play in the upper right, allowing Black to get the last move and the victory. The perfect play sequence is shown in the diagram.
Exercise 8-6 The key to understanding this position is to view the 3-square region in the lower-left (b7, a8, and b8) and g8 as a 4-square region. White should move into the odd region in the upper left, avoiding the lower left until Black plays into g8. The question then, is where in the upper left to move? The obvious choices are a3 and b3. A bit of thought allows us to reject b3 in favor of a3. The problem with b3 is that if Black plays immediately plays to g8, then White’s only move to the lower-left region (the only odd region) is b7, which offers Black free moves at a3 and a2. By contrast, after a3, a Black move to g8 (either now or in the future) is well met by b7, and White will be able to get the last move in every region. The perfect play sequence is shown in the diagram, with White winning 33-31.
Chapter 9
Exercise 9-1 Black should attack the h8 corner by playing h5. If White responds with h4, this flips f2 and g3. Black can then run White out of moves by playing g1.
Exercise 9-2 Black should attack the h1 corner by playing h3. White has little choice but to reply with h7, flipping the Black discs on g6 and h6. This sets up a good move for Black at c6.
Exercise 9-3 White should attack the h8 corner with e8, flipping the Black disc on e5 and controlling the c3-f6 diagonal. If Black responds with d8, White plays g7, taking permanent control of the diagonal.
Exercise 9-4 White should play d8, attacking the a8 corner from two directions. Although this sacrifices the h8 corner and the bottom edge, White can later take the a8 corner and sweep around the board, winning easily.
Exercise 9-5 White should attack one of Black’s unbalanced edges. In this case, the h8 corner is more valuable for White than the a1 corner, so White should begin by playing a7. Black has little choice but to respond with a8, allowing White to win by wedging at b8.
Exercise 9-6 Black should attack the h8 corner by playing h3. If White responds with h2, then Black can initiate a stoner trap with b7.
Exercise 9-7 The trap fails when Black responds c3, denying White access to the attack square (c8) while establishing access for Black to the a8 corner. Now matter how White continues, Black will be able to take the corner on his next move.
Exercise 9-8 The trap succeeds. Even if Black plays e1, White still has access to the attack square e8, because the move to b7 flips the disc on c6.
Exercise 9-9 The trap fails. Suppose that Black responds with e1, breaking the diagonal. White must continue with f8, but this flips the disc on b4, making the entire b-column White. Black can now play b8 without flipping b7, and will be able to take the a8 corner on his next turn.
Exercise 9-10 The trap fails when Black responds g7. If White tries to continue with f8, it flips the disc on g7, allowing Black to play h8.
Exercise 9-11 The trap fails when Black responds with c8.
Exercise 9-12 The trap fails when Black responds with h3, attacking the h8 corner. White must respond with h2, but now Black can take the a8 corner. Remarkably, computer analysis reveals that White is still winning after b7!
Exercise 9-13 The trap succeeds. After playing b7, White loses access to the attack square d8, but the only Black moves which do not surrender a corner immediately (a3 and a4) give White access to d8.
Exercise 9-14 The trap fails when Black responds with d1. If White continues with f8, it flips the disc on b4, making the entire b-column White. Black can now play b8 without flipping b7.
Exercise 9-15 The trap fails when Black responds with a6. Now if White plays d8, the b-column is entirely White, allowing Black to play b8 without flipping b7. However, it is worth noting that if White plays b8 instead of d8, Black’s only winning move is to play d8 himself. So, in some sense the trap does succeed in winning the h8 corner.
Chapter 10
Exercise 10-1 Black should play f2. While this move is loud, it sets up a very valuable swindle. If White plays b2, Black first fills in at e1, and later can swindle White by playing b8 without flipping b7. If White plays anywhere other than b2, Black can play a8 without giving White access to b8.
Exercise 10-2 Black should play a6. White’s only safe move is a5, but this makes the b-column entirely White, allowing Black to play b1 without flipping b2.
Exercise 10-3 Black moves to h4, attacking the h1 corner. If White replies with h7, it sets up a swindle, allowing Black to play a7 without flipping b7. If White does not play h7, Black can take h1 on his next move, and White still can not play h7 without allowing a swindle.
Exercise 10-4 Black is attempting to swindle White by playing d1 on his next turn. White can prevent this by playing b5, denying Black’s access to d1.
Exercise 10-5 If Black plays g1, then White replies with b2 and Black loses. Black should instead begin with a3. If White responds with a5, then Black can continue with g1. If White now plays b2, then the entire b-column is White, allowing Black to pull off a swindle with b1.
Exercise 10-6 White can get three of four moves in the corner by grabbing the diagonal with g2. Black will break the diagonal on his next turn, and White then continues with g1. Although White is conceding a corner early in the game, the tempos gained are worth more than the corner. Note that Black could deny White’s access to g1 by moving to b6, but this creates a huge wall and leaves White with the advantage.
Chapter 12
Exercise 12-1 Black should play quietly to c2, with the potential for moving to b3 and c4 in the future. This is the best way to take advantage of White’s shape.
Exercise 12-2 White should play c6, making an excellent shape. This is one of those positions that does not require much reading ahead to figure out the right move.
Exercise 12-3 White has several reasonable looking moves, including the quiet move f2. However, if White plays f2, then this results in the position shown in Exercise 12-1. Black gets in a good move at c2 and threatens b3 followed by c4. WZebra indicates that the best move is f1, which at first glance does not seem appealing at all. Not only does it offer Black a wonderful move at c4, but it also puts a piece on the edge opposite the edge White already occupies (c8-d8). The value of playing f1 is mainly defensive. Black can not respond with c2, because this would give White access to c4. Of course Black gets a good move in a c4, but after this neither b3 nor c2 is particularly good, and there is no way for Black to play to both. In the initial position, WZebra even prefers g4, denying Black access to c2, over f2. The difference between playing f1, f2, or g4 is not big, but the point is that it is important to consider how your opponent will exploit your bad shape.
Exercise 12-4 Black’s best move is, believe it or not, a2! In the 1980’s, a6 was the automatic response in this position, but this allows White to consolidate his position with a3. Black then has nothing better than the obvious move at b6, resulting in the position in Exercise 13-2. The point of playing a2 is that it threatens a6, allowing Black to gain two tempos on the edge. White can preempt this by attacking the corner with a3, but after Black defends with a5, White must initiate play in the north, leaving White with only a narrow advantage. Exercise 12-5 Black should exploit White’s weak edge position by playing g7. White can of course break the diagonal, but Black will eventually get 4 of the 6 moves (g7,g8, h4, h6,h7,h8) in the region.
Exercise 12-6 The obvious move here is b2-- unfortunately it is not the correct move. After b2, Black does not have a follow-up response to White’s h4. The usual move would be to play a3, semi-forcing White to take a1, and then wedge at b1. In this case, however, playing b1 gives White access to d1. Rather than b2, Black should begin with d1. If White responds with g1, then b2 becomes an attack on an unbalanced edge. If White breaks the diagonal with h4, Black can play the a3-a1-b1 sequence and win the h1 corner.
Chapter 13
Exercise 13-1 Black begins with 32 discs. If Black plays h7, White responds with h6, and Black gains just the disc on f7, finishing with 33 discs. If Black instead plays h6, White responds with h7. Cancellation is useful when counting this sequence. Black gains four discs on row 6 (c6, d6, e6, f6) but loses four discs on the b1-h7 diagonal (c2, d3, e4, f5). Further, Black gains g5, but loses h4. Thus, after Black h6/White h7 Black has no gain and finishes with 32 discs.
Exercise 13-2 Black begins with 27 discs. If Black plays a8, White responds with b8, and Black gains six discs (a8, c6, d5, e4, f3, g2) for a total of 33. If Black plays b8, White responds a8. Black gains nine discs (b3, b4, b5, b6, c7, d6, e5, f4, g3) but loses four discs (a5, a6, a7, g8) for a net gain of five discs.
Exercise 13-3 Black should play d8 and ends with 37 discs. After Black plays d8, White gets swindled because he does not have access to e8, so Black gets this move as well. When there are two empty squares at the end of the game, and one of the moves swindles the opponent, it is always better to make this move.
Exercise 13-4 Parity suggests that White should play to the odd region (b6). However, in this case, b2 is the correct move, allowing White to finish with 33 discs. If White plays b6 first, it flips the disc on d4. After Black takes a1, White’s move to b2 does not flip e5 because his disc on d4 “gets in the way”. Starting with b2 is therefore one disc better than b6.
Exercise 13-5 White should play a1. After Black passes, White plays b2, and Black ends the game with b1. Counting this sequence, White begins with 20 discs, and gains seven discs on the left edge after playing a1 for a subtotal of 27. Following a1, White must consider both b1 and b2. Starting with the move that is easier to count, b1 gains five discs on the top edge and White will finish with 27+5=32 discs. After a1, if White plays b2, it gains eight discs (c2, d2, e2, f2, c3, d4, e5, f6) for a subtotal of 27+8=35, but after Black plays b1, White loses the disc on b5, so he ends with 34 discs.
Exercise 13-6 The perfect play sequence is White b8, Black a8, White a7. Counting this sequence, White starts with 30 discs. After White b8, Black a8, White has gained five discs (c7, d6, e5, f4, g3) and lost five discs (c8, d8, e8, f8, c6). One the final move a7, White gains three discs (a7, a6, b7) for a total of 33 discs. If White begins with a7 or a8, the game ends in a draw.
Chapter 15
Puzzle 1 Black’s first move is a6. Unless White responds by going to a7, Black can take the corner at a1 for his second move. If White does respond with a7, it will turn over the disc at g7, allowing Black to take h8 corner.
Puzzle 2 White’s first move is b6, turning over ten discs. This leaves Black with only three options (b7, g2, and h7) all of which allow White to take a corner on his next move.
Puzzle 3 Black’s first move should be to b2. This allows White only two options (a2 and b7), both of which give Black access to a corner on his next move.
Puzzle 4 White plays to g1, leaving Black with no safe moves.
Puzzle 5 White plays to h4, simultaneously attacking two corners (a1 and h8). Black has no way to defend this double attack.
Puzzle 6 Black plays to a5, leaving White with no safe moves.
Puzzle 7 White plays to d1, leaving Black with no safe moves.
Puzzle 8 Black plays to g2, leaving White with no safe moves. If White plays to b2, it flips the disc on g2, giving Black access to h1.
Puzzle 9 Black plays to a6, leaving White with only two options (h2 or e7). If White chooses h2, Black captures h1. If White chooses e7, Black plays b7, ending the game.
Puzzle 10 White plays to e8, leaving Black with no safe moves.
Puzzle 11 Black plays to g1, leaving White with no safe moves.
Puzzle 12 Black plays to g2, leaving White with no safe moves.
Puzzle 13 Black plays to a3, attacking the h8 corner. If White responds with b2, this flips the disc on b7, giving Black access to a8.
Puzzle 14 White begins by playing h5. If Black responds with g3 or h4, White plays h7, leaving Black with no safe moves.
Puzzle 15 White’s first move is h5. If Black plays to h3, White plays to f7, leaving Black with no safe moves. If Black plays g2, White plays e1, gaining access to h1. If Black plays any other move, White plays h3, gaining access to h1.
Puzzle 16 Black should play to g7. White’s only safe move is f7, to which Black responds f8, leaving White with no safe moves.
Puzzle 17 White goes to e1, attacking the h1 corner. Black must defend with d1, after which White plays g2, grabbing the diagonal and leaving Black with no safe moves.
Puzzle 18 White goes to d1, attacking the h1 corner. Black must defend with c1, after which White plays h7, leaving Black with no safe moves.
Puzzle 19 Black plays to h2, which does not give White access to h3. If White replies with e2 or f2, Black plays h3, leaving White with no safe moves.
Puzzle 20 Black goes to g2, leaving h1 as White’s only response. Black then plays f8, leaving d8 as White’s only response, which gives Black access to a8.
Puzzle 21 Black plays to g8. No matter how White responds, Black follows with e8 and can play a8 on his third move.
Puzzle 22 Black’s first move should be to g3. This offers White for possible replies (a2, b2, g2, and h2). If White chooses a2, Black attacks corner a1 by playing at a5. If White chooses b2, Black attacks a1 by playing d8. If White chooses g2 or h2, Black can attack corner h1 by playing h3.
Puzzle 23 White should play a3. If Black responds a2, White plays b2, poisoning Black’s move to f2 and leaving Black with no safe moves. If Black does not respond a2, White plays a6 and captures the a8 corner on his third move.
Puzzle 24 White goes to b8, attacking corner h8. If Black defends by going to a8, White counters with a3, thereby gaining access to corner a1. If instead Black defends by going to h8, White responds with h7, thereby gaining access to corner h1.
Puzzle 25 White should play a5. If Black responds a7, White counters with h6. If Black instead plays a7, White counters with h6. In either case Black is left with no safe moves.
Puzzle 26 White plays to h5. If Black replies with g8, White plays to h7, leaving Black with no safe moves. If Black instead tries h3, White counters with c8, gaining access to corner a8.
Puzzle 27 Black should play d2. If White responds with d1 or e1, Black counters with b8; if White instead plays c2, Black counters with c8. In either case, White will have no safe moves.
Puzzle 28 Black goes to f6. White’s only safe response is g2. Black then moves to d6, gaining access to corner h1.
Puzzle 29 White should play e3. Black’s only safe response is b3. White then moves to a3, leaving Black with no safe moves.
Puzzle 30 White should play g7. If Black replies c2, White plays b2, leaving Black with no safe moves. If Black instead plays a2, White wedges at a5, gaining access to a1.
Puzzle 31 Black’s first move should be to g7. White’s only safe moves are g6 and g8. In either case Black continues with f8, gaining access to a corner on his next move.
Puzzle 32 Black goes to g6. If White chooses h5, Black replies with h7. If instead White chooses h7, Black replies a4. In either case, White has no safe moves.
Puzzle 33 Black should play d8. If White chooses a2, Black replies f8. If White instead chooses b8 or f8, Black replies g8. In each case, White is left with no safe moves.
Puzzle 34 White goes to d1. Whatever Black’s response, White continues with b2, leaving Black with no safe moves.
Puzzle 35 Black plays to h6. If White responds with g7 or h7, Black moves to h4, gaining access to corner h8.
Puzzle 36 White’s first move should be to h5. Black’s only safe move is h4. White then moves to g7, leaving Black with no safe moves.
Puzzle 37 Black goes to b7. White’s only safe response is f2, after which Black plays g2, offering White no safe moves.
Puzzle 38 White should play a5. Black must reply with a1, after which White fills in at b2, leaving Black with no safe moves.
Puzzle 39 Black goes to d1, attacking the h8 corner. White must respond g1. Black then moves to g2, leaving White with no safe response.
Puzzle 40 White should play a4, forcing Black to reply with a3. White then moves to d1, attacking the h1 corner. Black’s only defense is c1, but this move flips the disc on b2, giving White access to corner a1.
Puzzle 41 White goes to a4, forcing Black to reply with a3. White then moves to h2, leaving Black with no safe response.
Puzzle 42 White should play b8. No matter where Black responds, White continues with e8, leaving Black with no safe response.
Puzzle 43 Black goes to g7. Whatever White’s response, Black plays a6, attacking the a1 corner. If White defends with a7, it flips the disc on b7, giving Black access to a8.
Puzzle 44 White moves to d1. Black’s only safe response is c1. White then moves to f8, leaving Black with access only to a2, which gives White the a1 corner.
Puzzle 45 White’s first move should be f8, forcing Black to reply e8. White then moves to a2, forcing Black to play g8, offering White the h8 corner.
Puzzle 46 White goes to g4. Whatever Black replies, White moves to g2, leaving Black with no safe response.
Puzzle 47 Black’s first move should be to b7. White’s only safe response is a8. Black then plays g3; White’s only move is g2, giving Black the h1 corner.
Puzzle 48 Black goes to g2. This offers White three safe responses: c2, h1, and h2. If White chooses c2 or h2, Black moves to b7, leaving White with no safe response. If White chooses h1, Black wedges at h2 and takes corner h8 on his next turn.
Puzzle 49 Black plays b8, leaving White with safe responses at c8 and d8. Whichever White chooses, Black plays the other half of the pair, leaving White with no safe moves.
Puzzle 50 White should play a2. If Black chooses a1, White wedges at e1, gaining access to h1. If Black instead chooses h7, then White responds with a6, leaving Black with no safe moves.
Puzzle 51 White goes to c7. If Black responds c8, White plays b2. If instead Black responds b6, White plays b7. In either case Black is left with no safe response. If Black responds b8, White wedges at c8, gaining access to a corner on his third move.
Puzzle 52 Black should play a4. If White chooses b7, then Black replies with c2, breaking the diagonal. If instead White chooses h7, Black replies g2, leaving White with no safe response.
Puzzle 53 White should play g7. If Black replies b8, White employs a Stoner trap by playing f8. If Black instead replies c2, White plays b2, leaving Black with no safe moves.
Puzzle 54 Black’s first move should be to a2, forcing White to respond a1. Black then launches a Stoner trap by playing h3.
Puzzle 55 Black should play a7, forcing White to respond with a8. Black can then wedge at g1 and take a1 on his next turn.
Puzzle 56 Black goes to c1, forcing White to respond with g1. Black then moves to h5, leaving White with no safe moves.
Puzzle 57 White should play h7. If Black responds with h6, White moves to d1, leaving Black with no safe moves. If Black does not respond with h6, White moves there himself, gaining access to h1 on his next turn.
Puzzle 58 Black goes to g5, leaving White with five safe moves (b1, f6, f7, g6, and h6). No matter which of these moves White chooses, Black responds with e1, guaranteeing himself corner a8 or h1 on his next turn.
Puzzle 59 Black should play b7, leaving a8 as White’s only safe response. Black then wedges at b8, leaving White with no safe moves.
Puzzle 60 Black should play b2. If White responds d8, Black should then launch a Stoner trap by playing a6. If White does not respond with d8, then Black plays c8, guaranteeing capture of corner a8 on his next turn.
Puzzle 61 White goes to c1. Black’s only safe move is d8. White then goes to c8, leaving Black with no safe moves.
Puzzle 62 White should play h4. No matter how Black responds, White initiates a Stoner trap with c1.
Puzzle 63 White goes to d8. This leaves Black with safe moves at b1 and d1. Regardless of which move Black chooses, White plays b7, leaving Black with no safe moves.
Puzzle 64 White’s first move should be b7, threatening a Stoner trap by playing c8. Black must reply with b3 to prevent the Stoner. White then plays to b4, leaving Black with no safe response.
Puzzle 65 White goes to a2, leaving a1 as Black’s only safe response. White then plays to b2, leaving Black with no safe moves.
Puzzle 66 Black should play a2. If White responds c7, Black plays h7, leaving White with no safe moves. If White responds d8, Black wedges at e8 and can take corner h8 on his next turn. If White responds e8 or h1, Black plays c6 and can take corner a8 on his next turn.
Puzzle 67 White goes to h4. If Black responds h8, White should play at b7, leaving Black with no safe moves. If Black instead responds g2 then White can cut the diagonal with d1.
Puzzle 68 White should play to b7. If Black responds a2, White should spring a Stoner trap with a move to a3. Likewise, White can counter a Black response of g8 by playing f8. If Black’s initial response is f8, White should reply with g8, leaving Black with no safe moves.
Puzzle 69 Black goes to b2. If White responds a2 or h2, Black should continue with g2, leaving White with no safe moves. If instead White responds g1, then Black should continue with h6, again leaving White with no safe moves.
Puzzle 70 Black should play at e1, threatening corner a1. If White blocks by moving to f1, Black should break the a8-h1 diagonal with g8 and take corner h1 on his next turn. If White Blacks by moving to a1 himself, Black can wedge at a2 and take corner a8 on his next turn.
Puzzle 71 Black should play g7. No matter where White responds, Black should next play at a6, threatening corner a1. White must play at a7, which flips the disc at g7, offering Black corner h8.
Puzzle 72 Black goes to d1. White must play c1, after which Black continues with a4, leaving White with no safe moves.
Puzzle 73 Black should play c8, forcing White to respond with b8. Black then attacks corner h1 by playing d1. If White tries to defend with c1, it flips the disc on b7 and offers Black the a8 corner.
Puzzle 74 Black plays d8, leaving c8 as White’s only safe response. Black should then play a2, leaving White with no safe moves.
Puzzle 75 Black should play h5. This leaves White with two safe responses: h4 and h6. Black should respond h3 or h7, respectively, leaving White with no safe moves.
Puzzle 76 Black should move to b7. If White chooses b3, Black play b2, leaving White with no safe response. If White instead chooses h8, Black wedges at g8 and takes corner a8 on his next turn.
Puzzle 77 White goes to g7, leaving h8 as Black’s only safe move. White then contin
Puzzle 78 White should play to b2. If Black chooses a1, White wedges at b1 and takes corner h1 on his next move. If Black instead chooses b1, White plays b8, leaving Black with no safe response.
Puzzle 79 White goes to a2, leaving e2 as Black’s only safe response. White continues with f2, leaving Black with no safe moves.
Puzzle 80 Black should play g2. White’s only safe move is h7, after which Black launches a Stoner trap by playing h3.
Puzzle 81 Black plays a2, and no matter where White responds, Black follows with a4. This guarantees capture of corner a8 on his third move.
Puzzle 82 White should play b4, attacking corner h8. If Black responds b2, White breaks the diagonal with b3. If Black instead responds b3, White breaks the diagonal with g1.
Puzzle 83 White goes to b2. If Black responds d1, White initiates a Stoner trap with c1. Otherwise, White plays d1 himself, again setting up a Stoner trap.
Puzzle 84 Black moves to c2. If White responds with g1, then Black plays g7 and White has no safe response. If White responds b2, Black cuts the diagonal with b8 and takes a1 on his next turn.
Puzzle 85 Black plays g5. If White responds with a4, Black wedges at a3 and takes corner a1 on his next turn. If White responds h6, Black wedges at h5 and takes corner h8 on his next turn.
Puzzle 86 Black should play b2. White’s only safe move is a8, after which Black plays a7, leaving White with no safe moves.
Puzzle 87 Black moves to g7, leaving b5 as White’s only safe response. Black then moves to b4, leaving White with no safe moves.
Puzzle 88 Black plays h7. White’s only safe move is c7, after which Black plays b2, leaving White with no safe response.
Puzzle 89 Black should play h3, leaving b3 as White’s only safe response. Black then plays b7, leaving White with no safe moves.
Puzzle 90 Black moves to g2. If White responds with d8, Black plays h4 and White has no safe moves. If White instead plays g7, Black breaks the diagonal with h4 and takes h8 on his next turn.
Puzzle 91 Black plays g7. If White chooses f6, Black plays h6, leaving White with no safe moves. If White instead chooses h6 or h7, Black plays b7, again leaving White with no safe moves. If White chooses g2, Black cuts the diagonal with g4 and takes h1 on his next turn.
Puzzle 92 Black should play g7. If White responds with g8, Black can play g5 or g6, leaving White with no safe moves. If White responds with g5 Black plays g6, or if White responds g6 Black plays g5; in each case White has no safe moves.
Puzzle 93 Black should play e7. White’s only safe response is f8. Black then plays g7, leaving White with no safe moves.
Puzzle 94 White goes to d3. If Black chooses f1, then White plays e1, winning the h1 corner. If Black instead choose e1, White wedges at f1, again winning the h1 corner.
Puzzle 95 White should play d7. Black’s only move is d5, after which White plays f3, winning the h1 corner.
Puzzle 96 White goes to h7, and no matter where Black responds, continues with h3, winning the h1 corner.
Puzzle 97 White should play f3. Black must defend with c6. White then plays f2, and Black can not flip the disc on f3.
Puzzle 98 Black should begin with f8, and White must defend at e8. Black then plays b7. No matter how White responds, Black follows with a Stoner attack at c8, guaranteeing a corner on his fourth move.
Puzzle 99 Black goes to b7, and White passes. Black then goes to a2. White’s only move is to b2, flipping the disc on b7. Black’s third move is to a8, White passes, and Black takes h8 on his fourth move.
| Navigation: Main Page > Learn Othello > Book Rose | << previous chapter << - >> next chapter >> |
