Rose: Chapter 9
| Klicke hier für Deutsche Version | |
| Navigation: Main Page > Learn Othello > Book Rose | << previous chapter << - >> next chapter >> |
Chapter 9: Tesuji Part I
Tesuji is a Japanese word (pronounced te as in ten, su as in super, ji as in jeep) used in games such as Go and Shogi, with no simple equivalent in English. It is sometimes translated as “set moves” or “brilliant moves”. Tesujis are basically just good moves in certain positions that arise often enough to merit special attention. Knowledge of tesujis allows you not only to spot them easily when they are available, but also to look ahead and set them up, or avoid giving your opponent a chance to use them. This chapter looks at tesuji involving corner attacks, while Chapter 10 examines swindles and other tesuji.
The basic idea behind all of the corner attack tesuji is to make a move which threatens to take a corner. This forces the opponent to either make a move that eliminates the threat, or give up the corner. When both of these options are bad for the opponent, then the corner attack will be an effective move. However, it is important to keep in mind that there are circumstances under which your opponent can afford to simply give up the corner, in which case the corner attack may be a bad move.
Forcing your opponent to create a wall
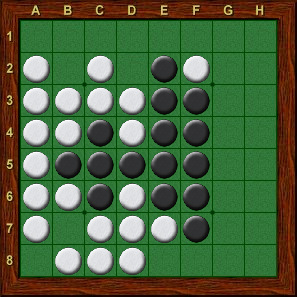
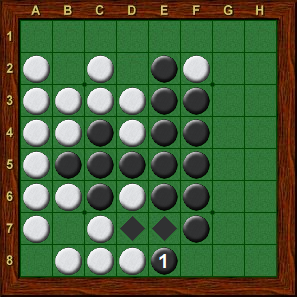
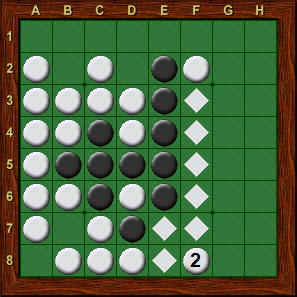
Diagram 9-1 shows one pattern (similar to Diagram 5-11) that often occurs in beginner’s games. White has just played b8, giving Black a golden opportunity to attack the a8 corner by playing e8 (Diagram 9-2). In this case, the a8 corner is extremely valuable for Black, as it would allow him to jump to the a1 corner as well. In order to avoid losing the corner, White must respond with f8, forming a huge wall across the board (Diagram 9-3).
 |
 |
|
| Diagram 9-1 | Diagram 9-2 | Diagram 9-3 |
| Black to move | White to move | Black to move |
 |
 |
|
| Diagram 9-4 | Diagram 9-5 | Diagram 9-6 |
| Black to move | White to move | Black to move |
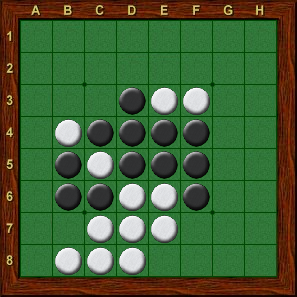
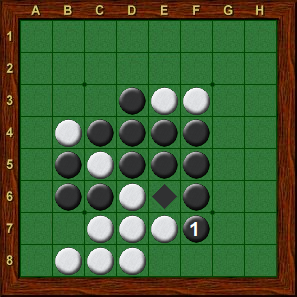
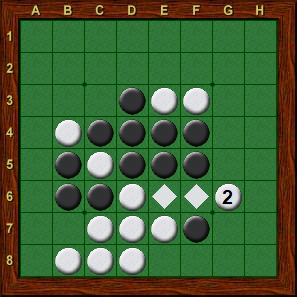
Even in expert games, the threat of this tesuji is often used to great effect. In Diagram 9-4, Black should move to f7, threatening to follow with e8 in Diagram 9-5. White would like to respond with g8, but in this case he can not. White’s best move is to limit the effectiveness of Black’s e8 threat by playing g6 (Diagram 9-6). Now if Black plays e8, White can respond f8 without flipping the discs at f4 and f5. However, Black can continue with h6, flipping the disc at f6 back to Black and reestablishing the threat of e8.
Forcing your opponent to flip your poison discs
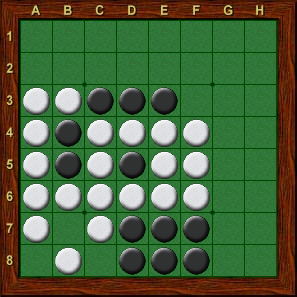
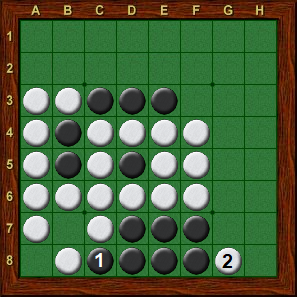
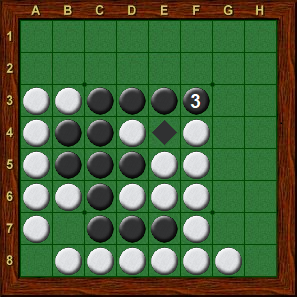
Diagram 9-7 shows a typical example of this tesuji. As the position stands now, it appears that Black will have to break through White’s wall, playing g4, g5 or g6. Black potentially has an excellent play at f3, but the discs at f7 and f8 poison the move. In this case, Black can set up his f3 move by playing c8, attacking the a8 corner. This leaves White with little choice but to take the bottom edge with g8 (Diagram 9-8). This removes the poison discs, allowing Black to play a quiet move at f3 (Diagram 9-9), and now White must break through Black’s wall.
 |
 |
|
| Diagram 9-7 | Diagram 9-8 | Diagram 9-9 |
| Black to move | Black to move | White to move |
Gaining access to a vital square
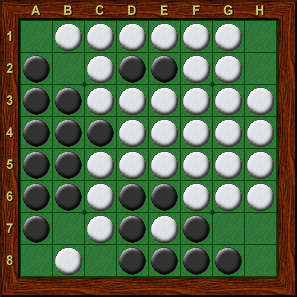
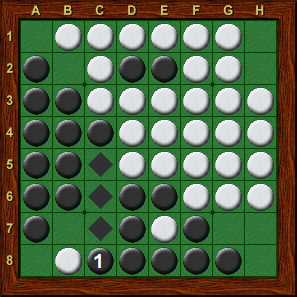
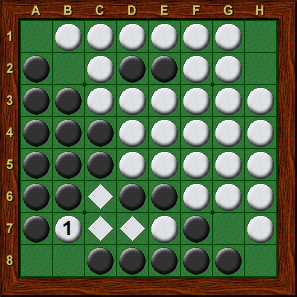
In Diagram 9-10, Black desperately needs access to h1, and can get it by playing c8, attacking the a8 corner (Diagram 9-11). If White tries to grab the diagonal with b7, Black just takes a8, gaining undeniable access to h1. Of course, White can take the h8 corner, winning the bottom edge, but then Black continues with h1, guaranteeing him the other three edges and a comfortable victory. Note that if we modify Diagram 9-10 slightly by removing the white disc on b8 and putting it on h7 instead, Black’s c8 would not work. White simply plays b7, denying Black access to h1 (Diagram 9-12). It is the fact that Black is attacking a corner in Diagram 9-11 which guarantees eventual access to h1.
 |
 |
|
| Diagram 9-10 | Diagram 9-11 | Diagram 9-12 |
| Black to move | White to move | Black to move |
Diagonal grab
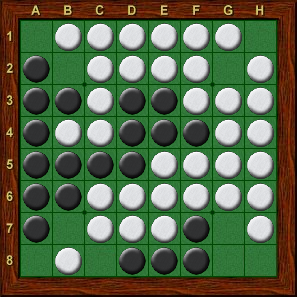
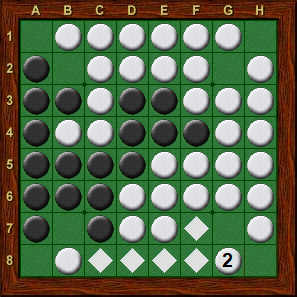
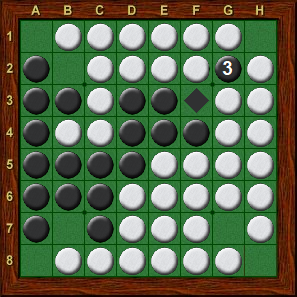
Diagram 9-13 shows a common endgame pattern. It may appear that Black has lost, but there is a way to win. Black begins by playing c8, attacking the a8 corner; White’s natural response is g8 (Diagram 9-14). With the disc at c6 black, now Black grabs the diagonal with g2, and White is dead (Diagram 9-15).
 |
 |
|
| Diagram 9-13 | Diagram 9-14 | Diagram 9-15 |
| Black to move | Black to move | White to move |
Double corner attack
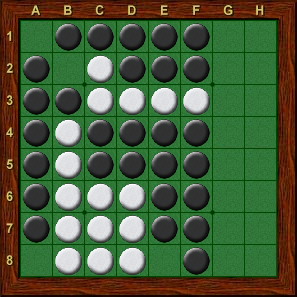
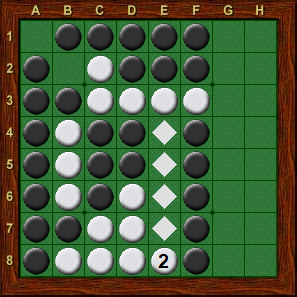
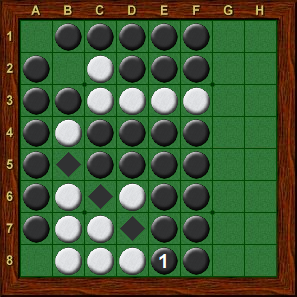
Diagram 9-16 shows a pattern which frequently occurs late in the midgame or in the endgame. I have often seen players in this situation take the corner immediately, fearing that somehow they will lose access to it. The problem with playing a8 in Diagram 9-16 is that White will wedge with e8, and now Black is short of moves (Diagram 9-17). It is much better for Black to play e8 himself, setting up a double corner attack (Diagram 9-18). Comparing Diagram 9-17 with Diagram 9-18, several advantages for Black are apparent. In Diagram 9-18, no matter where White moves, Black will still be able to take the a8 corner on his next move, and White does not get a wedge on the bottom edge. Further, instead of Black having to find a move as in Diagram 9-17, in Diagram 9-18 it is White’s turn to move.
 |
 |
|
| Diagram 9-16 | Diagram 9-17 | Diagram 9-18 |
| Black to move | Black to move | White to move |
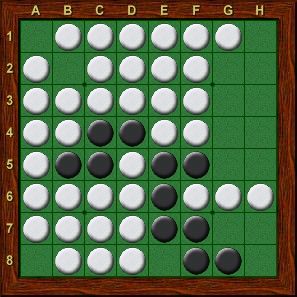
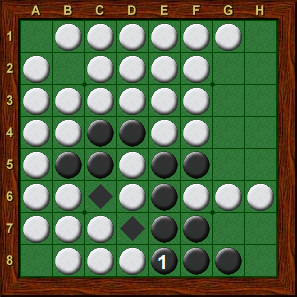
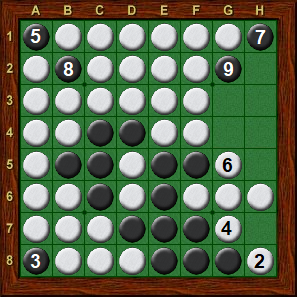
Since a double corner attack almost always wins the corner, if the corner is valuable enough you should not hesitate to sacrifice an edge. In Diagram 9-19, you may be tempted to play g7, h7, or some other move, but Black will win easily after e8 (Diagram 9-20). This sacrifices the bottom edge, but Black will get a huge number of stable discs as he sweeps around the left and top edges (Diagram 9-21).
 |
 |
|
| Diagram 9-19 | Diagram 9-20 | Diagram 9-21 |
| Black to move | White to move | Black wins |
Double unbalanced edge
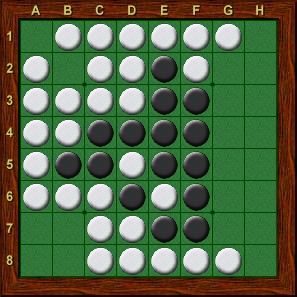
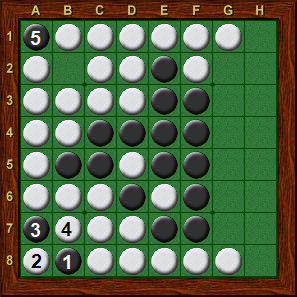
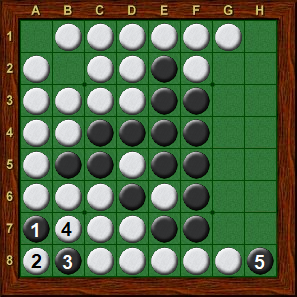
In Diagram 9-22, White has two unbalanced edges facing the a8 corner. This formation is nearly always fatal, because Black not only wins a corner, but can choose which corner to take. In this case, Black has two possible corner attacks, a7 or b8. In either case, if White takes the a8 corner on his next turn, then Black will wedge, winning a corner. The two most natural sequences are shown in Diagram 9-23 and 9-24. The question is, which of these is better for Black?
 |
 |
|
| Diagram 9-22 | Diagram 9-23 | Diagram 9-24 |
| Black to move | White to move | White to move |
This boils down to the question of which corner is more value for Black, a1 (Diagram 9-23) or h8 (Diagram 9-24). While h8 is certainly valuable, a1 is worth much more. Not only does it allow Black to capture another corner with h1, but it also gives Black a huge free move at b2. The point to keep in mind is that in order to win the a1 corner, Black should begin by attacking the other corner (h8) first, playing b8 in Diagram 9-22. Note that White could refuse to play along with Black’s plan and play somewhere on the g-column instead of a8. In that case, Black can follow up with b7, in some sense sacrificing the a8 corner again while still threatening to capture the h8 corner.
Stoner trap
This tesuji is named after John Stoner, one of the founding members of the US Othello Association. I have saved this corner attack tesuji for last because it is more complicated than the other tesuji that I have presented so far. When successfully implemented, the trap guarantees the capture of a corner, but there are many circumstances under which the trap fails, some of which are very subtle. Further, as with all of the corner attack tesuji, it is important to keep in mind how much must be sacrificed to set up the trap, and balance that against the value of the corner gained.
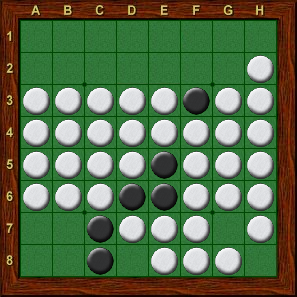
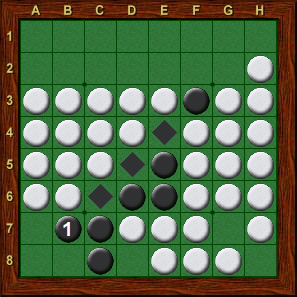
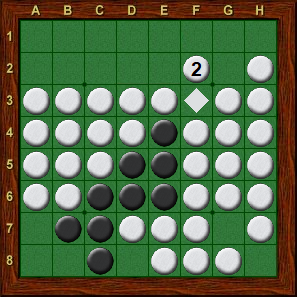
Diagram 9-25 shows the basic setup for a Stoner trap. In this case, Black will exploit White’s weak bottom edge to capture the h8 corner. Black should begin with b7 (Diagram 9-26). Note that Black controls the b7-f3 diagonal so that White can not take the a8 corner, at least for the moment. This leaves White with only two choices which do not immediately lose a corner: e2 and f2. Suppose that White takes f2, flipping the disc at f3 and gaining access to the a8 corner (Diagram 9-27).
 |
 |
|
| Diagram 9-25 | Diagram 9-26 | Diagram 9-27 |
| Black to move | White to move | Black to move |
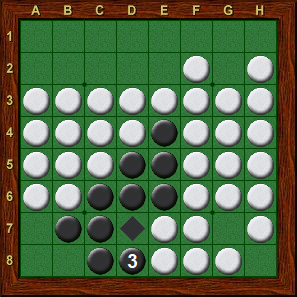
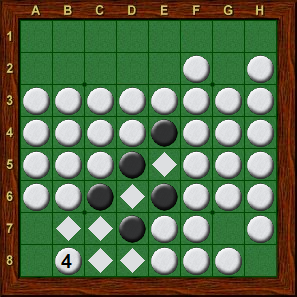
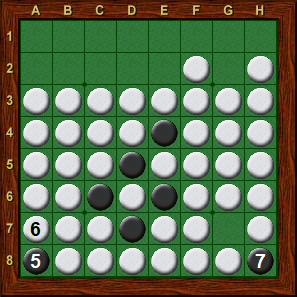
Black now launches a powerful corner attack with e8!! (Diagram 9-28). Black is threatening to take the h8 corner, and the only move for White which does not give up the corner immediately is b8 (Diagram 9-29). Unfortunately for White, playing b8 flips the disc on b7, the very disc that Black first played in Diagram 9-25. Now Black can take the a8 corner, and then h8 on his next turn (Diagram 9-30). In this manner, a successfully implemented Stoner trap always wins the corner attacked; if the opponent tries to defend the corner by taking the edge, he flips the X-square, losing two corners. It is important to note, however, that a Stoner trap usually results in the loss of the corner adjacent to the X-square.
 |
 |
|
| Diagram 9-28 | Diagram 9-29 | Diagram 9-30 |
| White to move | Black to move | Black takes h8 |
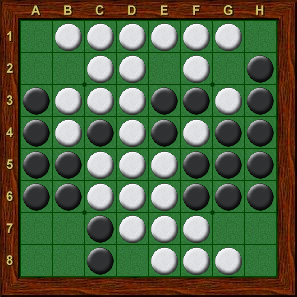
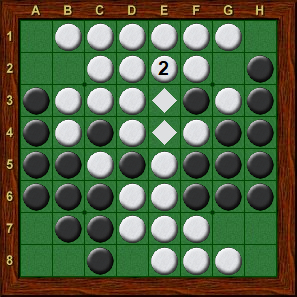
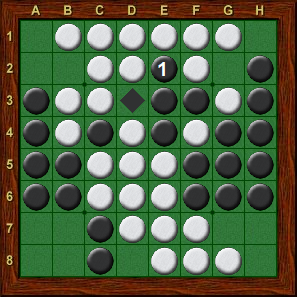
It is very easy for players (of all abilities) to get tunnel vision when they see the opportunity to set up a Stoner trap. They focus so much on the tesuji that they forget to think about whether or not it works out to their advantage. For example, consider Diagram 9-31. Here, Black can play a Stoner trap with b7. This move will eventually lead to black capturing h8, but how much is h8 worth? Since Black has an unbalanced edge, if he takes h8, White will be able to wedge at h7, winning the h1 corner. Further, playing b7 leaves White with a nice quiet move at e2, which breaks the diagonal and eventually will allow White to take a8 and the left edge (see Diagram 9-32).
 |
 |
|
| Diagram 9-31 | Diagram 9-32 | Diagram 9-33 |
| Black to move | Black b7, White e2 | White to move |
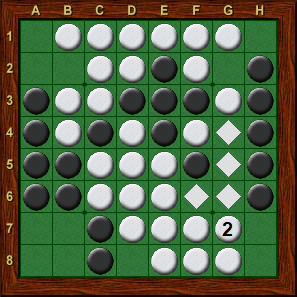
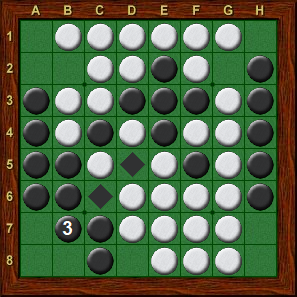
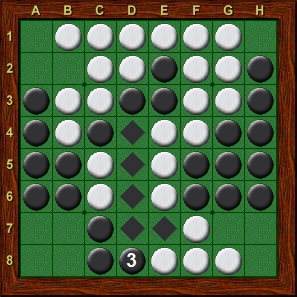
It is far better for Black to simply play the quiet move e2 (Diagram 9-33), playing where White would like to play, and leaving b7 as a powerful threat. White could grab a diagonal with g7 (Diagram 9-34), but now Black takes the other diagonal with b7, and White is dead (Diagram 9-35). If instead White tries to stop Black’s b7 threat by playing g2, then Black simply cuts with d8, winning easily (Diagram 9-36). Why sacrifice a corner to play a Stoner trap when you can just run your opponent out of moves instead?
 |
 |
|
| Diagram 9-34 | Diagram 9-35 | Diagram 9-36 |
| Black to move | White to move | After g2, d8 |
Stoner trap varieties
So far, we have looked only at the basic Stoner trap. While this is probably the pattern seen most often in actual play, there are a great number of variations to the basic theme. Three of these are shown below. In each case, Black can play b7, follow with an attack on the h8 corner, and eventually take h8.
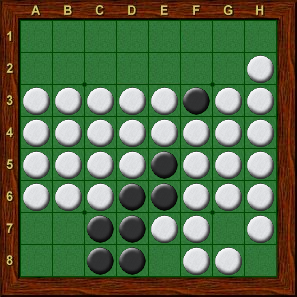 |
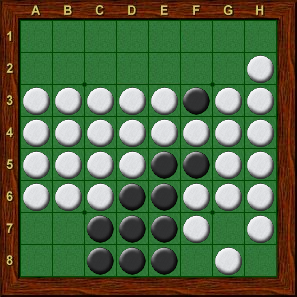 |
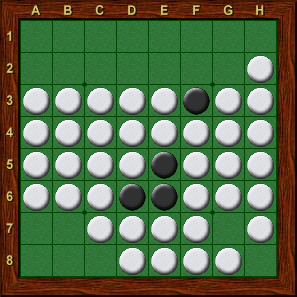
|
| Diagram 9-37 | Diagram 9-38 | Diagram 9-39 |
| Black to move | Black to move | Black to move |
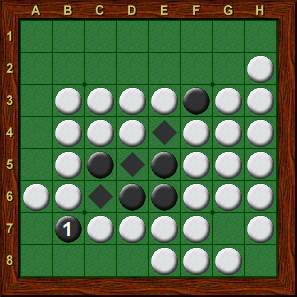
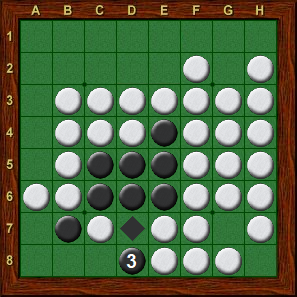
Another twist on the Stoner trap is shown in Diagram 9-40. Here again, Black begins by playing b7 (Diagram 9-41). White can break the diagonal with f2, but now Black launches a corner attack with d8. If White takes the edge at c8, he flips the b7 X-square diagonally, losing two corners (Diagram 9-42). While this sort of Stoner trap occurs relatively infrequently, in my experience it is often more effective than the conventional type. The corner sacrificed is often not that valuable, and the attacker has greater chances of finding good moves near the sacrificed corner. In the next section, we examine some of the ways that Stoner traps can fail.
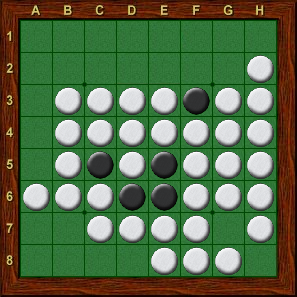 |
 |
|
| Diagram 9-40 | Diagram 9-41 | Diagram 9-42 |
| Black to move | White to move | White to move |
A funny thing happened on the way to the X-square
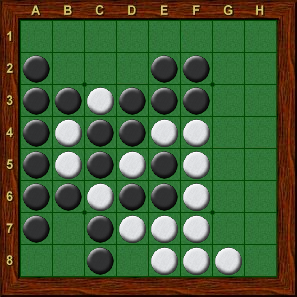
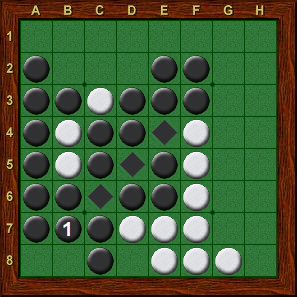
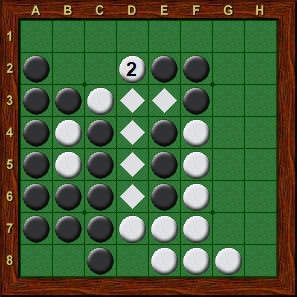
The most common reason that Stoner traps fail is that, after playing the initial X-square, the attacker is unable to make the corner attack on his next move. For example, consider Diagram 9-43. Suppose that Black decides to launch a Stoner trap, starting with b7 (Diagram 9-44). Black is threatening to win a corner by playing d8, but White can prevent this by moving to d2 (Diagram 9-45)! Black does not have access to the critical square d8, and White has broken the diagonal. No matter where Black plays, White will be able to capture the a8 corner on his next turn, and Black’s Stoner trap has failed.
 |
 |
|
| Diagram 9-43 | Diagram 9-44 | Diagram 9-45 |
| Black to move | White to move | Black to move |
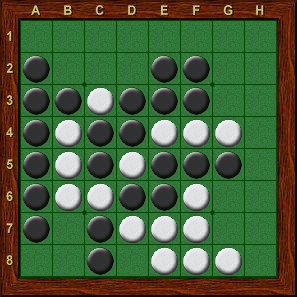
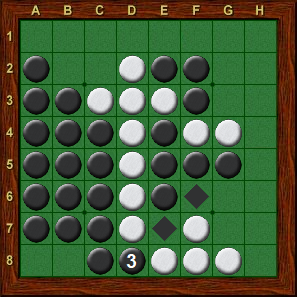
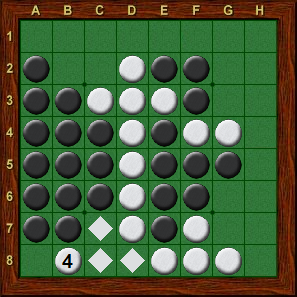
Another common reason for Stoner traps to fail is that the opponent can safely deal with the corner attack without flipping the X-square. Diagram 9-46 is a modified version of Diagram 9-43. Here, after the sequence Black b7, White d2, Black is able to launch a corner attack with d8 (Diagram 9-47). However, with the b-column entirely Black, White is able to play b8 without flipping the b7 X-square. See the exercises at the end of this chapter for more examples of Stoner traps.
 |
 |
|
| Diagram 9-46 | Diagram 9-47 | Diagram 9-48 |
| Black to move | White to move | Black to move |
Exercises
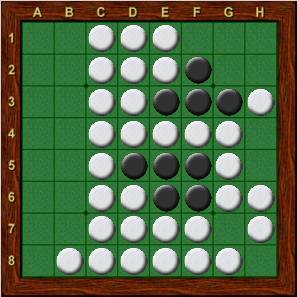
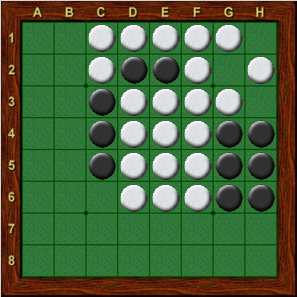
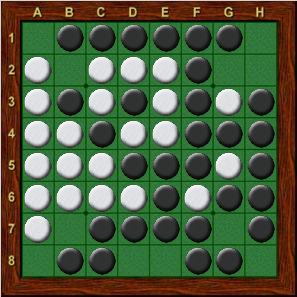
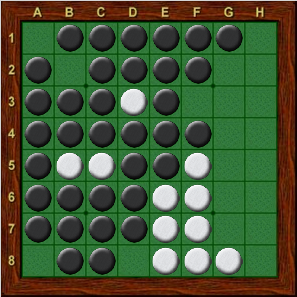
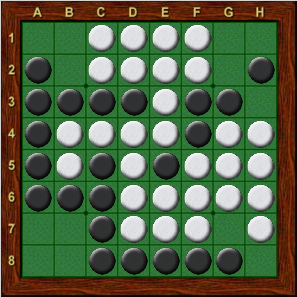
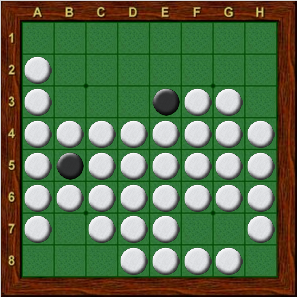
In each diagram, find the best move. Answers you'll find here.
 |
 |
|
| Exercise 9-1 | Exercise 9-2 | Exercise 9-3 |
| Black to move | Black to move | White to move |
 |
 |
|
| Exercise 9-4 | Exercise 9-5 | Exercise 9-6 |
| White to move | White to move | Black to move |
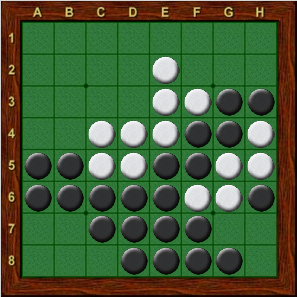
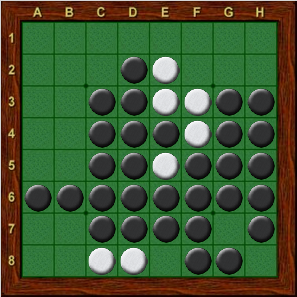
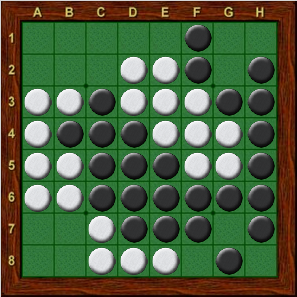
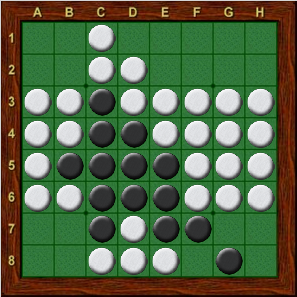
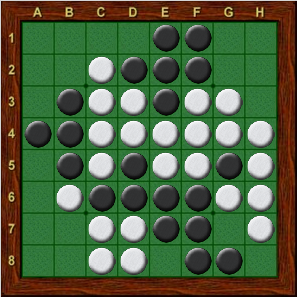
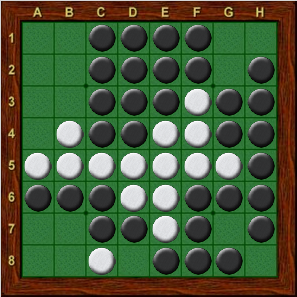
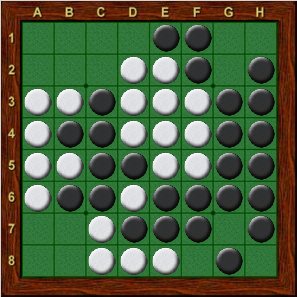
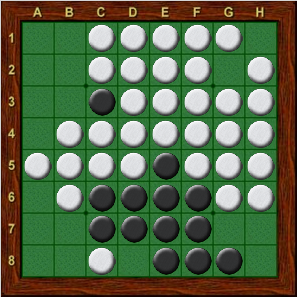
The problems below were created by John Stoner and first published in 1981. In each diagram, determine if White can spring an escape-proof Stoner trap starting with a move to b7.
 |
 |
|
| Exercise 9-7 | Exercise 9-8 | Exercise 9-9 |
| White to move | White to move | White to move |
 |
 |
|
| Exercise 9-10 | Exercise 9-11 | Exercise 9-12 |
| White to move | White to move | White to move |
 |
 |
|
| Exercise 9-13 | Exercise 9-14 | Exercise 9-15 |
| White to move | White to move | White to move |
| Navigation: Main Page > Learn Othello > Book Rose | << previous chapter << - >> next chapter >> |