Rose: Chapter 10
| Klicke hier für Deutsche Version | |
| Navigation: Main Page > Learn Othello > Book Rose | << previous chapter << - >> next chapter >> |
Chapter 10: Tesuji Part II
Swindles
Swindles are perhaps the most fundamental tesuji of Othello. As discussed in Chapter 5, there are many situations where two squares form a pair: two squares such that if a player moves to one the squares, the opponent’s best move is normally to move to the other. A swindle occurs when a player moves into the pair, but the opponent does not have a legal move to the other square of the pair, allowing the first player to get both moves in the pair. There are situations where a player can get both moves in a pair because the opponent does not want to move into the other half of the pair; a swindle occurs only when the opponent can not move into the other half.
Corner/C-square Swindle
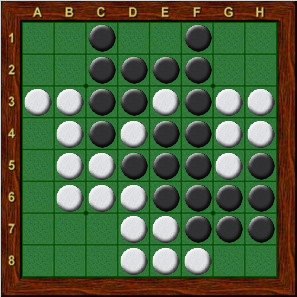
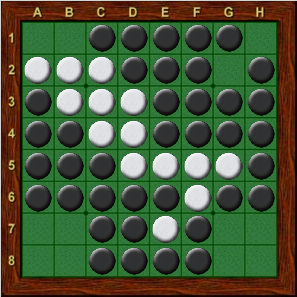
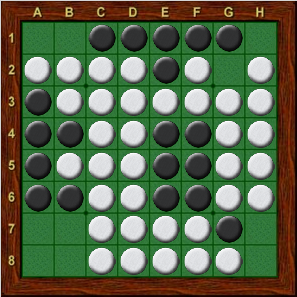
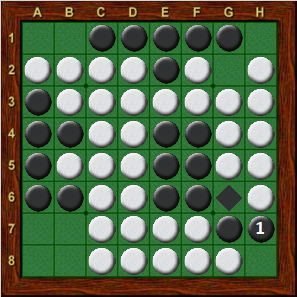
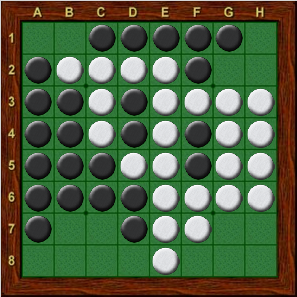
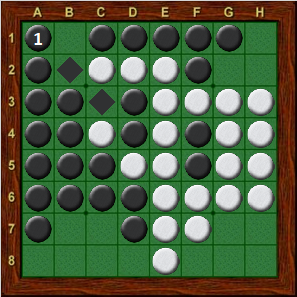
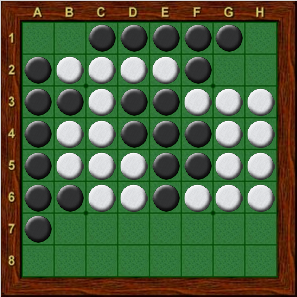
Swindles involving corner/C-square pairs are the most common type of swindle, and often the most devastating. In Diagram 10-1, a1 and b1 form a pair. If Black plays a1, White will want to wedge at b1, winning the h1 corner-- presumably that is why White played to b2 in the first place. However, in this case, Black can “swindle” White, moving to a1 without giving White access to b1. Black can later move to b1 and wins easily. This situation can often be set up by using a corner attack to semi-force the opponent to take the corner on the opposite end of the diagonal. In Diagram 10-2, Black can win the game by attacking the h1 corner with h7 (Diagram 10-3)! If White plays h8, he will create many stable discs, but the b2-g7 diagonal will become all White. This allows Black to take a1 without offering White access to b1, which is enough to win the game. Of course, White can play somewhere else, but then Black follows through on his attack, winning two edges with h1.
 |
 |
|
| Diagram 10-1 | Diagram 10-2 | Diagram 10-3 |
| Black to move | Black to move | White to move |
 |
 |
|
| Diagram 10-4 | Diagram 10-5 | Diagram 10-6 |
| Black to move | White to move | Black to move |
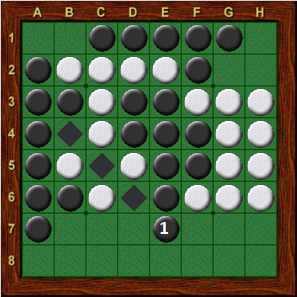
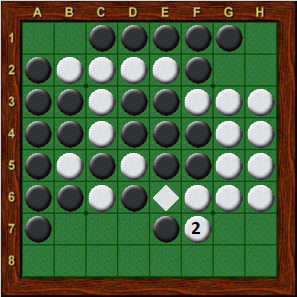
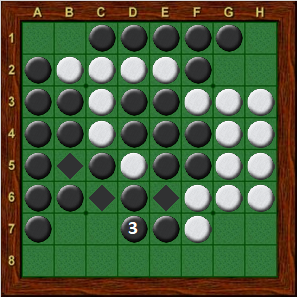
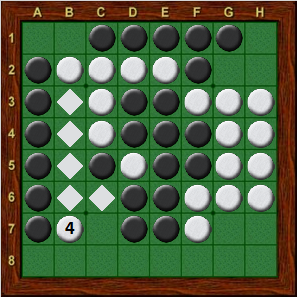
Diagram 10-4 shows another swindle in which one side gets both a corner and the adjacent C-square. Sometime earlier in the game, White played to b2, hoping to wedge at b1 after Black takes the a1 corner. Unfortunately for White, if Black takes the corner now, White will not have access to b1 because the entire b-column is black (Diagram 10-5). Black will be able to play b1 on his next turn, winning easily. A common way to set up this swindle is to “extract” the discs the opponent needs to gain access to the C-square. In Diagram 10-6, Black should begin with e7, extracting the white disc on b4 (Diagram 10-7). Then, on his next move, Black can extract the white disc on b5, setting up the swindle. For example, if White plays f7 (Diagram 10-8), Black can follow with d7 (Diagram 10-9).
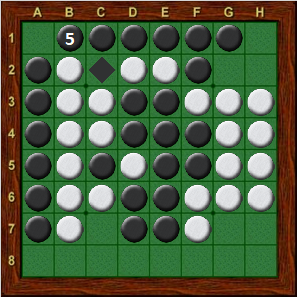
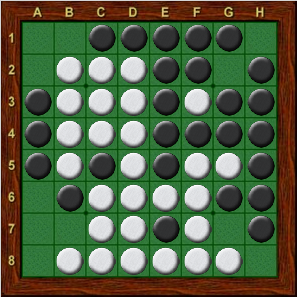
In the examples above, the swindles involved taking a corner without giving the opponent access to the adjacent C-square. When this swindle is not available, it is sometimes possible to play the swindle in the opposite order, taking the C-square without offering the opponent access to the adjacent corner. For example, suppose that in Diagram 10-9, White sees that he is going to be swindled, and plays to b7 in an attempt to gain access to b1 after Black takes the a1 corner (Diagram 10-10).
 |
 |
|
| Diagram 10-7 | Diagram 10-8 | Diagram 10-9 |
| White to move | Black to move | White to move |
 |
 |
|
| Diagram 10-10 | Diagram 10-11 | Diagram 10-12 |
| Black to move | White to move | White to move |
In Diagram 10-10, White’s move to b7 makes the entire b-column white. While this prevents Black from getting a swindle with a1, Black can now get a swindle by playing b1! Since this does not flip the disc on b2 (Diagram 10-11), Black will later be able to take the a1 corner. Diagram 10-12 shows another common situation. Here, Black would like to play b1 without flipping b2, but the black disc at b6 poisons the move. Unfortunately for White, the only “safe” moves available are a6 and a7, which flip the disc on b6, allowing Black to get a swindle with b1. As the above examples demonstrate, before playing an X-square move to attack an unbalanced edge, it is important to verify that you will not get swindled.
C-square/A-square swindle
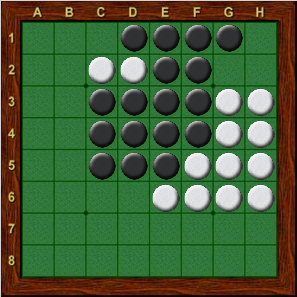
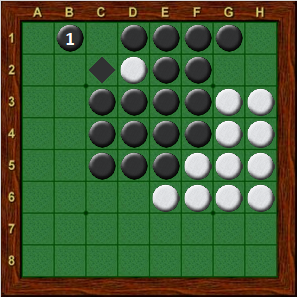
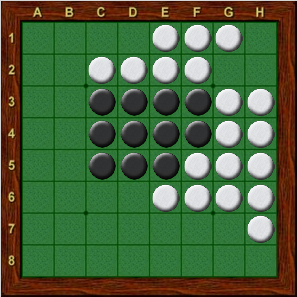
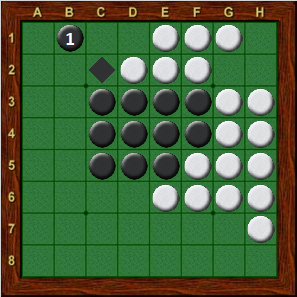
While not as common as swindles involving C-squares and corners, it is not unusual to see swindles with C-square/A-square pairs. Diagram 10-13 shows a situation similar to Diagram 10-4. Black can swindle White by playing b1! (Diagram 10-14), taking advantage of the fact that the entire c-column is black. Black will later fill in the hole at c1, gaining two-tempos. Another reasonably common situation is shown in Diagram 10-15. Again, Black should begin by playing b1 (Diagram 10-16).
 |
 |
|
| Diagram 10-13 | Diagram 10-14 | Diagram 10-15 |
| Black to move | White to move | Black to move |
 |
 |
|
| Diagram 10-16 | Diagram 10-17 | Diagram 10-18 |
| White to move | White b3, black d1 | White to move |
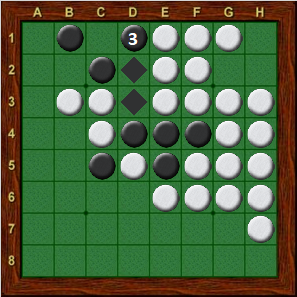
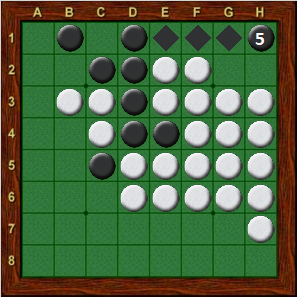
In Diagram 10-16, White does not have access to c1 or d1. No matter how White plays, Black can follow with d1, winning the h1 corner (Diagram 10-17). One point to note, however, is that if Black takes the h1 corner, White may be able to wedge at c1, winning the a1 corner (Diagram 10-18). In this case, the h1 corner is extremely valuable and Black can still win easily, but there are some positions where this swindle backfires.
Boscov swindle
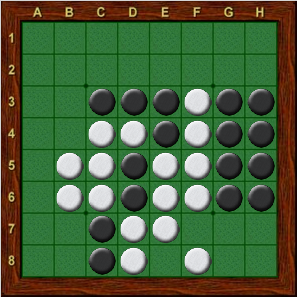
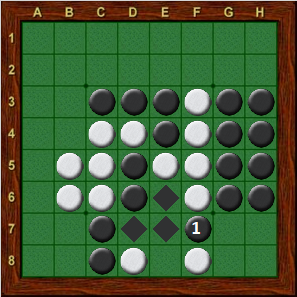
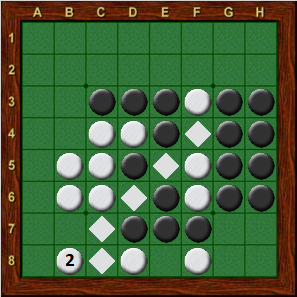
This swindle is so devastating that most people fall victim to it only once. My “one time” was in a 1980 loss to David Toth. Diagram 10-19 shows the basic setup. Black may be tempted to play f7, trying to force White to play to the North (Diagram 10-20). However, White has a wonderful swindle with b8! (Diagram 10-21). Black has sealed himself off from e8, so White will later be able to play both e8 and g8. This loss of tempos allows White to win easily. While the Boscov swindle does not occur very often, it raises an important point, which is that moves which flip discs next to the edge can easily lead to a swindle.
 |
 |
|
| Diagram 10-19 | Diagram 10-20 | Diagram 10-21 |
| Black to move | White to move | Black to move |
Four in the corner swindle
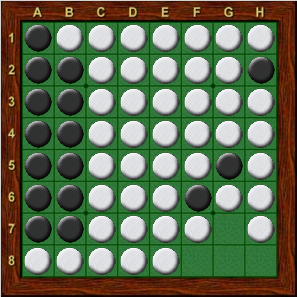
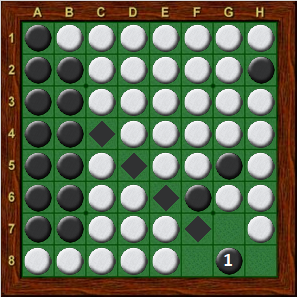
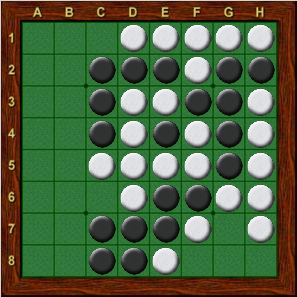
This swindle is available surprisingly often, and is easy to overlook if you do not know this tesuji. The basic pattern is shown in Diagram 10-22. With four empty squares and Black to play, Black appears destined for a parity-induced loss. However, the pattern of the four empty squares, as well as the fact that black has access to the corner, allows Black to pull off a swindle. Black’s winning move is g8! (Diagram 10-23). No matter how White plays, Black takes h8 and White has to pass. With this tesuji in mind, look at Diagram 10-24. While this position is complicated, Black’s only winning move, g8!, is not hard to find if you are aware of the tesuji.
 |
 |
|
| Diagram 10-22 | Diagram 10-23 | Diagram 10-24 |
| Black to move | White to move | Black to move |
A-square/B-square swindle
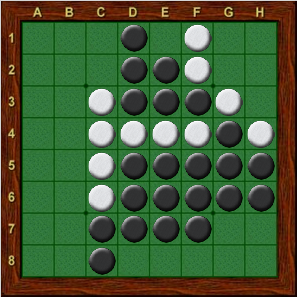
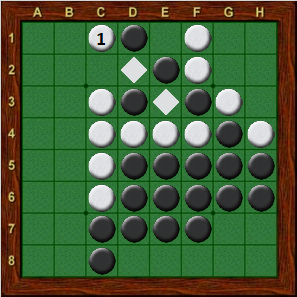
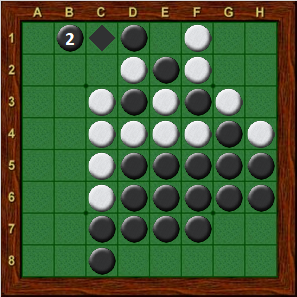
In Diagram 10-25, White can exploit the position on the top edge by playing c1! (Diagram 10-26). Black would like to wedge at e1, but in this case he does not have access. Of course Black could take the edge with b1 (Diagram 10-27), but this is a weak position subject to the sort of corner attack tesuji discussed in Chapter 9. If Black plays somewhere else, White continues with e1, gaining two tempos.
 |
 |
|
| Diagram 10-25 | Diagram 10-26 | Diagram 10-27 |
| White to move | Black to move | White to move |
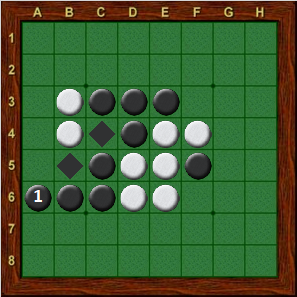
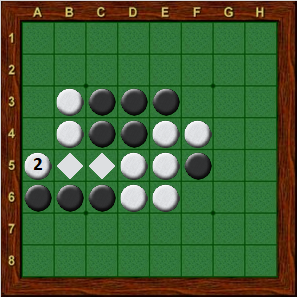
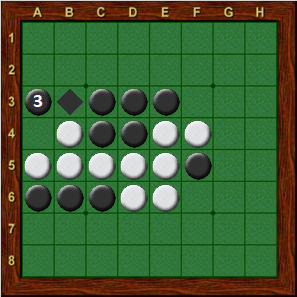
Diagram 10-28 shows another variation on this theme; this particular position is from an opening that used to be common in expert games, and similar patterns occur fairly frequently. Black has just played a6, inviting white to play a5 (Diagram 10-29). While a5 is a quiet move for White, it flips the disc on c5, allowing Black to play a3 without flipping b4 (Diagram 10-30). As in Diagram 10-26, this leaves a difficult choice between taking a bad edge with a7, or allowing Black to gain a tempo with a4.
 |
 |
|
| Diagram 10-28 | Diagram 10-29 | Diagram 10-30 |
| White to move | Black to move | White to move |
Landau maneuver
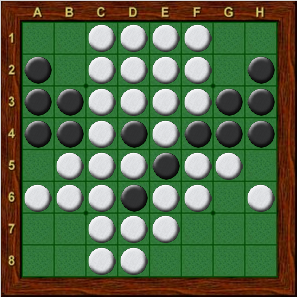
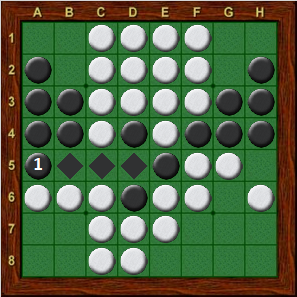
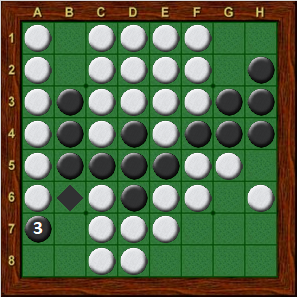
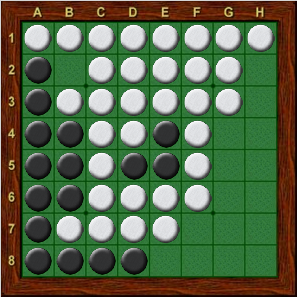
This tesuji is named after Ted Landau, a former U.S. Champion. The position in Diagram 10-31 is from a postal game where Landau played Black. While Black has several moves which are good enough to win, Landau found a5!!, a shocking move which crushes White (Diagram 10-32). The point of this is move is that if White takes the a1 corner, Black continues with a7, making the entire b-column black (Diagram 10-33). If White continues with a8 (perfect play), he can not secure a disk on the b-column. Black essentially gets two swindles (b2/b1 and b7/b8), and can play into all four empty squares in the column.
 |
 |
|
| Diagram 10-31 | Diagram 10-32 | Diagram 10-33 |
| Black to move | Black to move | White a1, Black a7 |
 |
 |
|
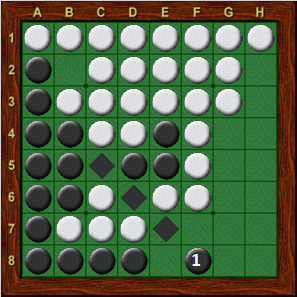
| Diagram 10-34 | Diagram 10-35 | Diagram 10-36 |
| Black to move | White to move |
Other tesuji
Inviting a wedge
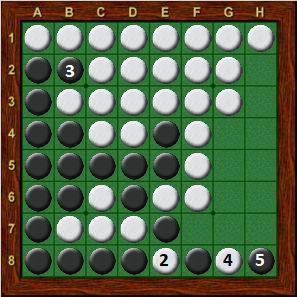
This is a nasty little tesuji that would usually be used to help run up the score in a one-sided game. In many ways it is similar to feeding the opponent moves in order to get parity in the endgame (see Chapter 8). Diagram 10-34 shows the basic pattern. Not only has White run completely out of moves, but Black also has a free move available at b2. Black can take full advantage of the situation by playing f8! (Diagram 10-35). At first, this appears to be a bad move, because White can simply wedge at e8. However, Black now takes his free move at b2, and White is forced to “unwedge” with g8, giving Black the h8 corner (Diagram 10-36). Of course, in Diagram 10-35, White can (and should) play f7, but this leaves Black with another free move at e8.
Diagonal grab to get 3 of 4 in corner
|
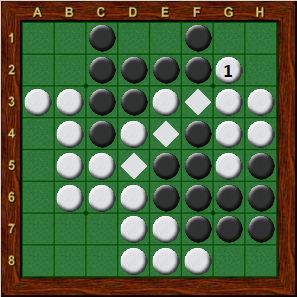
This tesuji appears with great frequency, usually late in the midgame or early in the endgame. In Diagram 10-37, Black has sacrificed the h8 corner in order to gain a tempo. White appears to be under pressure because he is walled off from the region in the lower-left. He could of course take the h8 corner, but then Black simply wedges at g8, and it is still White’s turn to move. White needs to somehow gain a tempo, and can do so by playing g2!, grabbing the diagonal (Diagram 10-38). | |
|
Diagram 10-37 White to move |
 |
 |
|
| Diagram 10-38 | Diagram 10-39 | Diagram 10-40 |
| Black to move | White to move | Black to move |
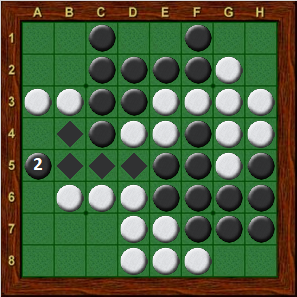
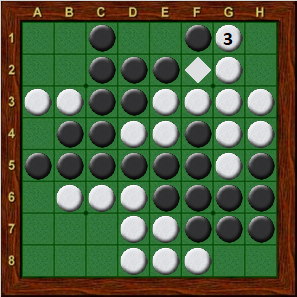
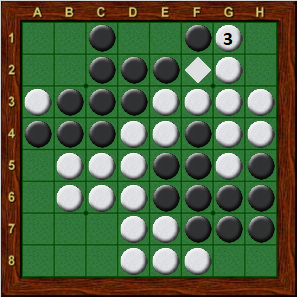
Of course, in this position Black can easily break the diagonal by playing a5 (Diagram 10-40), winning the h1 corner. However, this is exactly what White wants! White responds with g1, in some sense sacrificing the h1 corner again (Diagram 10-40). Although White loses the corner, he gets three of four moves in the region, gaining two tempos. A very important point is that since Black has broken the diagonal, there is no swindle available. If Black avoids breaking the diagonal, say by playing a4 in Diagram 10-38, then White should not respond with g1 (Diagram 10-41), because it would allow Black to play h1 without flipping the disc on g2. Instead, White must wait until Black breaks the diagonal before playing g1.
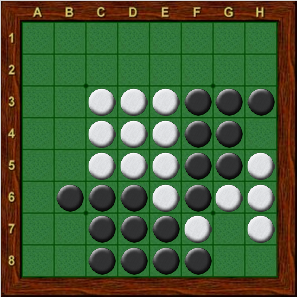
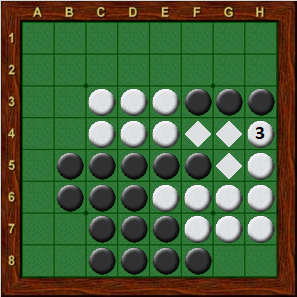
Diagram 10-42 shows another variation of this tesuji. Here we can treat h4 as part of the lower-right corner region, and White will take three of the four moves in the region. White should begin with g7, grabbing the diagonal. If Black breaks the diagonal, say with b5, then White plays h4, gaining another tempo (Diagram 10-43). In this case, White must be extra-careful not to get swindled. If White flips the disc on g3, or takes Black off of the whiteline diagonal, then White will get swindled.
 |
 |
|
| Diagram 10-41 | Diagram 10-42 | Diagram 10-43 |
| Black to move | White to move | Black to move |
Exercises
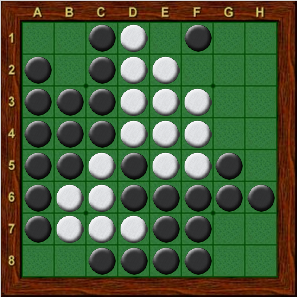
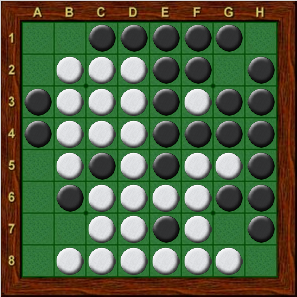
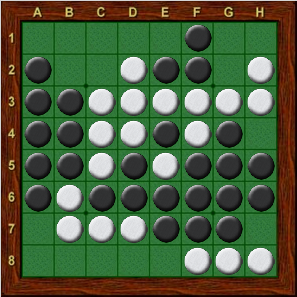
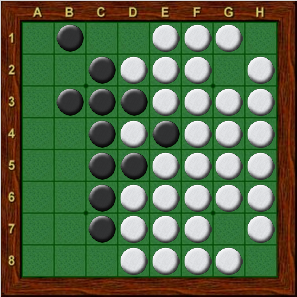
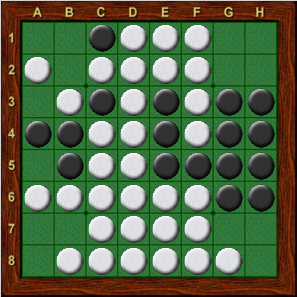
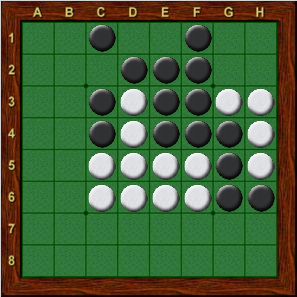
In each diagram, find the best move. Answers you'll find here.
 |
 |
|
| Exercise 10-1 | Exercise 10-2 | Exercise 10-3 |
| Black to move | Black to move | Black to move |
 |
 |
|
| Exercise 10-4 | Exercise 10-5 | Exercise 10-6 |
| White to move | Black to move | White to move |
| Navigation: Main Page > Learn Othello > Book Rose | << previous chapter << - >> next chapter >> |
