Rose: Chapter 5
| Klicke hier für Deutsche Version | |
| Navigation: Main Page > Learn Othello > Book Rose | << previous chapter << - >> next chapter >> |
Chapter 5: Basic edge play
At the start of the game there are 60 empty squares on the board, and 28 of those squares are on the edges. Thus edge moves account for almost half of all the moves in a typical game, and I believe that the winner of most games is decided by how well both sides play the edges. As I discussed in Chapter 4, in the opening there are often many different moves to choose from, all of which result in a reasonably balanced position. On the edges, the opposite is true. Usually there is one move that is clearly better than the rest, and a mistake can give your opponent a huge advantage.
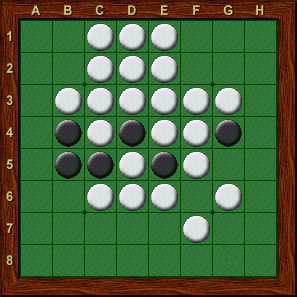
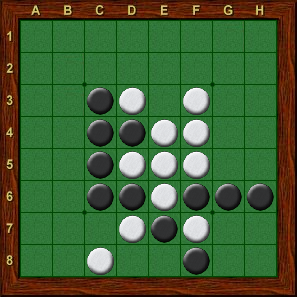
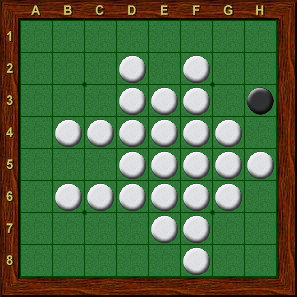
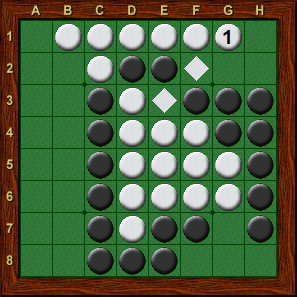
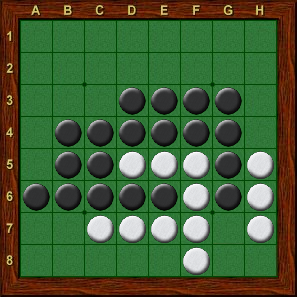
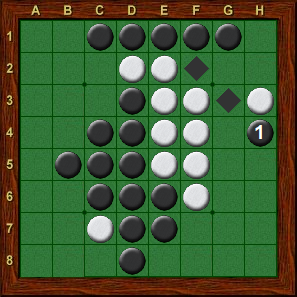
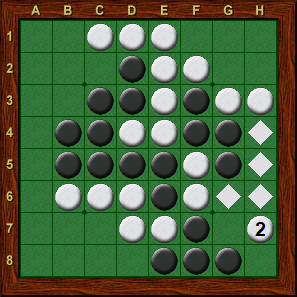
As we have already seen, quiet moves are usually better than loud moves, and this holds true for edge moves as well. If your opponent has run out of moves, then a quiet edge move is often enough to decide the game. We have already seen one example of this in Diagram 3-3. In Diagram 5-1 Black has run out of safe moves, but it is White’s turn. If White could pass, then Black would be forced to move to an X-square and concede a corner. Of course White can not pass, but he can play g1, which has basically the same effect as a pass. As shown in Diagram 5-2, Black still has no safe moves and must play to an X-square. Moves such as g1 in this example are called free moves: Black can not prevent White from taking g1 whenever he wants, and g1 offers no new safe options for Black. While it is possible to have a free move in the middle of the board, most free moves occur on the edge. Sometimes there will be an opportunity for more than one free move along the same edge. In Diagram 5-3, White has three free moves along the eastern edge at h4, h3, and h2 (note that they must be taken in that order), and can easily run Black out of moves.
 |
 |
|
| Diagram 5-1 | Diagram 5-2 | Diagram 5-3 |
| White to move | Black to move | White to move |
 |
 |
|
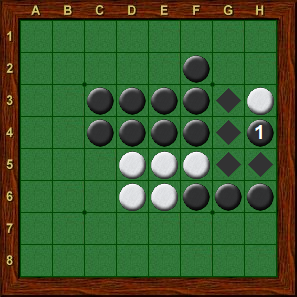
| Diagram 5-4 | Diagram 5-5 | Diagram 5-6 |
| White to move | White to move | White to move |
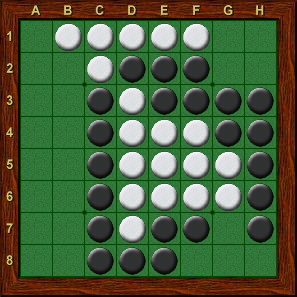
Given the power of free moves, it is usually a bad idea to make a move which offers one to your opponent. Diagrams 5-4, 5-5, and 5-6 show three bad moves by Black which generate a free move for White. In all three cases, White will take the eastern edge on his next turn and be left with a free move to h2.
The concept of tempo
In Diagrams 5-1 and 5-2, White uses a free move to achieve the same effect as a pass. In Diagram 5-1 it is White’s turn to move, but in Diagram 5-2, it is Black’s turn. White has transferred the burden of initiating play to Black without offering Black any new safe options. In English, White is said to gain a tempo. In Japanese, White is said to “hand over the move (to the opponent)”.
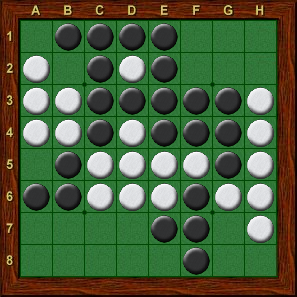
Diagram 5-7 shows a position from a game in the 1992 All Japan Championship. Playing White is Hideshi Tamenori, a 5-time World Champion and generally regarded as the greatest player of all time. His opponent was Ken’ichi Ishii, himself a 2-time World Champion.
 |
 |
|
| Diagram 5-7 | Diagram 5-8 | Diagram 5-9 |
| White to move | Blackto move |
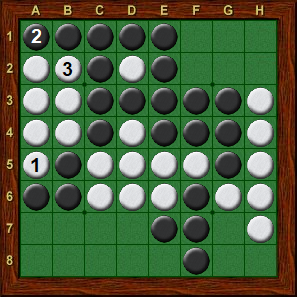
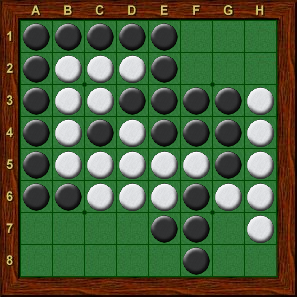
In this position, Tamenori played a5!! This might appear to be a terrible blunder, but it was actually the best move. As shown in Diagram 5-8, Ishii replied by taking the a1 corner, stabilizing both the left and top edges, after which Tamenori filled in the hole at b2. The resulting position is shown in Diagram 5-9. Note that, compared with Diagram 5-7, Black has no new options, and in fact one of his safe options, namely a5 itself, is no longer available. Further, it is now Black’s turn to move! Thus, by playing the sequence in Diagram 5-8, Tamenori was able to gain a critical tempo. He handed-over the burden of initiating play to Black, leaving Black in grave danger of running completely out of moves. As demonstrated in this example, it is often worth sacrificing a corner in order to gain a tempo.
In the opening, when play is in the center of the board, finding the best move may not be easy, but usually even the second or third best move would not lose a tempo. The reason that edge moves tend to be so critical in determining the winner of the game is that a mistake on the edge will often lose a tempo. Especially in expert play, one extra tempo is often the difference between winning and losing. Throughout the rest of this chapter, and indeed the rest of the book, we will see many examples of how tempos are won and lost.
Wings won’t make you fly
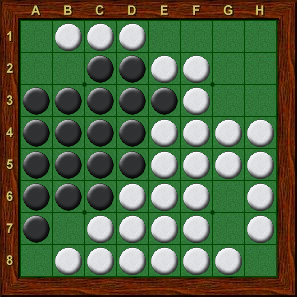
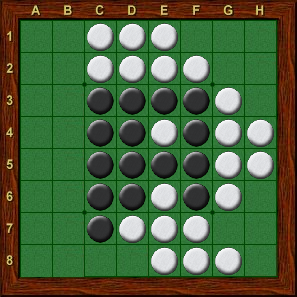
In Diagram 5-10, Black’s position on the left edge is called an unbalanced edge or wing. While the term wing refers only to this edge pattern, unbalanced can also be used to describe the top edge (unbalanced three) or the right edge (unbalanced four). Unbalanced edges are inherently dangerous as the occupied C-square could offer the opponent access to the adjacent corner. They are often vulnerable to a variety of attacks, many of which can quickly determine the outcome of a game. The pattern on the bottom edge, with all six squares between the corners filled, is called a balanced edge and in many circumstances is the best possible edge position to have.
 |
 |
|
| Diagram 5-10 | Diagram 5-11 | Diagram 5-12 |
| Black to move | White to move |
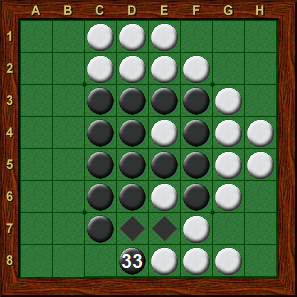
Diagram 5-11 shows an example where Black can exploit White’s unbalanced three on the bottom edge. Black should begin with d8, attacking the h8 corner, as shown in Diagram 5-12. This leaves White with two unappealing choices: save the corner by playing c8, flipping Black’s entire wall, or play somewhere else and allow Black to take the corner. In either case, Black will have a huge advantage in the game.
 |
 |
|
| Diagram 5-13 | Diagram 5-14 | Diagram 5-15 |
| Black to move | White to move |
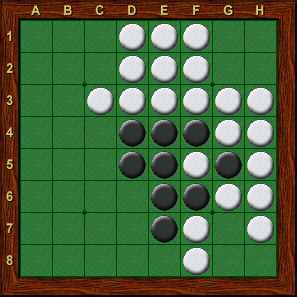
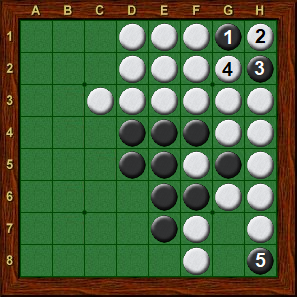
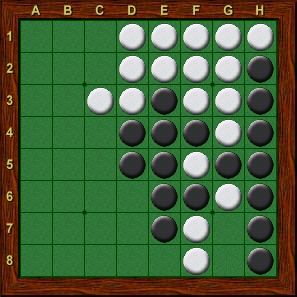
In many circumstances, attacking an unbalanced edge is so powerful that it is worth sacrificing a corner to do so. In Diagram 5-13, Black can initiate an attack on White’s wing by playing g1! If White takes the h1 corner, then Black can wedge (play between two discs of the opposite color) at h2, and then take the h8 corner, as shown in Diagram 5-14. The resulting position is Diagram 5-15. The question is, which corner is more valuable, h1 or h8? In this case, h8 is clearly more valuable. Having the h1 corner gives White stable pieces on the top edge, but that is about the end of the story. Meanwhile, Black will be able to extend out from his h8 corner, capturing most if not all of the bottom edge. In essence, Black has sacrificed one edge (the top edge), but will receive two edges (the right and bottom edges), and a tempo, in return.
|
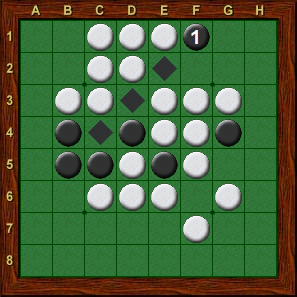
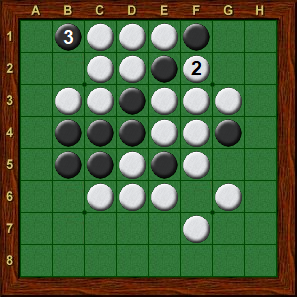
Since unbalanced edges are often subject to attack, you should look for opportunities to turn your opponent’s edge into an unbalanced edge. In Diagram 5-16, Black should play f1, leaving the position in Diagram 5-17. If White takes at g1, Black has a quiet move at f2, gaining a tempo (Diagram 5-18) and leaving White with an unbalanced edge to attack later. If White does not take g1, then black can play b1, effectively gaining two tempos. For example, in Diagram 5-19, it is White’s turn to move (Black has gained a tempo) and Black’s free move at g1 is good for another tempo. | |
| Diagram 5-16
Black to move |
 |
 |
|
| Diagram 5-17 | Diagram 5-18 | Diagram 5-19 |
| White to move | White to move | White to move |
Mind the gap
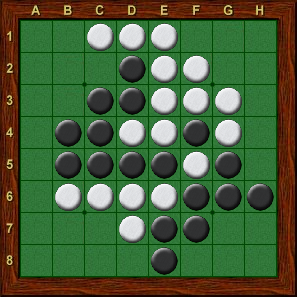
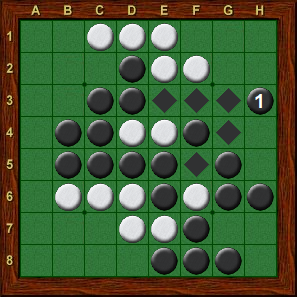
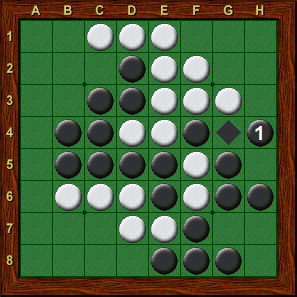
Suppose that in Diagram 5-20, Black decides to move somewhere on the right edge, trying to gain a tempo. He could play h3, leaving a 2-square gap between his pieces on the edge (Diagram 5-21), or to h4, leaving a 1-square gap. A general rule of thumb is that it is better to leave a 2-square gap than a 1-square gap. In Diagram 5-21, the squares h4 and h5 form a pair. If White plays into one of these squares, Black will play into the other, after which White will have to initiate play somewhere else on the board. Thus, regardless of whether White plays into the pair or not, Black’s initial choice of h3 will force White to play to the west (or an X-square), which will open up new choices for Black.
In this case the 2-square gap is between the A-squares, but 2-square gaps often occur between a C-square and (its more distant) B-square or even between a corner and a B-square. The concept of a pair is extremely useful, and we will see many more examples of it throughout the rest of the book.
 |
 |
|
| Diagram 5-20 | Diagram 5-21 | Diagram 5-22 |
| Black to move | White to move | White to move |
 |
 |
|
| Diagram 5-23 | Diagram 5-24 | Diagram 5-25 |
| Black to move | White to move | Black to move |
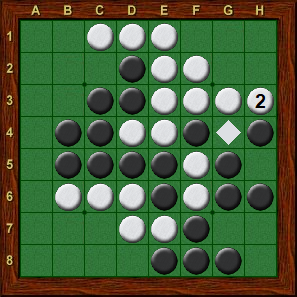
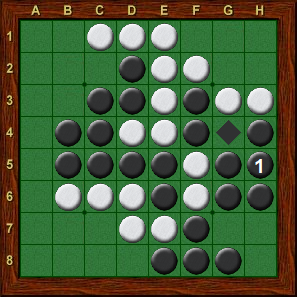
Compare this to the situation in Diagram 5-22 with a 1-square gap. Here, h3 and h5 appear to form a pair. However, as shown in Diagram 5-23, if White plays h3, then Black does not have access to h5! Now, Black will have to initiate play elsewhere. Of course, there will be other times that Black could fill the hole at h5. Suppose that, starting from Diagram 5-23, we make the disc at f3 black, and allow Black to play h5. This is shown in Diagram 5-24. One possibility for White is to take the edge with h7 (Diagram 5-25), and again Black will be forced to initiate play elsewhere. In other words, going back to Diagram 5-20, playing to create the 2-square gap with h3 gains a tempo, while creating a 1-square gap with h4 does not. There are many other cases where the opponent can exploit a 1-square gap by playing into the gap (Diagram 2-7 is one obvious example). While there are certainly occasions where leaving a 1-square gap is a good move, it is usually better to leave a 2-square gap or no gap at all. That said, it should be noted that having a 2-square gap is still a liability! Another rule of thumb is that such gaps should be left untouched unless there is some reason for filling them in (this point is discussed further in Chapter 6).
|
The most common circumstance under which it is advantageous to leave a 1-square gap is shown in Diagram 5-26. Here, both sides have taken an A-square on the south edge. White is threatening to gain a tempo by playing e8, and Black must find some means of dealing with this threat. Since e8 is too loud for Black, the best move is d8, leaving a 1-square gap at e8. If White continues with e8, Black can take the edge with b8, leaving a free move at g8. | |
|
Diagram 5-26 Black to move |
Anchors won’t weigh you down
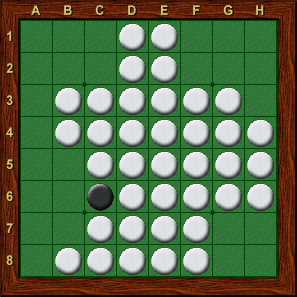
If you follow the basic strategy of this book and make mostly quiet moves, while your opponent is grabbing as many discs as possible, then you may occasionally find yourself in a position where you are in danger of losing by wipeout. In Diagram 5-27, White has a lot of walls and very few places to move, which would normally make this an easy win for Black. However, with only one piece left, Black’s options are also limited. If Black plays the “safe” move c2, then white completes the wipeout with c1. Black’s only other choice is g2, which will give up the h1 corner.
 |
 |
|
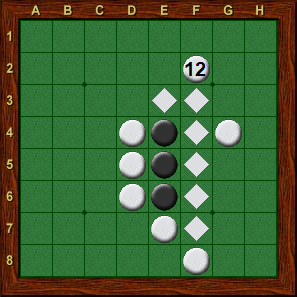
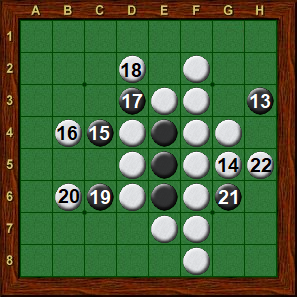
| Diagram 5-27 | Diagram 5-28 | Diagram 5-29 |
| Black to move | Black to move |
|
Often the best way to avoid this situation is to take at least one piece on an edge, preferably an A-square, that you can use as your “anchor”. Even if taking the edge does not look theoretically correct, perhaps because you have a quieter move elsewhere, establishing an anchor can save you from all kinds of grief later in the game. For example, suppose you are Black in Diagram 5-28. Your opponent has been grabbing pieces from the start of the game, and you already have a big advantage. However, your opponent is also one move away from wiping yo out: if you get careless and play e2, your opponent grabs e1 and the game is over.
| |
|
Diagram 5-30 Black to move |
Exercises
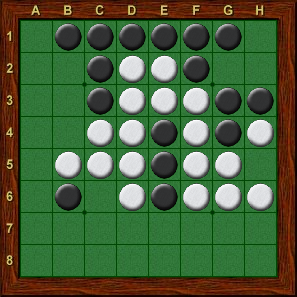
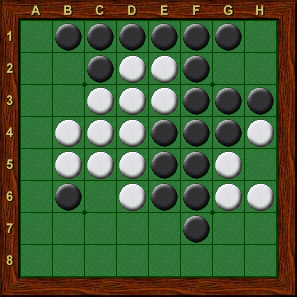
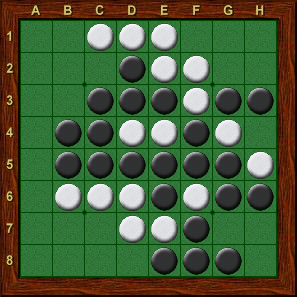
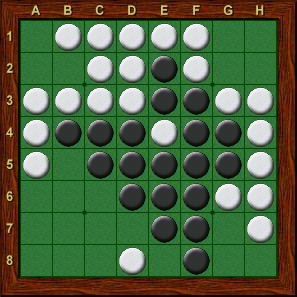
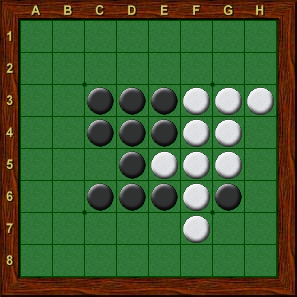
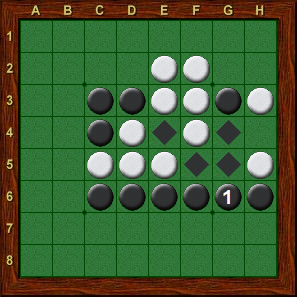
In each diagram, find the best move. Answers you'll find here.
 |
 |
|
| Exercise 5-1 | Exercise 5-2 | Exercise 5-3 |
| Black to move | Black to move | White to move |
 |
 |
|
| Exercise 5-4 | Exercise 5-5 | Exercise 5-6 |
| Black to move | White to move | White to move |
Exercise 5-7
Starting from Diagram 5-27, play out the rest of the game for both sides, starting with a Black move to g2. Even after losing the h1 corner, Black should be able to win.
| Navigation: Main Page > Learn Othello > Book Rose | << previous chapter << - >> next chapter >> |
