Rose: Chapter 13
| Klicke hier für Deutsche Version | |
| Navigation: Main Page > Learn Othello > Book Rose | << previous chapter << - >> next chapter >> |
Chapter 13: Endgame counting
In chapters 6 and 8, we looked at strategies that can help uncover good moves in the endgame. However, in many positions, the only way to find the right move is to make an exact count. That is, you must be able to consider a sequence of moves for the rest of the game, and figure out what the final score of the game will be. While I explore techniques to make this as easy as possible, it still requires the ability to “read ahead” and visualize what the board will look like in the future, which novice players may find difficult. The first part of this chapter explains how to count the last two moves of the game, which is relatively easy and should be manageable even for novices. The rest of the chapter contains some of the most difficult material in the book, and is designed for more advanced players. Regardless of your current level, practicing endgame counting is one of the best ways to improve your ability to read ahead, and can help you become stronger at all phases of the game. The Appendix discusses software designed specifically for practicing endgames.
|
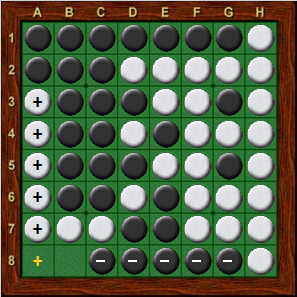
Diagram 13-1 shows a typical position where counting can be used to determine the best move. The first step is to count the number of discs of your own color on the board in the current position. There are several ways to count the discs, and experience will tell you which method works best for you. While speed can be important if you are playing a game with a time limit, getting the number of discs correct is critical, so it is important to find a method that allows you to count accurately. Personally, I count the number of discs in each column, adding from right to left. For example, in Diagram 13-1, there are 7 black discs in column h, plus 5 in column g makes 12, plus 4 in column f makes 16, etc. With practice, it becomes possible to just look at the column and know how many discs there are without really counting. Of course, you could just as well count left to right, starting in column a and ending with column h, but you are likely to find that it is easier to add along columns than along rows. Another way to count is to group the discs into fives, which makes it easier to add the groups (counting 5, 10, 15...), but I have found that this can make it difficult to remember which discs have been counted. | |
| Diagram 13-1 | |
| Black to move |
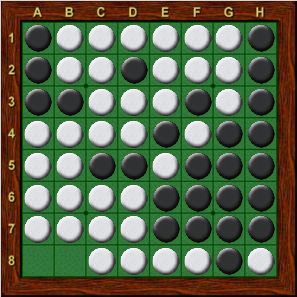
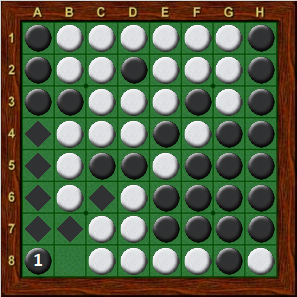
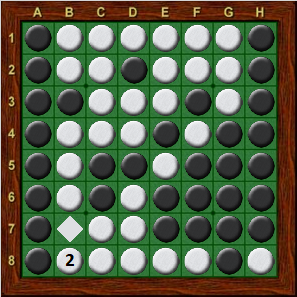
Having determined that Black has 26 discs in Diagram 13-1 (repeated below), we will now count the number of discs that Black will have at the end of the game. Consider what happens if Black plays a8 (Diagram 13-2) and then White finishes the game with b8 (Diagram 13-3). How many discs does Black have? In Diagram 13-2, Black has 26 + 7 = 33 discs; black started with 26 discs, got an additional five on the left edge (a4, a5, a6, a7, and a8) and two on the diagonal (b7 and c6). When counting a move which flips in two or more directions, it is often easier to add discs in this manner, one direction at a time. In Diagram 13-3, White flips one disc back (b7), leaving Black with 33 - 1 = 32 discs. Thus, if black plays a8 in Diagram 13-1, he will have 32 discs at the end of the game.
 |
 |
|
| Diagram 13-1 | Diagram 13-2 | Diagram 13-3 |
| Black to move | White to move | Black has 32 discs |
While it is possible to count this way, first calculating that Black has 33 discs in Diagram 13-2 then 32 discs at the end of the game, which I would call the two-step method, you can save a step by finding the score in Diagram 13-3 directly. After all, when thinking about the move to a8 in Diagram 13-1, we know that at the end of the game Black will not get to keep the disc on b7 because White will move to b8. So, instead of crediting Black with this disc and then taking it away, it is easier to just not count it in the first place.
If I were counting this position, I would start with 26, add five for the discs on the left edge to make 31, and then add one for the disc on c6 to make 32. If you have never done it before, it might seem as though this “shortcut” of going straight to Diagram 13-3 in one step will make counting more difficult and error-prone. However, having spent years using both methods, I assure you that cutting out the extra step will allow you to count both more quickly and with fewer mistakes. The difference between these two methods should become clearer when we consider what happens if Black starts with b8 in Diagram 13-1.
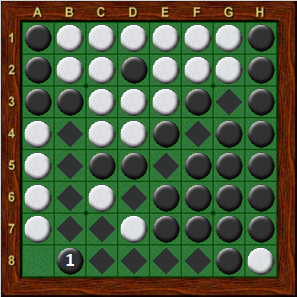
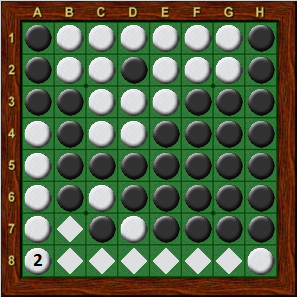
Beginning with Diagram 13-1, if Black starts with b8, the result is shown in Diagram 13-4. White will finish the game with a8 (Diagram 13-5). How many discs does Black have? In Diagram 13-4, Black has 26 + 14 = 40 discs; Black started with 26 discs, got an additional five on the bottom edge (b8, c8, d8, e8, and f8), five on the diagonal (c7, d6, e5, f4 and g3), and four on column b (b4, b5, b6, and b7; note that b8 was already included above). In Diagram 13-5, White flips seven discs back (b7, b8, c8, d8, e8, f8, and g8), leaving Black with 40 - 7 = 33 discs. Thus, if Black plays b8 in Diagram 13-1, he will have 33 discs at the end of the game. Since a8 leaves Black with 32 discs and b8 leaves Black with 33 discs, b8 is the better move.
 |
|
| Diagram 13-4 | Diagram 13-5 |
| White to move | Black has 33 discs |
Using the one-step method to calculate the number of discs in Diagram 13-5, again start with 26, the count in Diagram 13-1. Black then gains five discs on the diagonal (c7, d6, e5, f4, and g3) for 31 and three discs on column b (b4, b5, and b6) to make 34. Finally, when White moves to a8, Black loses the disc on g8 (note that we never added the other discs on the bottom edge to Black’s total, so there is no need to subtract them now), and at the end of the game Black will have 34 - 1 = 33 discs. Personally, I find counting this way much easier than calculating 26 + 14 = 40 after b8, and 40 - 7 = 33 after White a8.
At this point I should mention another counting method, which I call the plus/ minus method. Above, we compared the number of discs at the end of the game, for a8 and b8, to determine that b8 was better. Another way to choose a move is to instead calculate the number of discs gained or lost. Comparing Diagram 13-1 and Diagram 13-3, we see that at the end of the game, Black will gain 6 discs by playing a8 (a4, a5, a6, a7, a8, and c6). Comparing Diagram 13-1 and Diagram 13-5 shows Black will gain 7 discs by playing b8 (8 new discs on c7, d6, e5, f4, g3, b4, b5 and b6 less one disc lost at g8). Again, since the gain is larger for b8 (+7) than for a8 (+6), we know that b8 is the better move.
The main advantage of using the plus/minus method is that there is no need to count the number of Black discs in Diagram 13-1. If a8 is +6 and b8 is +7, then b8 is better, end of story. If someone gave me 5 seconds to figure out the right move I could do it with the plus/minus method, but it might take me 10 seconds to count that there are 26 black discs in Diagram 13-1. Moreover, if you do bother to count the number of discs in the initial position, then the plus/minus method will still let you determine the final score. In our example, if we calculate that b8 is +7, then the final disc count must be the initial count, 26, plus 7, or 33.
If you never plan on counting positions with more than 2 empty squares, then plus/minus is probably better than counting discs. The main advantages of counting discs only become apparent as you start to count longer sequences. Often the reason to count is not to determine the best move, but to find a move which is good enough to win. If you are counting discs, and you find a sequence that will leave you with 33 discs, then you know you can win. If you find a sequence that is +10, is that enough to win? The only way to know is to count the number of discs in the original position, which takes away the main advantage of the plus/minus method. In fact, when I count with plus/minus, I usually have a “target” score which tells me whether I have enough to win. In our example, starting with 26 discs, the target would be +7; that is, if I find a move which scores +7 or better, then I know I can win. However, in a long endgame count in which you consider many possible sequences, it can be hard to keep the target in mind. When counting discs, it is always obvious that 33 discs win.
Another drawback of the plus/minus method is that it can be confusing when you are losing discs in the sequence under consideration. Suppose that you start with 45 discs but will lose discs during the rest of the game. It is obvious that finishing with 33 discs is better than 32, but is -12 better than -13? Mentally counting “45 minus 5 is 40, minus 5 is 35, plus 2 is 37, minus 4 is 33” is easier than “minus 5 minus 5 is minus 10, plus 2 is minus 8, minus 4 is minus 12”.
Since you can use either the one-step or two-step approach, and choose to either count discs or use plus/minus, there are really four different ways to count. While I would strongly recommend using one-step instead of two-step, whether you count discs or use plus/minus is really a matter of personal preference; you can certainly be effective with either method. When I first started playing Othello, back when dinosaurs roamed the earth, as far as I know everyone counted using the two-step, plus/ minus method, and even today some experts count this way. Around 1990 I switched to using one-step plus/minus, and it was not until 2000 that I finally started counting discs. Having considerable experience using both methods, I would recommend counting discs over plus/minus for longer sequences.
Cancellation
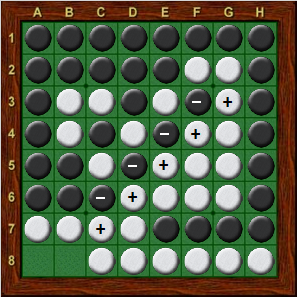
Regardless of which method you use to count, a technique which I call cancellation can make counting easier. Consider counting out the position in Diagram 13-6 using the plus/minus method. To count the sequence Black a8, White b8, normally we would say that Black gains two discs (a7 and a8) for +2, and loses two discs (b5 and b6) for 0. Using cancellation, we mentally pair the discs gained (a7 and a8) with the discs lost (c5 and c6) and immediately get the result of 0 (see Diagram 13-7). To count out the sequence Black b8, White a8, we can cancel four discs gained (e.g., c7, d6, e5, and f4) with four discs lost (c6, d5, e4, and f3), leaving one extra disc gained on g3. Thus, this sequence is +1 for Black (see Diagram 13-8).
 |
 |
|
| Diagram 13-6 | Diagram 13-7 | Diagram 13-8 |
| Black to move | Black a8, white b8 | Black b8, white a8 |
|
Cancellation is most useful in situations such as Diagram 13-8, where the discs to be cancelled lie on adjacent squares, or are at least close to each other. If the discs are on opposite sides of the board, I find that it is usually better to just count without using cancellation. If you have to keep shifting your eyes from one part of the board to another in order to line up the discs to be cancelled, it becomes much more likely that you will make a mistake. One exception to this is when there are a large number of edge discs which can be cancelled, such as Diagram 13-9. When considering the sequence Black a8, White b8, it might pay to cancel out five edge discs, yielding the result of +1. As I mention throughout this chapter, through practice and experience you can discover whether this technique makes counting easier for you. | |
| Diagram 13-9 | |
| Black to move |
Branching
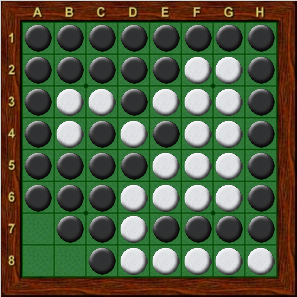
In the examples above, with only two empty squares, once Black chooses a move the final score of the game is determined, since White simply fills in the last empty square to finish the game. Once you start counting positions with more empty squares, your opponent may have more than one move to choose between. It then becomes necessary to think not only about which move you want to play, but also about which move your opponent will choose in response. Even with just three empty squares, this can make figuring out the best move much more difficult. For example, consider Diagram 13-10.
 |

|
| Diagram 13-10 | Diagram 13-11 |
| White to move | Possible sequences from Diagram 13-10 |
White can choose among any of the three empty squares, and after his move, Black will be able to play into either of the two remaining squares. This means that there are 3 X 2 = 6 possible sequences to consider; these are shown in Diagram 13-11, along with the score for White after each sequence (e.g., after the sequence White a7, Black a8, White b8, White will have 30 discs at the end of the game). Given this information, what are the best moves for both sides?
If White begins with a7, then Black chooses between a8 and b8. If Black plays a8, then White will end up with 30 discs, which means that Black will have 34. If Black plays b8, then White will end up with 29 discs, and Black will have 35. Black will naturally choose the move which gives him the most discs and gives White the fewest discs possible. Thus, if White begins with a7, Black follows with b8, and White will have 29 discs at the end of the game. Similarly, if White begins with a8, Black chooses b8, and White will get 33 discs. If White begins with b8, both of Black’s replies yield the same score, and White will get 31 discs. Since White can score 33 starting with a8, but only 31 with b8 and 29 with a7, White’s best move in Diagram 13-10 must be a8, and Black will reply with b8.
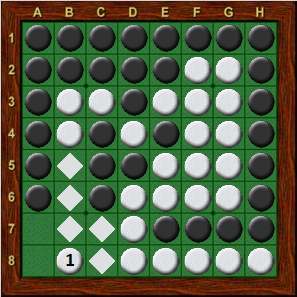
The example above demonstrates how complicated counting the endgame can seem when the opponent has different moves to choose from. The good news is that in practice, we can simplify the process considerably, and it really is not all that difficult to find the right move in Diagram 13-10. Suppose that you are playing White, without the information in Diagram 13-11. The first step in counting this position is to count the current number of discs for White, which is 24. Next, you have to decide which of the three choices to consider first. Usually, the first move to consider is the one which, without counting, looks the best. Suppose that you decide to start with b8. Diagram 13-12 shows the resulting position, and White now has 30 discs (of course, in an actual game you would have to see this in your mind’s eye).
 |
 |
|
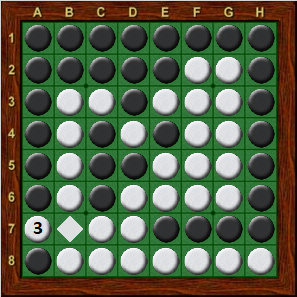
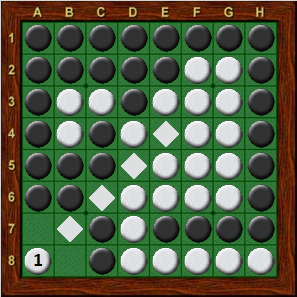
| Diagram 13-12 | Diagram 13-13 | Diagram 13-14 |
| White has 30 discs | White has 31 discs | White has 29 discs |
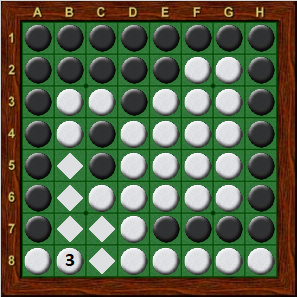
If we follow the logic of Diagram 13-11, we must now count the final score after each of Black’s choices to determine which is best (for Black); only then will we know how many discs White will get at the end of the game if he starts with b8. In practice, the best way to proceed is to count the final score if Black plays to a8 (and White finishes with a7), since this is considerably easier than counting the sequence a7-a8. After Black a8, White a7, the only change for White is the extra disc on a7 (see Diagram 13-13). Since White has 30 discs in Diagram 13-12, he must end up with 31 discs in Diagram 13-13. Now, to be sure that White can really get 31 discs by choosing b8 in Diagram 13-10, we have to count out the sequence if black chooses a7 in Diagram 13-12. Perhaps a7 is better for Black, and White will get less than 31 discs. Even without counting this sequence, however, one thing is clear: White will lose if he starts with b8. The only question is how much he will lose by, and rather than spending time figuring that out, it makes more sense to try one of the other choices in Diagram 13-10. Suppose that you decide to try a8 next, which results in the position shown in Diagram 13-14, where White has 29 discs.
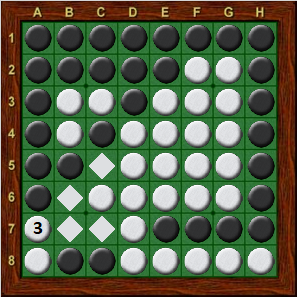
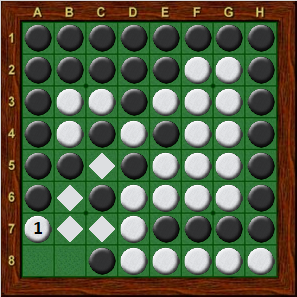
Again, we must decide which Black move to count first. In this case, b8 would appear to be the obvious choice, keeping two discs on the bottom edge. White finishes with a7, and the final position is shown in Diagram 13-15. Comparing this with Diagram 13-14, White gains four discs (a7, b6, c5, and c7), leaving a total of 33 discs. Thus, it appears that White may be able to win if he starts with a8 in Diagram 13-10. However, we must be certain that in Diagram 13-14, b8 is really the best move for Black. If Black plays a7 instead, then White finishes with b8 (Diagram 13-16). Comparing Diagrams 8-14 and 8-16, White has gained five discs (b5, b6, b8, c7 and c8) for a total of 34. Thus, if White starts with a8, Black can do no better than reply with b8, and White will win 33-31.
 |
 |
|
| Diagram 13-15 | Diagram 13-16 | Diagram 13-17 |
| White has 33 discs | White has 34 discs | White has 29 discs |
Now that you have determined a8 wins for White, you might want to stop counting and just play a8. However, suppose that you want to make sure that a8 is really the best move. Then, you must consider White’s final choice in Diagram 13-10, namely a7 (Diagram 13-17). With only 29 discs in Diagram 13-17, it is immediately obvious that White will not get more than 33 discs (the score when White begins with a8), and White can reject a7 in favor of a8.
As the analysis above demonstrates, in order to find the best move, it is not necessary to find the score for every possible sequence. In this example we considered 4 out of 6 sequences, and in some cases it is possible to find the right move by looking at only a small percentage of the sequences. This is especially true if we are willing to accept any move that wins, as opposed to finding the absolute best move. Still, branching certainly does make counting more complicated, which is why expert players usually look for winning sequences without any branches. Some examples of this appear in the next section.
Counting with more than two empty squares
This section describes techniques for counting positions with more than two empty squares. As mentioned in the first part of this chapter, there are several ways to count with only two empty, and naturally even more variation is possible when counting longer sequences. Below I go through some examples of how I count a position, but I would never claim that this is the only right way to do it. Through practice and experience, you can discover what methods work best for you.
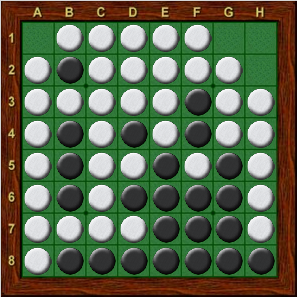
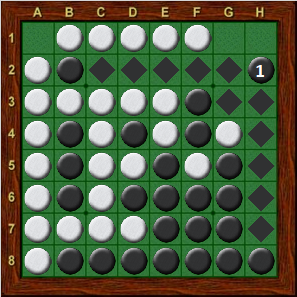
As shown in the previous section on branching, counting with more than two empty squares requires us to not only count out sequences, but to also think about which sequences we should count. In Diagram 13-18, Black has three choices, all of which will leave White with three choices, and after some of these sequences Black will have two moves to choose from. Fortunately, we do not have to bother counting out all of these possibilities. The key to counting this position is to use even number theory (see Chapter 8) to help decide which sequences to count.
 |
 |
|
| Diagram 13-18 | Diagram 13-19 | Diagram 13-20 |
| Black to move | After h2, a1 | After h2 |
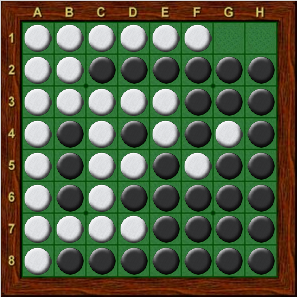
No matter where black plays in Diagram 13-18, the upper-right region will have two squares left, while the upper-left region will have one square (a1). Even number theory tells us that White will probably want to play a1 on his turn, leaving Black to initiate play into the final pair. Further, if Black starts with h2, then this creates a hyper region (an even numbered region that Black can not play into), so that even if White continues with a1, White will have to initiate play into the region. Thus, the place to start this count is with a Black move to h2 and a White reply of a1. The resulting position is shown in Diagram 13-19. Now the question is, where does White want to play, g1 or h1?
There are at least two ways of handling this situation. One is to count the discs in Diagram 13-19, then use this as a starting position to count both sequences (White g1, Black h1 and White h1, Black g1). Using this method, we must determine the number of black discs in Diagram 13-19. In order to do this, first we count the number of discs in Diagram 13-18, which is 23. Black’s move to h2 gives black six discs on the right edge (h2, h3, h4, h5, h6, and h7) for 29, g3 for 30, and five discs on the second row (c2, d2, e2, f2, and g2) for 35. White’s move to a1 flips the disc on b2, leaving Black with 34 discs in Diagram 13-19. Now that we know this number, we can count to the end of the game for both of White’s choices. First, if White plays g1 and Black plays h1, then Black loses discs on f2 and g3 for 32, and gains the disc on h1 for 33. If instead White plays h1 and Black plays g1, then Black loses the disc on f3 for 33, and gains the disc on g1 for 34. Thus, in Diagram 13-19 White can do no better than g1, and Black wins 33-31.
Another way to approach the same count is to figure out which move in Diagram 13-19 is better for White before calculating what the final score of the game will be. In this case, we would use the plus/minus method, counting from White’s point of view. Again starting from Diagram 13-19, after White g1 and Black h1, White will gain three discs (g1, f2 and g3). If instead White plays h1, after Black g1, White gains two discs (h1 and f3). Thus, in Diagram 13-19, we assume that White will play g1. We are then ready to count, starting with Diagram 13-18 (at some point we must count that there are 23 black discs in this position), the entire sequence Black h2, White a1, pass, White g1, Black h1. First, I would notice that at the end of the game black will own the entire right edge, gaining seven discs (h1, h2, h3, h4, h5, h6 and h7), for a total 30. Black also gets g2 for 31, three more discs on row 2 (c2, d2, e2) for 34, but loses b2 for 33.
In general I would favor the former of these two methods because it is easier, although the latter might be somewhat faster, since we are going more directly to the final position (in the former, we count f2 and g3 for Black then subtract them away later). Practice will tell you which method works best for you, but I believe that when the number of empty squares is greater, it becomes very difficult to handle the visualization required in the latter method. Further, sometimes counting to an intermediate position such as Diagram 13-19 will tell you right away that you are either going to win or lose. In our example the score is close, so we have to think about both White moves in Diagram 13-19. However, if black had 38 discs at that point, then we would know without further counting that Black will win, or if Black had 26 discs, we would know that black will lose.
Having calculated that Black will win after h2, White a1, it is a simple matter to conclude that after h2 (Diagram 13-20), Black wins no matter where White moves. In this case, the upper-right region (g1 and h1) and upper-left region (a1) are independent. That is, whether White plays out the upper-right region first or a1 first, the discs flipped will be exactly the same. Thus, if White plays g1 instead of a1, Black will still end up with 33 discs.
If we want to verify that h2 is Black’s best move in Diagram 13-18, then we must consider Black’s other options, namely g1 and h1. As noted above, even number theory tells us that in either case the first sequence to calculate is a reply of White a1. After Black h1, White a1, Black h2 is obviously the best choice. After Black g1, White a1, the final two moves (Black h2, White h1) are forced. Thus, we need only count two sequences, namely h1, a1, h2, g1 and g1, a1, h2, a1. These are left as an exercise, but it is not difficult to verify that neither of these sequences matches the 33 discs that Black can get by starting with h2. In the end, it was only necessary to count out four sequences to verify that h2 is the best move in Diagram 13-18.
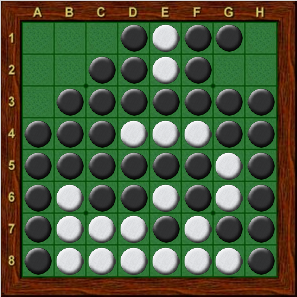
Diagram 13-21 shows a position from one of my games at the 2001 World Championships. Finding and verifying the best move in the position is not easy; giving the position to WZebra, it looked at 3,440 sequences before selecting h1. In the actual game I did not play this move, but I did find a winning sequence which was quite easy to count. First, I counted that White has 19 discs. Looking at the position, I thought that a3 was a good move, taking four interior discs (b4, c5, d6, and e7); Black has only one move, a2, leaving White with 23 discs.
 |
 |
|
| Diagram 13-21 | Diagram 13-22 | Diagram 13-23 |
| White to move | White to move | Final moves |
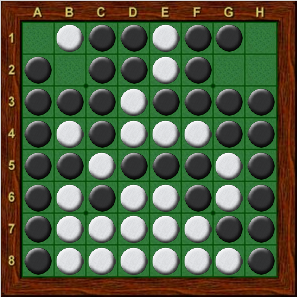
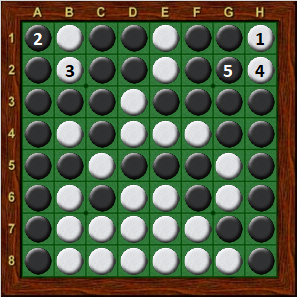
Now, the upper-left region is still a hyper region for Black, and one way to deal with this region is to feed Black moves in this region (see Chapter 8). I decided to look at b1, which gives Black two choices, b2 and c1. However, b2 is terrible, allowing White to play h1, pass, c1, pass, a1. So, Black must move to c1. These two moves give White additional discs on b1 and d3, but Black will eventually move to a1, flipping the disc on b1. Thus, I added only the disc on d3, making 24 white discs (Diagram 13-22). The rest of the moves, shown in Diagram 13-23, are obvious and offer Black no choices. It is also pretty easy to count this sequence. White gains five discs in the upper-left (b2, c2, d2, b3, and c3) for 29, and four discs in the upper-right (f1, g1, h1, and h2) for 33. In this case, I really only needed to count one sequence to find a winning move.
Exercises
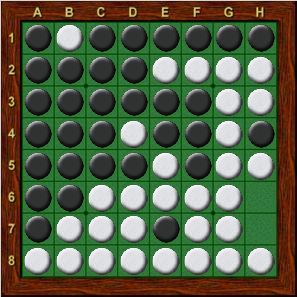
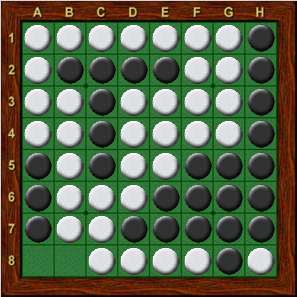
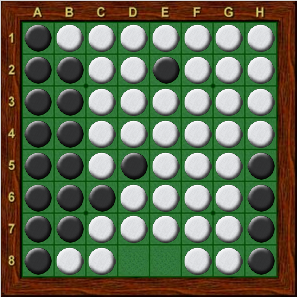
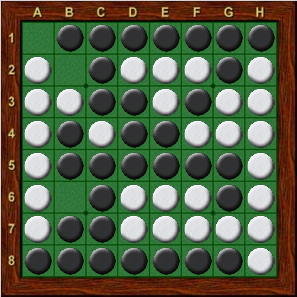
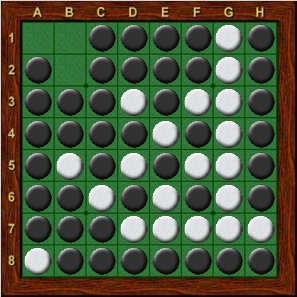
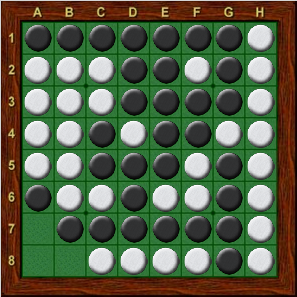
In each diagram, find the best move and determine the final score of the game with perfect play from both sides.
Answers you'll find here.
 |
 |
|
| Exercise 13-1 | Exercise 13-2 | Exercise 13-3 |
| Black to move | Black to move | Black to move |
 |
 |
|
| Exercise 13-4 | Exercise 13-5 | Exercise 13-6 |
| White to move | White to move | White to move |
| Navigation: Main Page > Learn Othello > Book Rose | << previous chapter << - >> next chapter >> |
