Rose: Chapter 7
| Klicke hier für Deutsche Version | |
| Navigation: Main Page > Learn Othello > Book Rose | << previous chapter << - >> next chapter >> |
Chapter 7: Playing defense
The previous few chapters have concentrated on strategies for finding good moves: taking corners, creating stable discs, making quiet moves, and so on. However, there is another, equally important part of the game— preventing your opponent from making the same sort of good moves that you are aiming for yourself. In this chapter we discuss defensive plays which attempt to take away good moves from the opponent. If you play through the transcript of any game between experts, you are likely to find at least a few defensive moves.
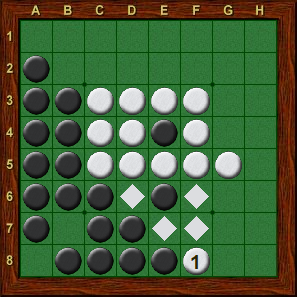
There are essentially three types of defensive moves. The first type is to flip some of your opponent’s pieces to take away access to his good move. A simple example is shown in Diagram 7-1. Here, White is threatening to take the a8 corner, which is clearly a good move. However, if Black makes a defensive play at g8, flipping the white disc on f8, he can deny White access to the corner.
The second type of defensive move is to play where your opponent wants to play. In Diagram 7-2, White would like to take the a8 corner. The only way to prevent him from doing so is for Black to take the corner himself. In this case, taking the corner is attractive for Black as well, but in other circumstances it pays to play in your opponent’s spot, even if it is a relatively loud move.
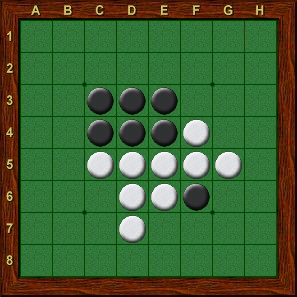
The third type of defensive move is to somehow make the opponent’s good move less attractive. In Diagram 7-3, White has a good move to f8. There is no way to take away White’s access to f8, but Black can make the move much less attractive by playing f7. Now if White plays f8, it would flip the entire f-column.
 |
 |

|
| Diagram 7-1 | Diagram 7-2 | Diagram 7-3 |
| Black to move | Black to move | Black to move |
 |
 |

|
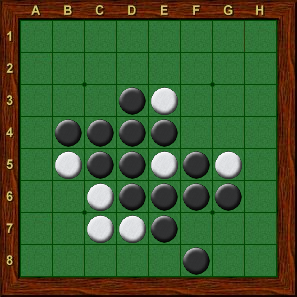
| Diagram 7-4 | Diagram 7-5 | Diagram 7-6 |
| White to move | Black to move | White to move |
Diagram 7-4 shows an opening position that often leads to a series of moves with White on defense and Black on offense. Note, however, that this does not mean the opening is good for Black. At each turn, Black threatens to make a very quiet move, but White can deal with these threats with defensive plays, and the opening is actually favorable for White. In Diagram 7-4, Black has a quiet move to f6, so White takes it away by playing d2 (Diagram 7-5), flipping the disc on d4. Note that an alternative is for White to play f6 himself, but this flips two frontier discs and creates a long wall, so d2 is the better move.
Black reestablishes access to f6 by playing g4 (Diagram 7-6), so White takes it away again with b6 (Diagram 7-7). Here again there are alternatives. For example, White could deny access by playing to c3 (Diagram 7-8), which is a bit loud but is not unreasonable. White could play f6 himself, but this is really too loud and would leave Black with a good move to g5. Another possibility in Diagram 7-6 is for White to play g6 (Diagram 7-9), which makes Black’s move to f6 less attractive because it flips the frontier disc on f5.
 |
 |

|
| Diagram 7-7 | Diagram 7-8 | Diagram 7-9 |
| Black to move | Black to move | Black to move |
 |
 |

|
| Diagram 7-10 | Diagram 7-11 | Diagram 7-12 |
| White to move | Black to move | Black to move |
Continuing on from Diagram 7-7, Black usually chooses b5, setting up a quiet move to c3 (Diagram 7-10). Here again, White has two good ways to deal with this threat. In Diagram 7-11, White takes away Black’s access to c3 by flipping the disc on e5. In Diagram 7-12, White plays c3 himself.
As the above examples suggest, when you opponent is threatening to make a very good move, the best move will usually be a defensive move. In a position such as Diagram 7-10, Black’s move to c3 is so good that White absolutely must prevent him from moving there. It might be tempting for White to make a quiet move of his own, for example g5, but even making a loud move such as e7 (flipping the black disk on e5) would be better than letting Black move to c3.
Diagram 7-3 showed an example where it is possible to make the opponent’s best move much less attractive. While that example was rather dramatic, even rather subtle defensive plays can be effective. For example, in Diagram 7-13, Black has a good move at f6. White can deny access by playing d2 (Diagram 7-14), which is a reasonable move, but most experts prefer to play g6 (Diagram 7-15).
 |
 |

|
| Diagram 7-13 | Diagram 7-14 | Diagram 7-15 |
| White to move | Black to move | Black to move |
 |
 |

|
| Diagram 7-16 | Diagram 7-17 | Diagram 7-18 |
| White to move | Black to move | White to move |
After g6, Black’s best move is still f6 (Diagram 7-16), but now White has a good move at g5 (Diagram 7-17). If White does not make some sort of defensive move in Diagram 7-13, then Black can gain a significant advantage. For example, if White plays 14. f2, Black responds with f6 (Diagram 7-18). Now it is too late for White to play g6, because it flips the disc on f5. White will not get a move to g5 as he could in Diagram 7-16, because Black will use the f5 disc to move there himself.
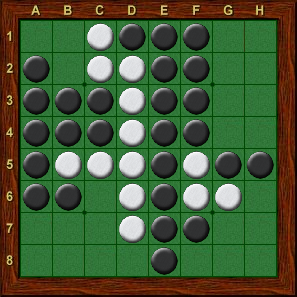
Diagram 7-19 shows an example where it is important to consider both offense and defense. At first glance, c2 is the obvious choice for Black (Diagram 7-20). It is a very quiet move, flipping only internal discs, and leaves White with no new options. However, considering defense as well as offense, Black has a much better move, namely b5 (Diagram 7-21)! Although this move might seem too loud to be good, it is an excellent defensive move, as it flips the white disc on g5. This eliminates two potentially good moves for White at c1 (gaining a tempo on the edge) and g7 (attacking Black’s unbalanced edge). Moreover, Black is still threatening to make quiet moves at c2 as well as c6.
 |
 |

|
| Diagram 7-19 | Diagram 7-20 | Diagram 7-21 |
| Black to move | White to move | White to move |
Exercises
In each diagram, find a good defensive move. Answers you'll find here.
 |
 |

|
| Exercise 7-1 | Exercise 7-2 | Exercise 7-3 |
| White to move | Black to move | White to move |
 |
 |

|
| Exercise 7-4 | Exercise 7-5 | Exercise 7-6 |
| Black to move | White to move | White to move |
| Navigation: Main Page > Learn Othello > Book Rose | << previous chapter << - >> next chapter >> |