Rose: Chapter 12
| Klicke hier für Deutsche Version | |
| Navigation: Main Page > Learn Othello > Book Rose | << previous chapter << - >> next chapter >> |
Chapter 12: Advanced midgame play
This chapter covers various elements of play in the midgame, roughly moves 15 through 45 in a typical game. We have already seen many strategies that are used in the midgame, but here we examine midgame strategy at a more advanced level. As with Chapter 11, this chapter is not meant to teach something that will immediately raise the level of your play. Rather, I describe a way to think about the midgame, so that (hopefully) your ability will grow more quickly as you practice.
Good shape/bad shape
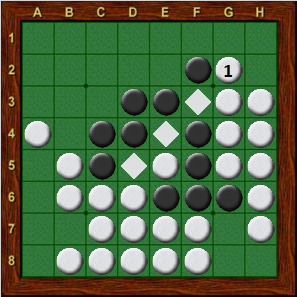
The first very strong Othello program readily available to the public was Brutus. While the program had relatively little knowledge of midgame strategy, it was able to make up for this by looking very far ahead. Although it was certainly hard for me to defeat Brutus, there was always something a bit dissatisfying about playing it. The program made a lot of awkward looking moves, and it always seemed that it should not be that hard to win against it. Somehow though, these moves usually turned out to be not so bad after all, because Brutus was looking at millions of possible continuations and could “read” that these strange moves would work out in the end.
|
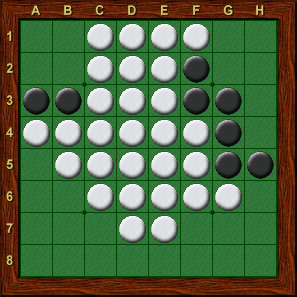
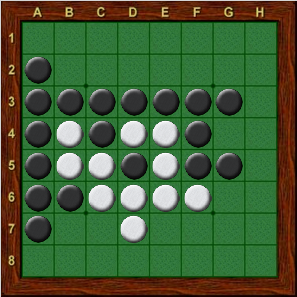
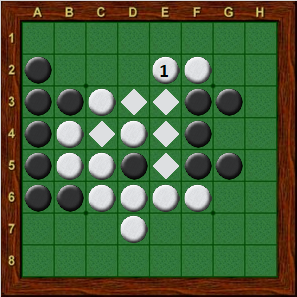
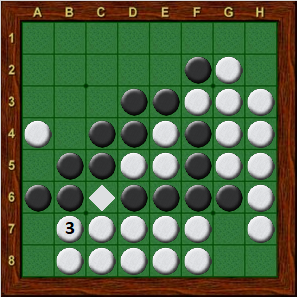
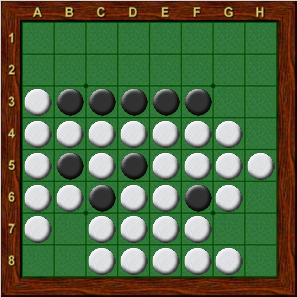
For humans, who have a far more limited ability to read ahead, it is much more important to rely on general principles and especially what I call good shape. Basically, good shapes are patterns that will tend to work out favorably in the future, even if we can not read out the position completely. In a position such as Exercise 3-2, reproduced below, even set to look ahead only 1 move, WZebra finds the right move (c7). How the game will proceed is by no means obvious, but the right move is, because cutting quietly through the middle is good shape. By contrast, bad shapes tend to lead to problems in the future; these are the types of positions that are often vulnerable to the tesujis presented in Chapters 9 and 10. Of course, we want to make good shapes when we can, but there are certain positions where the best move available makes a bad shape. In general, it is critical to read out the consequences of moves that make bad shapes to see if they really work, while less reading is required when making good shapes. | |
| Exercise 3-2 | |
| Black to move |
 |
 |
|
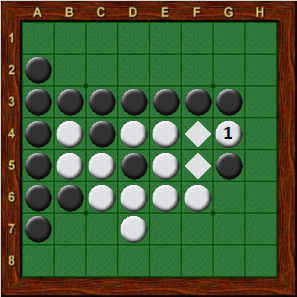
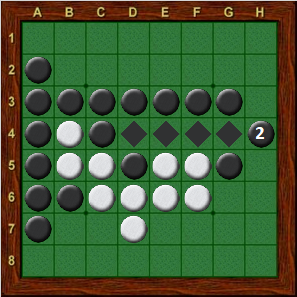
| Diagram 12-1 | Diagram 12-2 | Diagram 12-3 |
| White to move | Black to move | White to move |
Make the most of your opponent’s bad shape
Consider the position in Diagram 12-1. Suppose that it was Black’s turn to move in this position. Black would not have any quiet moves available, and would be in grave danger of completely running out of moves. In a situation like this, if White can simply avoid opening up new places to move for Black, then Black would have to play an unappealing move to the south. Breaking through Black’s wall by playing on row 2 and opening up new moves for Black is simply unthinkable. Rather, White wants to play to the east, but the question is where?
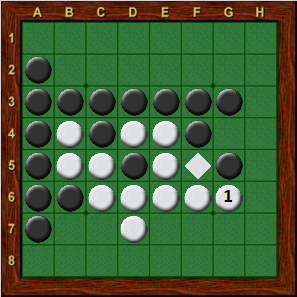
It might appear that g4 is a reasonable choice, since it a quiet move in between the black discs on g3 and g5 (Diagram 12-2). However, Black has a good response at h4 (Diagram 12-3). Now, White has no choice but to break through Black’s wall.
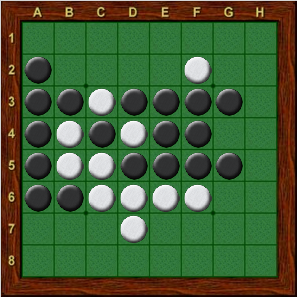
Although the black discs on g3 and g5 do form a bad shape, playing in between them is not the way to exploit this shape. Much better for White is to play g6 (Diagram 12-4), which accomplishes the goal of forcing Black to play to the south. Further, White still has two moves to the east at h5 (or h4) and g4.
In fact, even if White let Black pass a couple of times, and (from Diagram 12-1) played three moves in a row at g6, h5, and g4, the result would still be favorable for White, as Black would have to initiate play in the south.
As this demonstrates, often a good way to take advantage of your opponent’s bad shapes is to think about playing several moves in a row with your opponent passing. In Diagram 12-1, White could get in three good moves by beginning with g6, but would only get two moves starting at g4. Therefore, g6 is likely to work out better than g4.
 |
 |
|
| Diagram 12-4 | Diagram 12-5 | Diagram 12-6 |
| Black to move | White to move | Black to move |
Next, consider Diagram 12-5. Compared to Diagram 12-1, the position is not as favorable to White, since Black has some moves available to the north. However, White wants to follow the same basic strategy of forcing Black to initiate play to the south. In Diagram 12-5, Black has an unbalanced edge, and if Black opens up the south, White could eventually end up with a good move at b7. As in Diagram 12-1, White wants to try to gain some tempos by exploiting Black’s bad shape to the east, ideally initiating play with g6, then following with h5 and g4. Of course, in Diagram 12-5, White does not have access to g6, but White can establish access by playing e2 (Diagram 12-6). Notice how this links all of the white discs together, which is often a sign of good shape.
Black has many possible moves in Diagram 12-6. Either e1 or e7 would exploit the fact that the e-column is now white. Playing c2 would deny White access to g6, at least temporarily. Other possibilities are d1, d2, c7, d8, and e8. For White to thoroughly examine all of these possibilities would take a long time, but it would not be difficult to verify that none of these moves will pose a great problem for White. Often, as long as the move we are considering fits in with the principle of good shape, all that is required when thinking in the midgame is to make sure that, following any of your opponent’s replies, you will have another move which makes good shape.
In the current example, in order to play e2 with some confidence, we might check each of Black’s replies and come up with at least one reasonable response. If Black does nothing defensively (playing d1, e1, d2, or c7), then White will have a good move to g6. If Black tries c2, then simply playing d2 is certainly good shape. If Black tries to poison g6 by playing e7, then c7 would be a very quiet response. If Black tries d8 or e8, flipping the disc on d7, White must be a bit careful because now a move to g6 would give Black access to g4, making it much harder for White to gain tempos in the east. However, d8 and e8 are both bad shape and offer White some good choices. After d8, White could play c7, c8, or e7; after e8, White has c7, c8, or d8.
 |
 |

|
| Diagram 12-7 | Diagram 12-8 | Diagram 12-9 |
| White to move | Black to move | White to move |
Look for ways to set up key moves
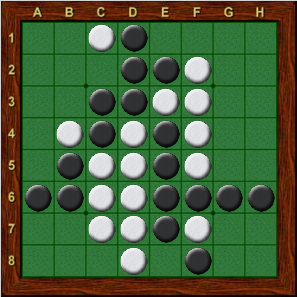
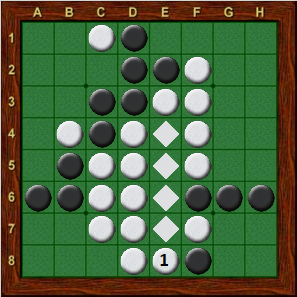
Diagram 12-7 shows a position from a game between two of Japan’s top players, Hirohisa Tezuka (Black) and Hideshi Tamenori (White). Before reading further, consider for a moment where you would play in this position. Whether you are a novice or an expert, e8 should jump out at you as a wonderful move (Diagram 12-8). A novice might simply notice that this is a very quiet move, only flipping discs in the middle of the board. An expert would further notice that the obvious reply for Black, namely taking the edge at c8, is an ugly looking move. It would seal Black off from the lower-left region and set up a quiet move for White at a5. An expert would also want to play e8 in order for White to exploit a good potential move at g5. In short, the shapes in Diagram 12-7 cry out for White to move to e8.
|
| |
| Diagram 12-10 | |
| Black to move |
 |
 |
|
| Diagram 12-11 | Diagram 12-12 | Diagram 12-13 |
| White to move | Black to move | Black to move |
Bad shape: look before you leap
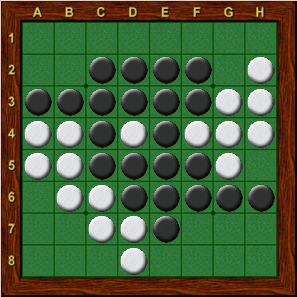
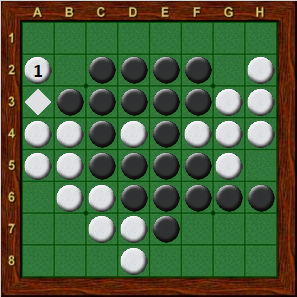
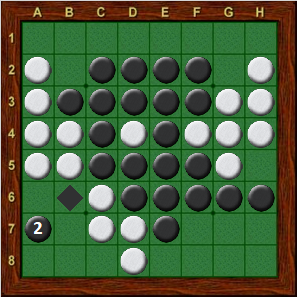
In Diagram 12-11, Black is in danger of running out of moves. If it were Black’s turn to move, pretty much the only choice would be to play a6. White can therefore put pressure on Black by playing a2 (Diagram 12-12). Now if Black plays a6, White can just take back with a7. The question then becomes, can White get away with this C-square move? The resulting shape is dangerous, because Black has several options in the lower-left, while White is walled off from the region. A move like a2 is very likely to result in White losing the a1 corner in the future. For example, Black might play a7 (Diagram 12-13), sacrifice the a8 corner, wedge at a6, and then take a1.
In order to play a2 with any confidence, you must be able read ahead a couple of more moves. You at least need to have some idea of where to move if Black indeed plays a7. The key to understanding this position is to realize that White can afford to lose the a1 corner, especially if Black runs out of moves in the process. Indeed, once the position in Diagram 12-13 is reached, White would like nothing more than for black to play a1, allowing White to wedge at a6 and winning the a8 corner.
|
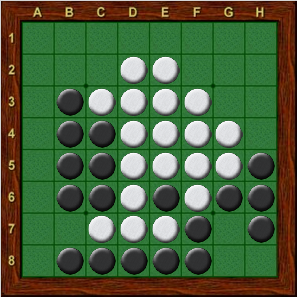
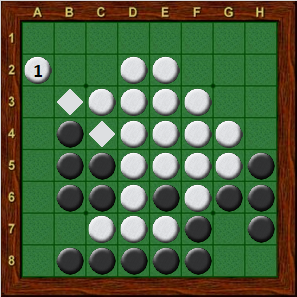
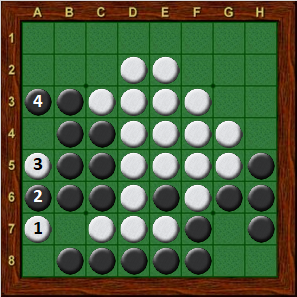
White should therefore play b2 (Diagram 12-14), offering the a1 corner to Black. If Black refuses the corner by playing b8 or c8, White can play a6, again offering Black the a1 corner. This time Black has little choice but to accept, and White can run Black out of moves by playing on the bottom edge. Starting with Diagram 12-11, if you can at least read ahead until the position in Diagram 12-14, then you can feel reasonably comfortable about making a dangerous move like a2, even if you can not read out the entire sequence until Black runs out of moves. | |
| Diagram 12-14 | |
| Black to move |
 |
 |
|
| Diagram 12-15 | Diagram 12-16 | Diagram 12-17 |
| White to move | Black to move | White loses |
In the example above, White was ahead and made a bad shape to put pressure on Black. In Diagram 12-15, it is White who is under pressure, but again the best move is to make a bad shape. Here, White is walled off from most of the board, and his only safe moves are on the left edge. White would like to attack Black’s unbalanced edge with g7, but this allows a swindle, as a Black move to g8 would not flip g7. None of the usual moves (a3, a4, a5, or a6) looks appealing, as they flip in more than one direction and open up new moves for Black. Computer analysis reveals that all of these moves lose by at least 12 discs.
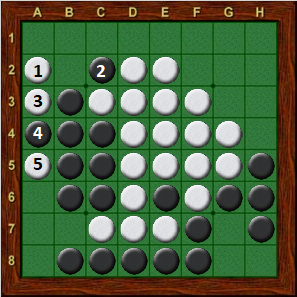
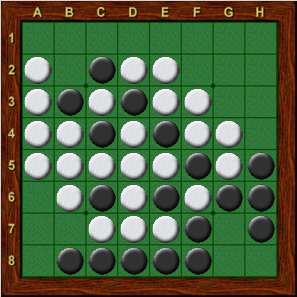
The only way for White to keep the game close is to play a2! (Diagram 12-16). This is a terrible shape, and would normally be a disaster. For example, if white tried to play a7, he would be run completely out of moves in the sequence shown in Diagram 12-17. However, in Diagram 12-16, Black does not have access to a3, and can not launch an immediate corner attack. Diagram 12-18 shows one possible sequence, leading to the position in Diagram 12-19. While the left edge is still a liability for White, playing a2 leads to the gain of a critical tempo, and the position is even.
 |
|
| Diagram 12-18 | Diagram 12-19 |
| Black to move | Black to move |
Edges as shapes
Among Othello experts, there has been a lot of debate over whether taking edges is good or bad. Looking at a position like Diagram 5-11, it is easy to understand why most novices are warned against taking too many edges. Edges may be subject to various attacks, and can also make it difficult to find quiet moves when the edges act as poison discs. Certainly, simply taking an edge any time one is available is not going to be a work against someone who has a reasonable idea of proper strategy.
While there is no true consensus, most experts would probably agree with the idea that taking edges is good for gaining tempos in the midgame, but often leads to problems later in the game. In terms of the current discussion, we might think of most edge positions as bad shape, even if they are not immediately subject to attack. If taking edges makes bad shapes, then you have to read ahead to decide whether an edge is worth taking.
In Diagram 12-15, Black holds two edges which are adjacent in the sense that they are both connected to the h8 corner. Holding adjacent edges can be a powerful strategy, and experience shows that it is usually better to occupy adjacent edges rather than opposing edges. While the bottom and right edges in Diagram 12-15 are both bad shape, White has no way to attack them. In the process of taking adjacent edges, it is often possible to gain tempos, forcing your opponent to build walls.
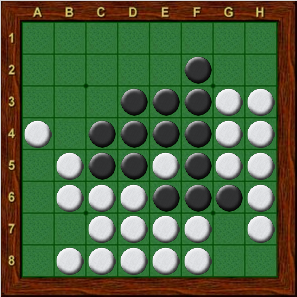
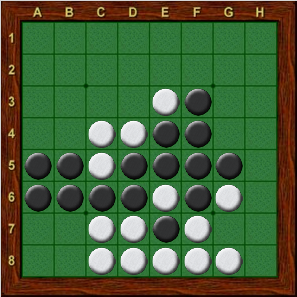
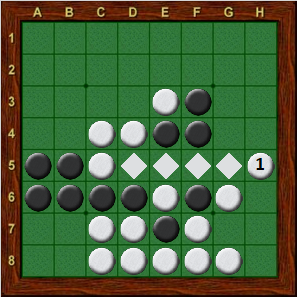
In some cases, it is possible to completely run your opponent out of moves in the midgame by grabbing the long diagonal connecting adjacent edges. Diagram 12-20 shows perhaps a famous example of this, from the 1984 World Othello Championship. Paul Ralle of France, as White, grabbed the diagonal with g2! (Diagram 12-21). Black can (and did) break the diagonal by playing a6, but White can again control the diagonal with b7 (Diagram 12-22), winning easily. Note, however, that if the diagonal grab was not available in Diagram 12-20 (for example if the disc on e4 were white rather than black), then White’s bad edges would give Black the advantage.
 |
 |
|
| Diagram 12-20 | Diagram 12-21 | Diagram 12-22 |
| White to move | Black to move | Black to move |
 |
 |
|
| Diagram 12-23 | Diagram 12-24 | Diagram 12-25 |
| White to move | Black to move | Black to move |
Diagram 12-23 shows another example where a “bad shape” edge turns out to be an advantage. This position is from the semifinals of the 2003 World Championship. Ben Seeley, playing White, moved to h5 (Diagram 12-24), exploiting the fact that Black does not have access to g4. Diagram 12-25 shows the position a few moves later in the game. Note that Black does not have access to g3 or h3 because of the block of white pieces at the bottom of the board. Black will at least get a good move to b7 at some point in the game, attacking White’s unbalanced edge, but overall having this edge is working to White’s advantage.
Harmony of the discs
Anders Kierulf of Switzerland (among other places) once carried out a statistical analysis of tournament games showing that the eventual losers of games had, on average, more edge discs in the midgame than the winner. However, as we have seen above, there are many circumstances under which taking edge positions, even “bad” positions such as unbalanced edges, is advantageous. One reason that the player with more edge discs goes on to lose the game is that, in many games the player who is losing will be forced to take edges in a desperate attempt to gain tempos and avoid running out of moves.
In my view, the key to playing well in the midgame is to make the right edge moves, keeping a balance between offense and defense. Taking bad edges can work as long as you are receiving adequate compensation for it, either in terms of offense as in Diagram 12-20, or in terms of defense as in Diagram 12-25.
Exercises
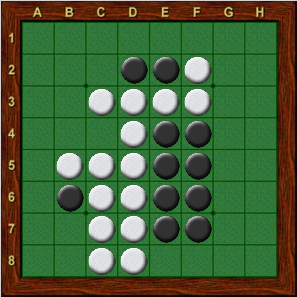
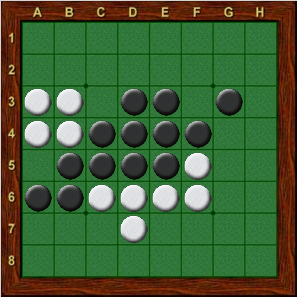
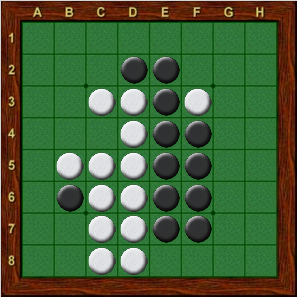
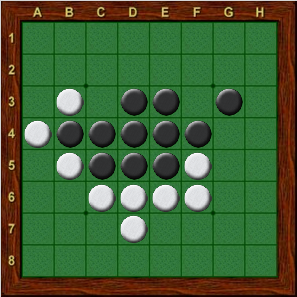
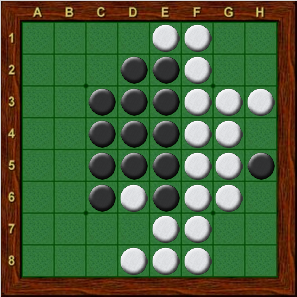
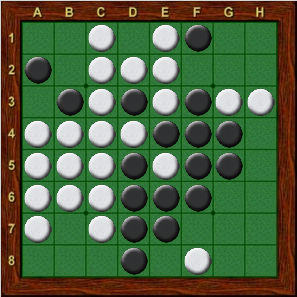
In each diagram, find the best move. Answers you'll find here.
 |
 |
|
| Exercise 12-1 | Exercise 12-2 | Exercise 12-3 |
| Black to move | White to move | White to move |
Hint for Exercises 12-3 and 12-4: consider the answers to Exercises 12-1 and 12-2.
 |
 |
|
| Exercise 12-4 | Exercise 12-5 | Exercise 12-6 |
| Black to move | Black to move | Black to move |
| Navigation: Main Page > Learn Othello > Book Rose | << previous chapter << - >> next chapter >> |
