Rose: Chapter 6
| Klicke hier für Deutsche Version | |
| Navigation: Main Page > Learn Othello > Book Rose | << previous chapter << - >> next chapter >> |
Chapter 6: Basic endgame strategy
If you are fortunate enough to build up a big lead in the opening and midgame, then the endgame can sometimes be a relatively easy mopping-up operation. However, when neither side carries this sort of advantage, the endgame can be extremely difficult. Even at the highest (human) levels of play, many games are won or lost in the last few moves. Unlike most strategy games, in Othello the board becomes more crowded as the game goes on, which results in more discs being flipped on each turn. Rapidly changing fortunes in the endgame is one of the things that makes Othello great! In this chapter we will examine some of the basic endgame strategies, saving the more difficult material for chapters 8 and 13.
 |
 |
|
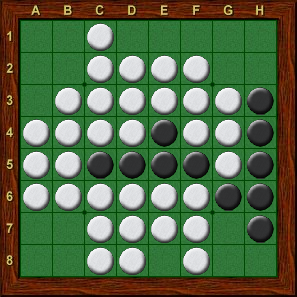
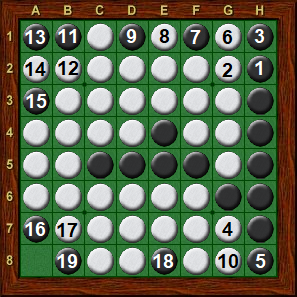
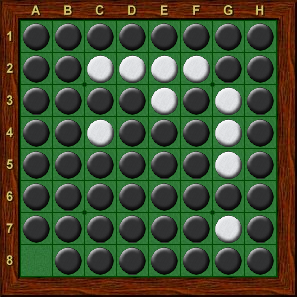
| Diagram 6-1 | Diagram 6-2 | Diagram 6-3 |
| Black to move | Black 53, white 10 |
In Diagram 6-1, Black has run White out of moves and has complete control of the game. Winning from here is hardly rocket science. Black can simply force White to give up the corners, and sweep around the edges. Diagram 6-2 shows one possible sequence of moves, resulting in the final position shown in Diagram 6-3. Notice that throughout this sequence, White has very few choices, and Black just keeps on accumulating more and more stable discs. In general, once your opponent is out of safe moves, you should try to keep him out of moves for the rest of the game. I have seen many examples where people let their opponent back in the game by getting too fancy in the endgame, trying to squeeze out every last disc instead of winning in the simplest way possible. With the board changing rapidly it is easy to overlook something and make a silly mistake. Always remember that in the endgame, simple is best.
 |
 |
|
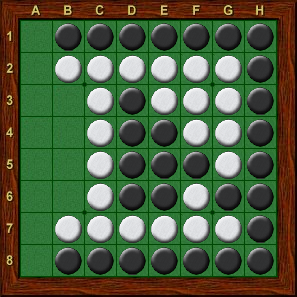
| Diagram 6-4 | Diagram 6-5 | Diagram 6-6 |
| Black to move |
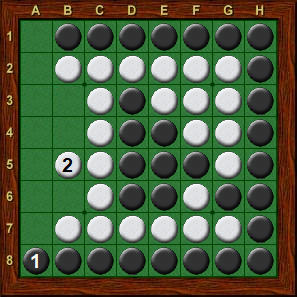
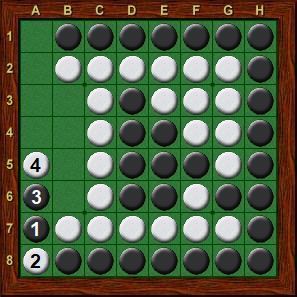
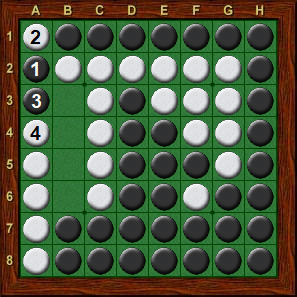
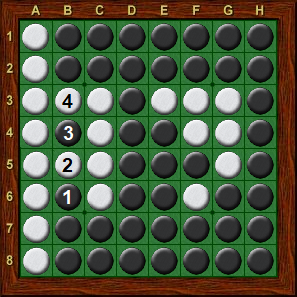
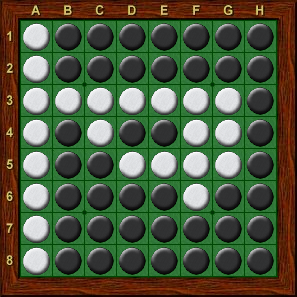
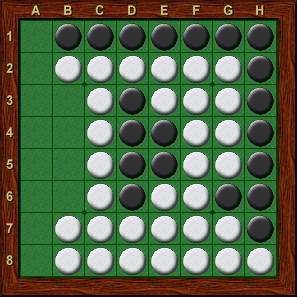
Diagram 6-4 shows another example where Black has run White out of moves. Here again, Black should be looking for the simplest way to win the game. While in this case grabbing the corners is sufficient to win, it is not that easy to build from the corner. For example, in Diagram 6-5, if Black takes a8, then White plays away diagonally at b5, and Black can not extend away from a8. The easiest way to win is shown in Diagram 6-6. Black begins with a7, intentionally giving up the a8 corner, and continues with a6, allowing White to take four discs on the edge. Black can then repeat the same moves near the a1 corner, as shown in Diagram 6-7. After filling in the last four squares (Diagram 6-8) the final position is reached in Diagram 6-9. Notice how White has taken the left edge, but little else. Black has captured many discs in the middle of the board, and hence this technique is called an interior sweep. It is also worth noting that throughout the entire sequence, every White move was forced.
 |
 |
|
| Diagram 6-7 | Diagram 6-8 | Diagram 6-9 |
| Black to move | Black wins 42-22 |
 |
 |
|
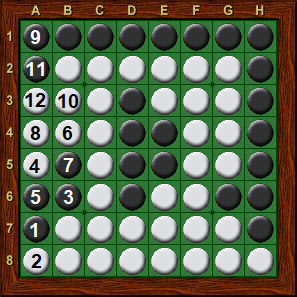
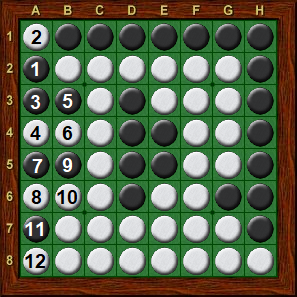
| Diagram 6-10 | Diagram 6-11 | Diagram 6-12 |
| Black to move | Black’s a7 fails | Black’s a2 wins |
While there are many occasions when taking the corner is better than using an interior sweep, it is usually much easier to finish the game using an interior sweep. It is often possible to leave your opponent with no choices for the rest of the game as you build up more and more stable interior discs.
Diagram 6-10 shows another example which is similar to Diagram 6-4, except that black has a much smaller lead as the bottom edge is white. Black will again want to execute an interior sweep, but note that this time Black must start with a2 rather than a7. If he starts with a7, as shown in Diagram 6-11, then White ends up doing most of the sweeping, and Black will lose. Much better for Black is to start with a2 (Diagram 6-12), near the edge which he owns. Now Black can properly execute an interior sweep, capturing most of row 7 on his last move, when it is too late for White to recapture those discs.
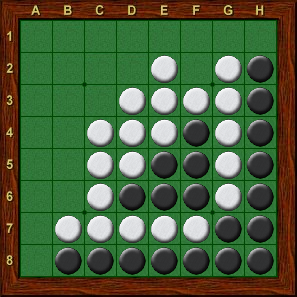
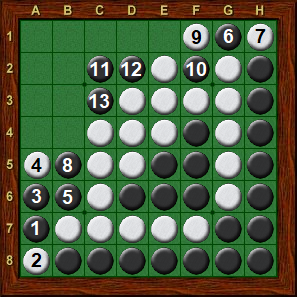
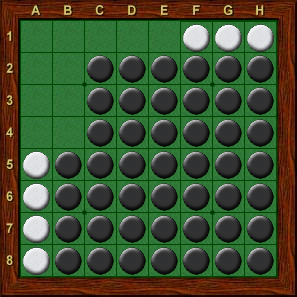
Interior sweeps can also be used on two different edges. In Diagram 6-13, Black can certainly play a move such as e1 and use the disc on e4 to take the corners, but it is much easier to win with an interior sweep, as shown in Diagram 6-14.
 |
 |
|
| Diagram 6-13 | Diagram 6-14 | Diagram 6-15 |
| Black to move | Final position |
Diagonal control
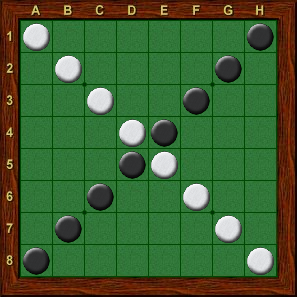
The preceding examples were relatively easy, since one side had already run out of moves. One common way to create this sort of situation is to use diagonal control, i.e., to capture all of the discs on one of the diagonal lines on the board. While this term could be used to talk about any diagonal line, in the endgame it usually refers to the long diagonals that run from a1 to h8 or a8 to h1, as shown in Diagram 6-16. Usually these are called the main diagonals, although in Japan they are often referred to as the whiteline and blackline (owing to the color of the discs in the starting position), respectively.
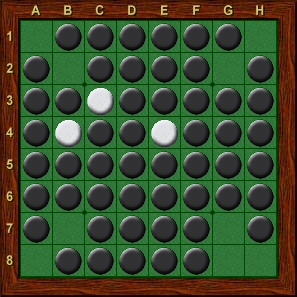
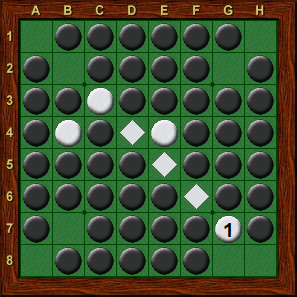
Diagonal control often allows you to move to an X-square, or sometimes both X-squares on the same diagonal, without offering your opponent a corner. These moves usually gain a tempo, and are often enough to run your opponent out of moves. Diagram 6-17 shows an example to illustrate the basic idea. White should play to g7, controlling the main diagonal, as shown in diagram 6-18. Black has no choice but to play g8, allowing White to sweep around the edges and win easily.
 |
 |
|
| Diagram 6-16 | Diagram 6-17 | Diagram 6-18 |
| Main diagonals | White to move | Black to move |
Positions similar to the one in Diagram 6-17 occur with great frequency in games where both players are using the basic strategy of avoiding X-squares. In such games, almost the entire board becomes filled in, with the X-squares and corners empty. If one player can control a diagonal, as in Diagram 6-18, the result is usually a lopsided victory for that player. Sometimes each player is able to grab one of the main diagonals, in which case the outcome of the game hinges on which side will run out of moves first. Having access to both X-squares on the diagonal is often critical in these situations.
 |
 |
|
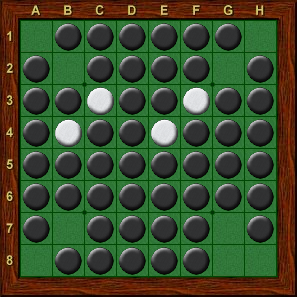
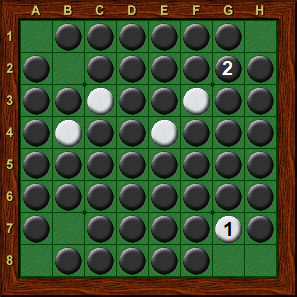
| Diagram 6-19 | Diagram 6-20 | Diagram 6-21 |
| White to move | Black to move |
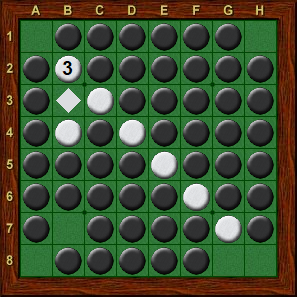
For example, Diagram 6-19 is identical to Diagram 6-17, except that the disc on f3 has been made white. If White controls the whiteline with g7, then Black can grab the blackline with g2, as shown in Diagram 6-20. In this case White can continue with b2, running Black out of moves and winning the game (Diagram 6-21). If White did not have access to b2 (for example if we make the disc at b4 black), then it would be White who runs out of moves first and Black would win the game. Thus, even though you might not want to play to an X-square early in the game, it is often important to have access to the X-squares late in the game. The pattern near the a8 corner in Diagram 6-19, where Black has no hope of accessing b7, is a major liability for Black. Experts are usually reluctant to create this sort of pattern, as it may come back to haunt them later in the game.
Breaking the diagonal
While in the examples above control of the diagonal was permanent, in many cases control of the diagonal is only temporary. In fact, if we are successful at running our opponent out of moves, forcing him to move to an X-square, we certainly hope to use that X-square to take the adjacent corner. If the X-square move happens to control the diagonal, then in order to take the corner, we must break the diagonal. That is, we must establish a disc on the diagonal controlled by the opponent. We have already seen one example of this in Diagrams 2-4 and 2-5.
Of course, the player who controls the diagonal will usually be anxious to keep his opponent off of it. Often, a move which breaks the diagonal will be followed by another move which flips the piece (or pieces) on the diagonal back again. Battles over diagonal control can sometimes continue for several turns, and even for experts it is often difficult to determine whether a diagonal can eventually be broken.
 |
 |
|
| Diagram 6-22 | Diagram 6-23 | Diagram 6-24 |
| White to move | Black to move | White to move |
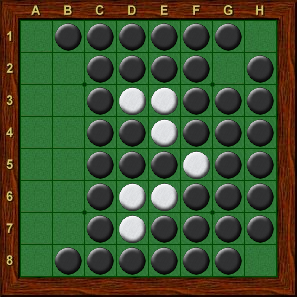
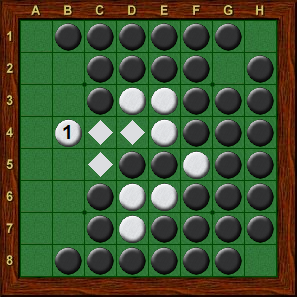
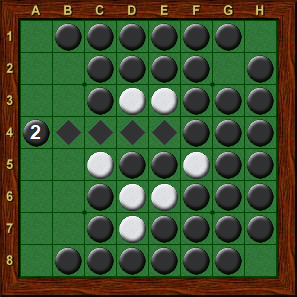
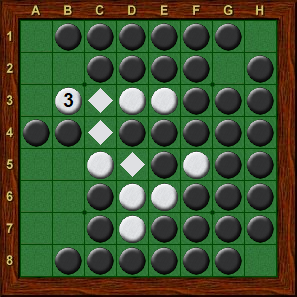
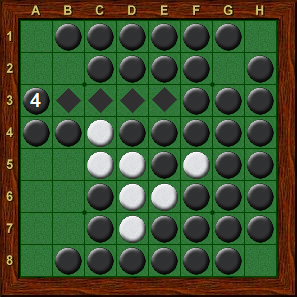
Diagram 6-22 shows a game in which Black ran out of moves, and in desperation played to g7, taking control of the diagonal. If White can break the diagonal, then he can take the h8 corner and sweep around the edges, winning by a huge margin. However, in this case breaking the diagonal permanently is not easy. White has four moves which break the diagonal, i.e., b3, b4, b5, and b6, but in each case Black has a reply which reestablishes control (a3, a4, a5, and a7, respectively). For example, if White tries b4 (Diagram 6-23), Black will reply a4 (Diagram 6-24). Now the only move which breaks the diagonal is b3 (Diagram 6-25), but Black again takes control with a3 (Diagram 6-26). Suddenly, Black is winning the game!
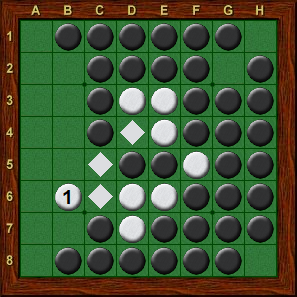
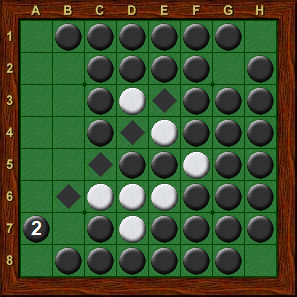
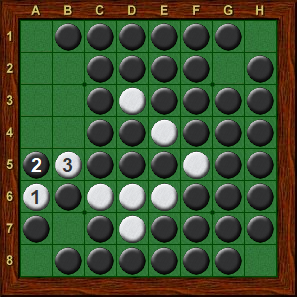
When you are trying to break a diagonal, it is often best to use a move which flips diagonally. Starting from Diagram 6-22, White should play b6, flipping the piece on d4, as shown in Diagram 6-27. Black has little choice but to play a7, keeping control of the diagonal (Diagram 6-28). However, a7 is a C-square, and as hown in Chapter 2, is subject to attack.
 |
 |
|
| Diagram 6-25 | Diagram 6-26 | Diagram 6-27 |
| Black to move | White to move | Black to move |
 |
 |
|
| Diagram 6-28 | Diagram 6-29 | Diagram 6-30 |
| White to move |
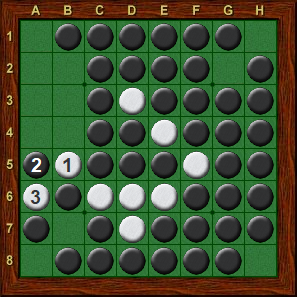
One possibility for White is to play a6, attacking the a8 corner (Diagram 6-29). Black must take the edge at a5. Now White can play b5, breaking the diagonal by flipping the disc on e5, and since a5 is occupied, Black has no way to recapture e5. Another possibility for White in Diagram 6-28 is to play b5, again breaking the diagonal at e5 (Diagram 6-30). Black can flip e5 back by playing a5, but now White can wedge at a6, and will be able to take the a8 corner on his next turn, winning easily.
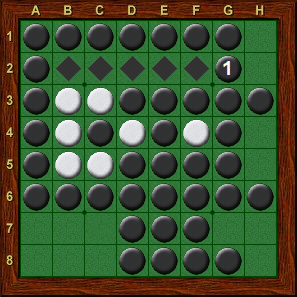
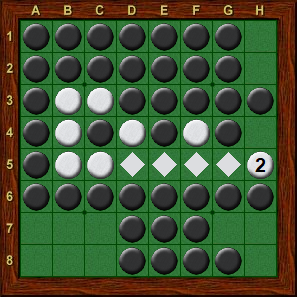
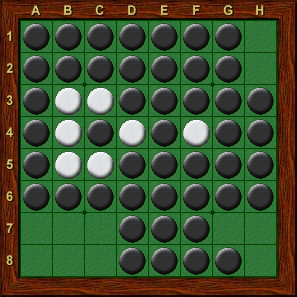
Back in Chapter 5, Diagram 5-21 showed an example where one side leaves a 2-square gap on the edge. While this sort of move is often useful to gain a tempo, 2-square gaps can be a major handicap in an endgame which comes down to diagonal control. In Diagram 6-31, Black has just played g2, taking control of the diagonal and creating a large block of stable discs. It might appear that black has the game won, but White can break the diagonal by playing h5 (Diagram 6-32) and squeeze out a narrow victory. If the h4-h5 pair were filled in (Diagram 6-33), White has no way to win. Because of situations such as these, White should leave pairs such as h4-h5 empty until there is a clear advantage to be gained by entering the pair.
 |
 |
|
| Diagram 6-31 | Diagram 6-32 | Diagram 6-33 |
| White to move | Black to move | White to move |
Introduction to swindles
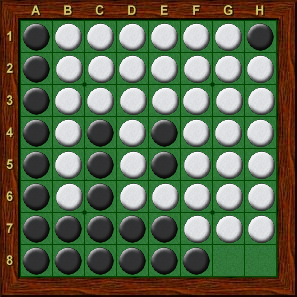
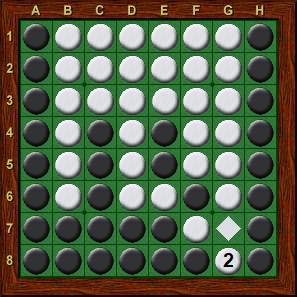
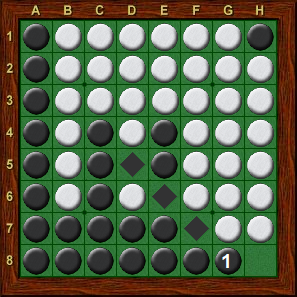
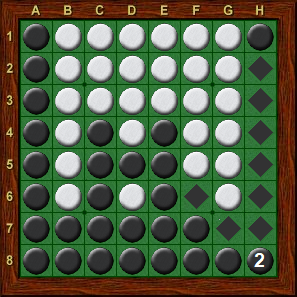
Chapter 5 introduced the concept of a pair. A swindle occurs when one player gets both moves in a pair because, following the first move into the pair, the opponent does not have a legal move to the other square in the pair. In Diagram 6-34, it might seem obvious that Black should play to h8, grabbing the entire right edge. White will end the game with g8 (Diagram 6-35), with White winning 33-31. However, notice what happens if Black plays to g8 instead (Diagram 6-36). In this case, White gets swindled; he does not have access to h8, and must pass! Black ends the game with h8, winning 36-28 (Diagram 6-37).
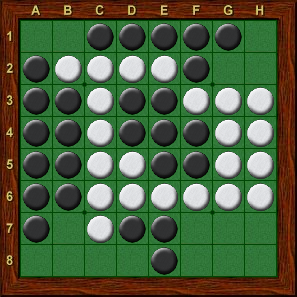
Diagram 6-38 shows another example of a swindle. Suppose that Black plays a1, as in Diagram 6-39. White would like to wedge at b1, gaining access to h1. However, in this case White can not play to b1 because he does not have a piece on the b-column. Black will later move to b1 himself, creating many stable discs. Also note how this swindle gains valuable tempos for Black. Swindles are discussed in much greater detail in Chapter 10.
 |
 |
|
| Diagram 6-34 | Diagram 6-35 | Diagram 6-36 |
| Black to move | Black h8, White g8 | Black to move |
 |
 |

|
| Diagram 6-37 | Diagram 6-38 | Diagram 6-39 |
| Black to move | White to move |
Exercises
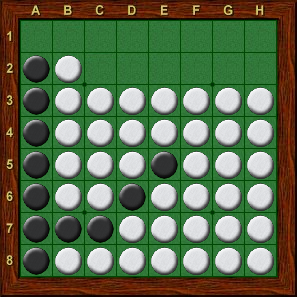
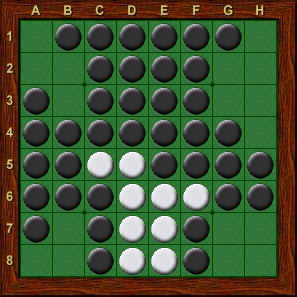
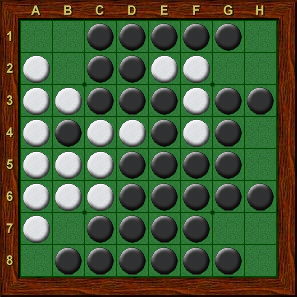
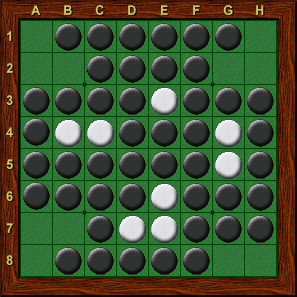
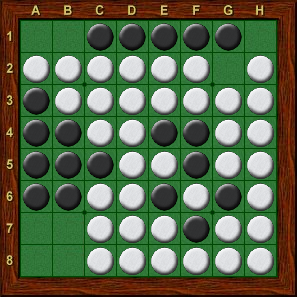
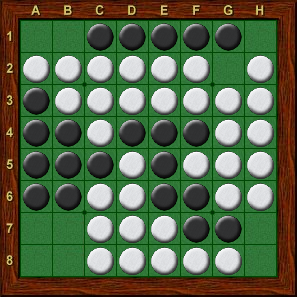
In each diagram, find the best move. Answers you'll find here.
 |
 |
|
| Exercise 6-1 | Exercise 6-2 | Exercise 6-3 |
| Black to move | White to move | White to move |
 |
 |
|
| Exercise 6-4 | Exercise 6-5 | Exercise 6-6 |
| White to move | Black to move | Black to move |
| Navigation: Main Page > Learn Othello > Book Rose | << previous chapter << - >> next chapter >> |