Rose: Chapter 16
| Klicke hier für Deutsche Version | |
| Navigation: Main Page > Learn Othello > Book Rose | << previous chapter << - >> next chapter >> |
Chapter 16: Game analysis
|
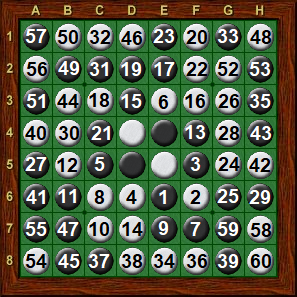
The finals of the 2003 World Othello Championships were contested between, appropriately enough, the two strongest players in the world. Ben Seeley of the United States and Makoto Suekuni of Japan finished 1-2 in the preliminary rounds of the tournament, and were the highest rated players in their respective countries. In the first game of the best 2-of-3 finals, Seeley, playing white, cruised to a 42-22 victory (see transcript). Suekuni thus needed to win the second game in order to get back in the match, while another victory for Seeley would make him World Champion. By the rules of the World Championship, the players reversed colors for the second game, with Seeley playing Black and Suekuni playing White. | |
| First game of finals | |
| Suekuni 22- Seeley 42 |
Player profiles
Ben Seeley of the United States has achieved a meteoric rise through the ranks in his short career as an Othello player. His first tournament was in 2000, and by 2001 he was the U.S. champion. He went on to finish second at the World Championship in 2002. Seeley is the strongest of what I call the “new breed” of players, people who became experts mainly by playing over the Internet.
Makoto Suekuni of Japan is the “Tiger Woods” of Othello, having played well from a very young age. He won an open tournament at the age of 10, and has won every major tournament at least once, including the All Japan Championship, Student Meijin, Meijin, Paris Open, Tokyo Open, and Mind Sport Olympiad. He won the World Championship in 1997.
 |
 |
|
| Diagram 16-1 | Diagram 16-2 | Diagram 16-3 |
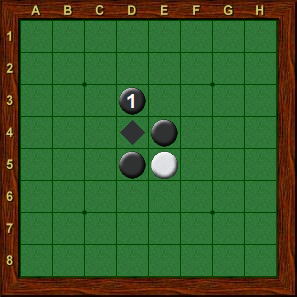
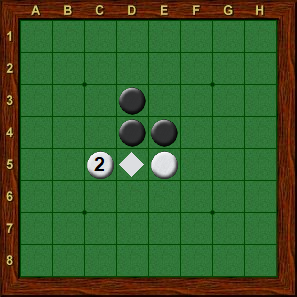
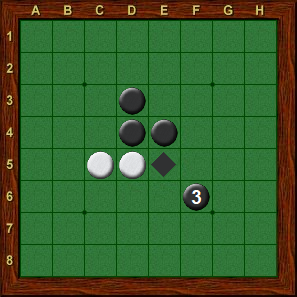
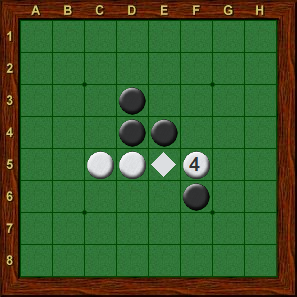
The second game of the finals began with Suekuni choosing the perpendicular opening at move 2. Although Suekuni sometimes plays the diagonal, in recent years he has mainly used the perpendicular. Seeley continued with 3. f6, the most common choice for Black against the perpendicular in recent years, although c6, d6, and e6 are all reasonable alternatives. At move 4, Suekuni again chose the most common move, f5. White could play e3 or even d2 here, but these moves leave Black with a small advantage.
 |
 |
|
| Diagram 16-4 | Diagram 16-5 | Diagram 16-6 |
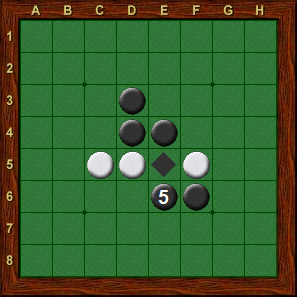
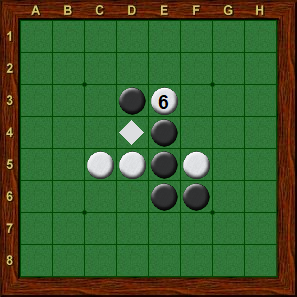
At move 5, Black has only one reasonable choice, namely e6, connecting his pieces while splitting White’s discs. Indeed it is the strength of this move which makes 3. f6 so appealing for Black. These first five moves are called the “Tiger” opening, supposedly because the shape resembles a tiger (this is slightly easier to imagine if move one is made at f5). At move 6, e3 is by far the most common move, playing quietly in the center of the board and setting up a threat to play f4. Occasionally playing to the outside with d7 or even f7 is used as a “change-up” by White when trying to drive Black out of his opening book early in the game.
 |
 |
|
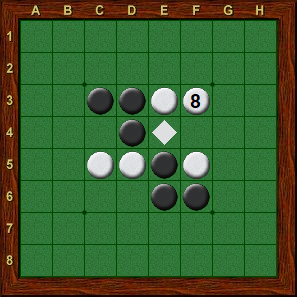
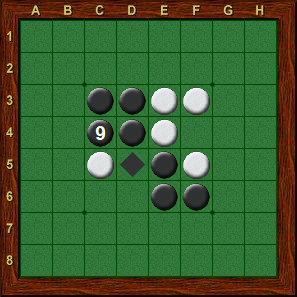
| Diagram 16-7 | Diagram 16-8 | Diagram 16-9 |
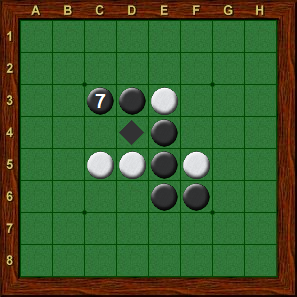
At move 7, Black wants to do something to prevent White from moving to f4. One possibility is for Black to play f4 himself, but more commonly Black makes a move which flips the white disc on d4. The most natural looking move is d6, flipping two discs in the center of the board, but as discussed in Chapter 11, this move tends to give White a lot of viable variations in the opening. Seeley’s choice, 7. c3, offers black a lot of possibilities for his next few moves. At move 8, White usually tries to set up a good move on row 4 by playing f3, d2, or even e7. At move 9, Black must do something to prevent White from playing c4. Seeley chose to play there himself, but flipping the white disc on e4 by playing f4 or e2 are reasonable alternatives.
 |
 |
|
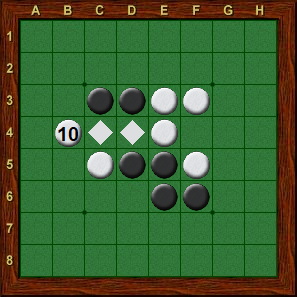
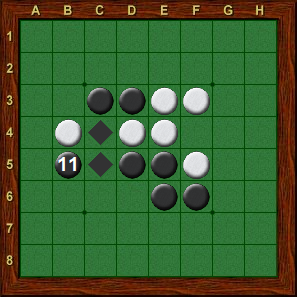
| Diagram 16-10 | Diagram 16-11 | Diagram 16-12 |
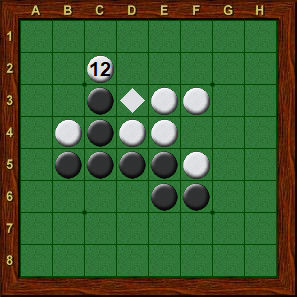
At move 10, Suekuni came through the middle with b4, the first move of the game that flipped more than one disc. White is threatening to follow with d6, and Black has no way of preventing this move, so he usually tries to make d6 less attractive for White by playing 11. b5 (the move Seeley chose) or 11. c6. At move 12, White almost always plays toward the outside at c2. Although 12. d6 is a reasonable play, black can respond with c6, leaving White with little choice but to play c2 anyway. It is therefore better for White to keep his options open and play straight to c2 at move 12.
 |
 |

|
| Diagram 16-13 | Diagram 16-14 | Diagram 16-15 |
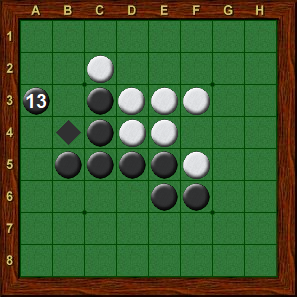
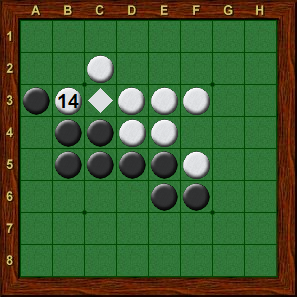
At move 13, Black wants to prevent White from playing d2. Black playing 13. d2 himself is the classic move, but in recent years it has become more popular to flip the white disc on b4. At 14, White could play d6, but again this gives Black an easy response at c6, so White usually chooses 14. b3. Black can play 15. c1, starting to establish adjacent edges, but Seeley’s choice of 15. d2, playing in the middle, was more popular at the time of this match.
 |
 |
|
| Diagram 16-16 | Diagram 16-17 | Diagram 16-18 |
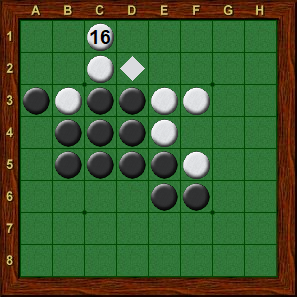
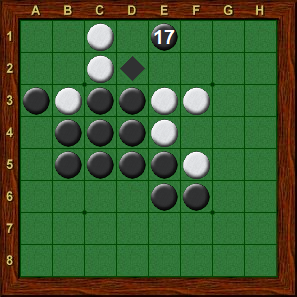
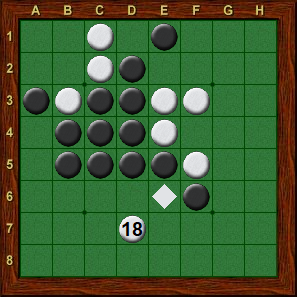
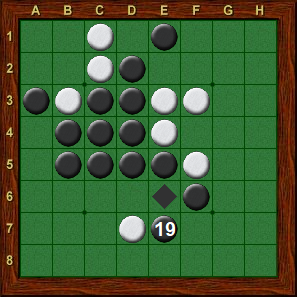
At 16, a4 appears tempting for White, flipping quietly in the middle. However, Black plays a5, and now that the a4-a5 pair is filled in, Black’s free move at a2 becomes a much more valuable threat. Suekuni chose, 16. c1, the most common choice for White, although the odd-looking 16. e2 also works out reasonably well. At 17, Black does not want to flip the white disc on f5, as this would open the possibility of White playing a5 without flipping b5. The position after Seeley’s 17. e1 was one that Suekuni was prepared for, as Seeley had played this exact same opening 4 times at the 2002 World Championships. At 18, White usually plays e2, e7, or a4, but Suekuni came up with a new move, 18. d7. Unfortunately for Suekuni, it seems that Seeley had seen this “new” move before. While moves jutting diagonally to the outside like 18. d7 are usually bad moves, in this case it seems to work out well for White.
 |
 |
|
| Diagram 16-19 | Diagram 16-20 | Diagram 16-21 |
Comparing Diagram 16-19 and Diagram 16-17, the only difference is the extra discs on d7 and e7. It might seem that this is an even trade-off, but adding extra discs such as these usually work against the player making the diagonal move (White’s 18. d7 in this case). The reason is that in Diagram 16-17, Black does not have any moves in the south, while in Diagram 16-19, Black can use the disc on d7 to make a move. Giving your opponent the option to make a move in a region that he was walled off from is often a bad idea, unless of course there are no other moves available. In this particular case though, 18. d7 seems to be a good move, and the reason finally becomes apparent after White’s move 26.
 |
 |
|
| Diagram 16-22 | Diagram 16-23 | Diagram 16-24 |
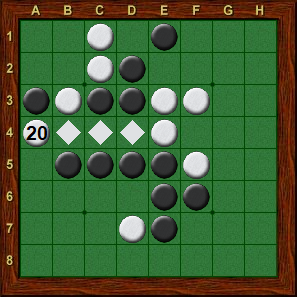
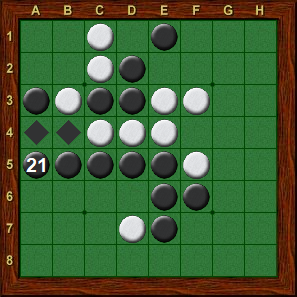
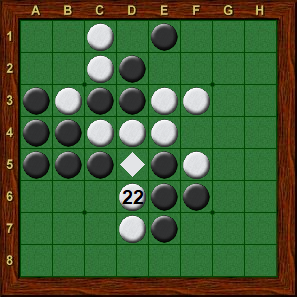
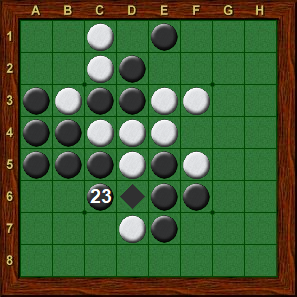
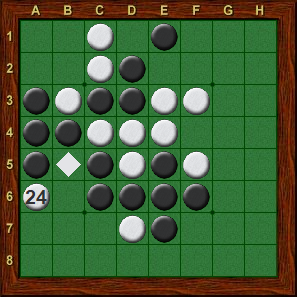
Following the exchange at moves 18 and 19, Suekuni followed with 20. a4. Seeley could not afford to give up two tempos by allowing White to play a2. He therefore took the edge with 21. a5. However, White now has a disc on the d-column, and is able to play a quiet move with 22. d6. This also sets up a huge threat for White at f4, and Black has little choice but to play defense with 23. c6. Suekuni continued with 24. a6, again threatening to gain two tempos unless Black takes the unbalanced edge at a7.
 |
 |

|
| Diagram 16-25 | Diagram 16-26 | Diagram 16-26b |
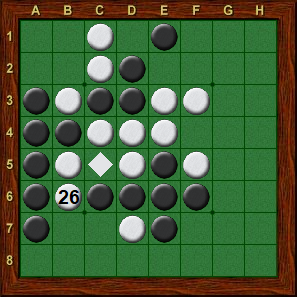
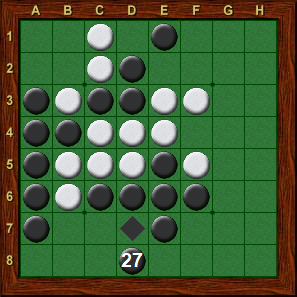
At move 25, Black again can not afford to allow White play a2, and therefore Seeley took the unbalanced edge with a7. Of course, in this case, the white disc on b3 offers Black the prospect of balancing his edge by playing a2. At 26, Suekuni made the quiet move to b6, and now the advantage of 18. d7 is revealed. In Diagram 16-26, White is threatening to make an excellent move to c7. Although Black could play 27. a2, White would just play c7; the resulting position is shown in Diagram 16-26b. Notice how Black does not have an attractive move to the south, while White has a potentially valuable move at f8, flipping the disc on e7, i.e., the extra disc Black played in the exchange at move 18-19.
 |
 |

|
| Diagram 16-27 | Diagram 16-28 | Diagram 16-28b |
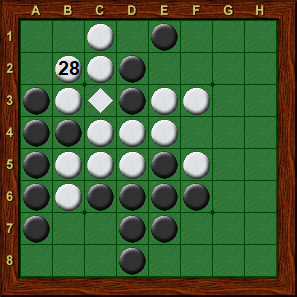
Presumably Seeley saw the problem with playing a2 and chose 27. d8, using the disc on d7 before White can play to c7. Now if White plays 28. c7, Black can just play c8. Suekuni eventually chose 28. b2, which was the right idea but the wrong move. White wants to prevent Black from playing a2, and attacking the unbalanced edge with b2 certainly accomplishes that. However, White’s best move was 28. c8, denying Black’s access to a2 by flipping the disc on e6 (Diagram 16-28b). Computer analysis reveals that after playing 28. b2, Suekuni was behind the rest of the game.
 |
 |
|
| Diagram 16-29 | Diagram 16-30 | Diagram 16-31 |
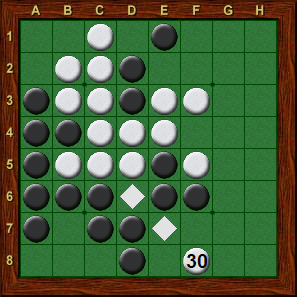
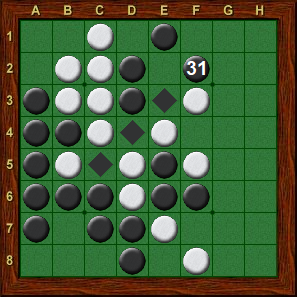
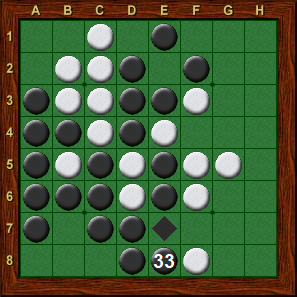
One of the problems with 28. b2 is that it allowed Seeley to make a quiet move at c7. Suekuni might have been thinking that if Seeley ever took the a1 corner, he could wedge at a2, gaining access to the a8 corner. In that case, the Black disc on c7 could allow White to use the four in the corner swindle (see Diagram 10-22). Another problem with 28. b2 is that White can not flip the disc on d2, because this would allow Black a swindle by playing a2 without flipping b2. A third problem is that, as in the actual game, a1-a2-b1 is likely to become an odd (3-square) region that White can not move into, losing parity. At 30, White has little choice but to play f8, threatening to follow with f4. Seeley then played an excellent defensive move with 31. f2! If White now plays f4, it would flip d2, again giving Black a swindle with a2.
 |
 |
|
| Diagram 16-32 | Diagram 16-33 | Diagram 16-34 |
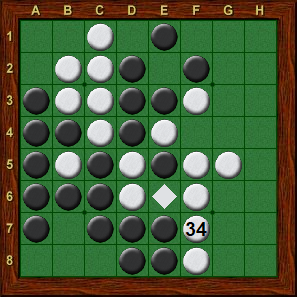
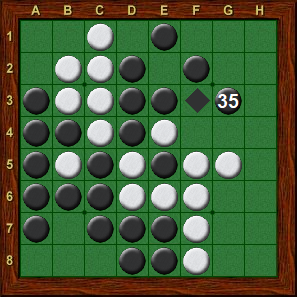
Suekuni played 32. g5; the main appeal of this move is that it sets up a quiet move to f7. Computer analysis reveals that 32.e2 was slightly better. Although e2 would flip the critical disc on d2, it makes a link with the black disc on f2, so that a Black move to a2 would still flip b2. The game continued with Seeley playing 33. e8, allowing White to get in his quiet move at f7. Exchanging Black e8 for White f7 reduced Seeley’s advantage from 6 discs to 4 discs. It turns out to be slightly better to play 33. g3 (the move Seeley played at 35) without putting in the e8-f7 exchange.
 |
 |
|
| Diagram 16-35 | Diagram 16-36 | Diagram 16-37 |
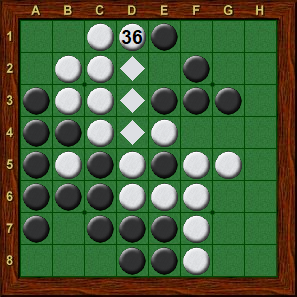
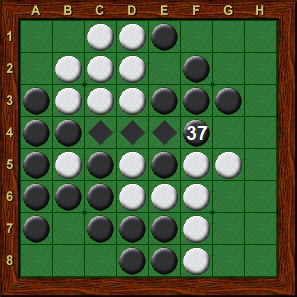
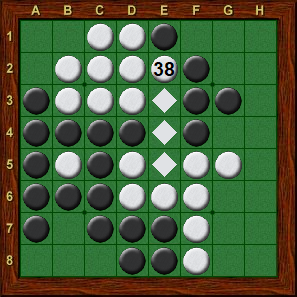
After Seeley’s 35. g3, Suekuni played d1, flipping the critical disc on d2. This move takes advantage of the fact that Black does not have access to a2 at the moment. Seeley reestablished access to a2 with 37. f4, powerfully playing through the middle of the board. Suekuni continued with 38. e2, which again links up the black disc on f2, poisoning Black’s move to a2 and preventing the swindle.
 |
 |

|
| Diagram 16-38 | Diagram 16-39 | Diagram 16-40 |
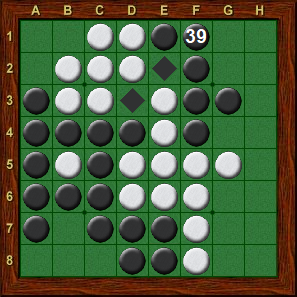
At 39, Seeley played f1, which in my view was the worst move he made in the game, even though computer analysis shows that Black is still winning by 2 discs after this move. Looking at Diagram 16-38, White can not move to f1, since this would flip the black disc on f2 and set up the a2-a1 swindle for Black. Meanwhile, White is threatening to make a quiet move at g4. It therefore makes sense for Black to play g4 himself at 39. Fortunately for Seeley, Suekuni did not take advantage of the situation, playing 40. h3 instead of the obvious g4. It is hard to say what Suekuni found appealing about h3. Perhaps he was hoping that Seeley would play g4, which is no longer a good move now that f1 has been filled in. Regardless, after 40. h3, Black now has 5 winning options (g2, g6, g8, h5, and h6), making it much easier for Seeley to close out the game.
 |
 |
|
| Diagram 16-41 | Diagram 16-41b | Diagram 16-42 |
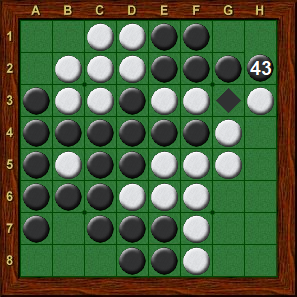
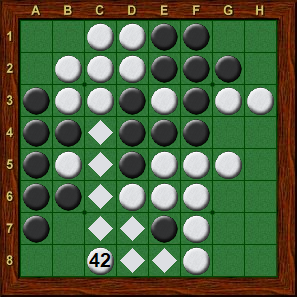
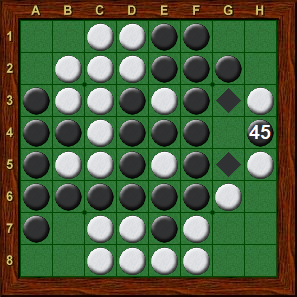
Computer analysis shows that 41. h5 was the best move, winning by 8, but Seeley chose g2 (winning by 4), which is more intuitive for humans. This is an example of the tesuji shown in Diagram 10-37, grabbing a diagonal and getting 3 of 4 moves in corner region. If White tries 42. g4, Black plays h2, gaining two tempos in the upperright, which would seal the coffin on White (see Diagram 16-41b). Suekuni instead played 42. c8, which keeps the game close. Although this breaks the diagonal, Black can not play 43. h2, because this would allow White to play g1 without flipping g2. may seem tempting for Black to regain control of the diagonal by playing 43. b7, but this does not work either, as White could just break the diagonal with g4.
 |
 |
|
| Diagram 16-43 | Diagram 16-44 | Diagram 16-45 |
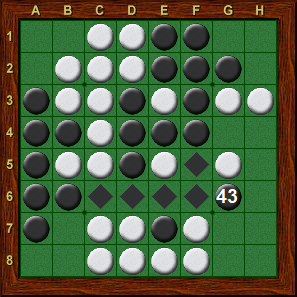
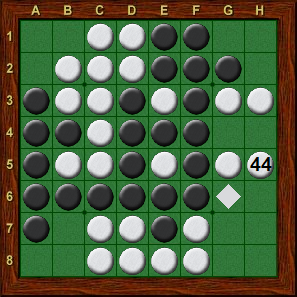
Black’s only winning move is the one Seeley chose, 43. g6. Now if White breaks the diagonal with 44. g4, Black can complete the tesuji by playing h2. Although theoretically the best move, losing by just 4 discs, 44. g4 keeps the position simple for Black. Suekuni instead tried for complications by playing 44. h5, which at least gives Seeley some game-losing options which look plausible, such as h6 or b7. However, Seeley kept his cool and simply wedged at h4. This guarantees black access to the critical square h2.
 |
 |

|
| Diagram 16-46 | Diagram 16-47 | Diagram 16-48 |
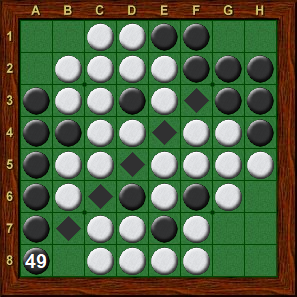
With fewer and fewer squares left open, White’s position is becoming increasingly desperate. The “best” move was 46. b7, but then Black can, for example, just grab the a8 corner and follow with a1, guaranteeing Black can stabilize three edges (the top, bottom and left edges). Instead Suekuni finally filled in the hole with 46. g4, and Seeley completed his tesuji by playing 47. h2. White is still walled off from the odd-region in the upper left, so that parity is working in favor of Black. Suekuni’s last hope was 48. b7. Now if Black takes the a8 corner, he gets swindled when White plays h1 without flipping the disc on g2.
 |
 |
|
| Diagram 16-49 | Diagram 16-50 | Diagram 16-51 |
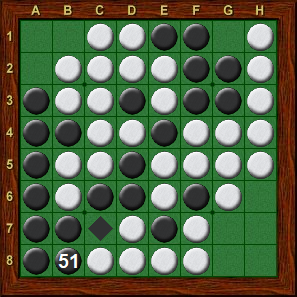
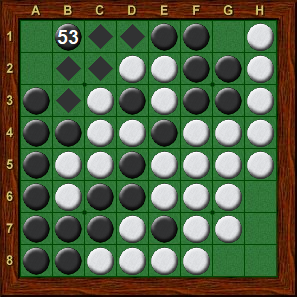
It thus came as something of a shock when Seeley chose to play 49. a8! This is certainly not the sort of move I would recommend to a novice (or an expert for that matter), but it is not too difficult to verify that Black will have enough discs even after getting swindled. White’s move to h1 does not flip along the diagonal, allowing to Black to keep five internal discs (b7, c6, d5, e4, and f3). Further, Black gets to play an extra move in the bottom-left (both a8 and b8) to compensate for White getting an extra move in the upper-right.
 |
 |
|
| Diagram 16-52 | Diagram 16-53 | Diagram 16-54 |
At this point, it appears that White has some hope of retaining parity by playing 52. g7. Although White is cut off from the odd region in the upper left, Black does not have access to g1. Black’s only choices are to play into the even region in the bottom right or the odd region in the upper left. If Black moves to the odd region, White can play g1, leaving only even regions. However, there is one big problem for White. When White plays g1, it makes the entire g-column white. This sets up a swindle for Black, allowing him to play g8 without flipping g7.
 |
 |
|
| Diagram 16-55 | Diagram 16-56 | Diagram 16-57 White passes |
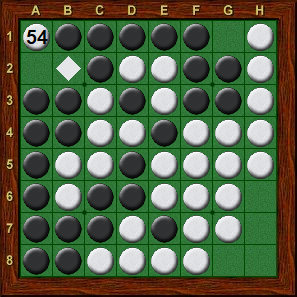
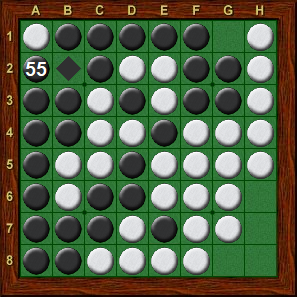
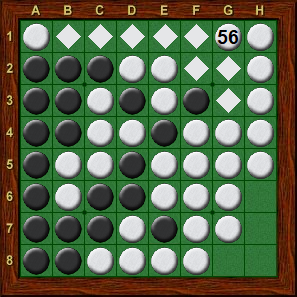
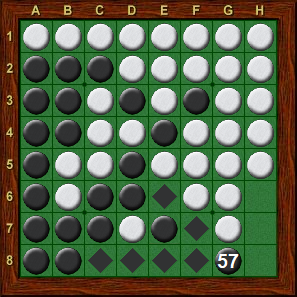
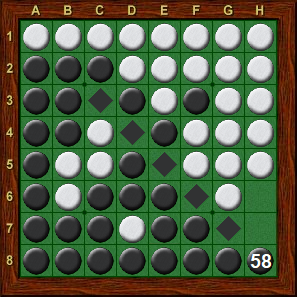
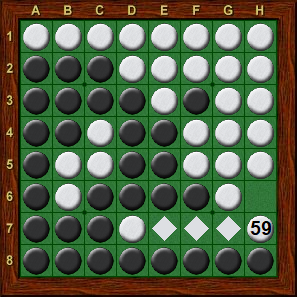
In the actual game, Seeley played 53. b1, which loses some discs (a2 was the best move) but is easy to count. Suekuni played 54. a1, but after 55. a2, there is no choice but to play 56. g1, setting up the swindle. It is interesting to note that in Diagram 16-56, there are only four empty squares, and Black only has 21 discs. However, 57. g8 is a huge move. Not only does it flip a lot of discs, but it forces White to pass, and now Black will get parity in the last region.
 |
 |

|
| Diagram 16-58 | Diagram 16-59 | Diagram 16-60 |
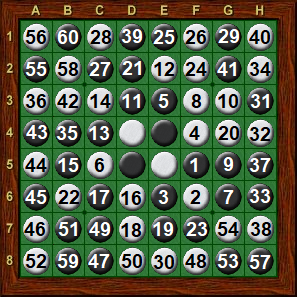
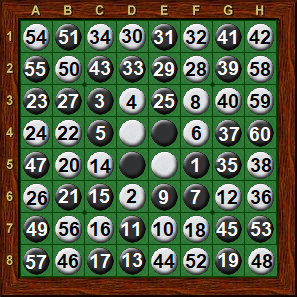
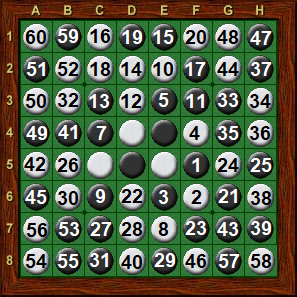
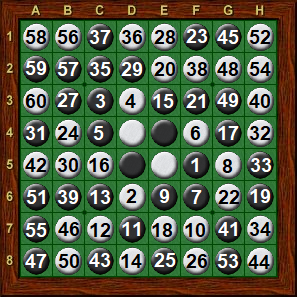
Seeley picked up another 7 discs on the last 3 moves of the game, enough for a 35-29 victory and the title of World Othello Champion! Below are six other transcripts from the tournament, including the preliminary round match between Suekuni and Seeley.
 |
 |
|
| Black: Makoto Suekuni 37 | Black: Makoto Suekuni 33 | Black: Ben Seeley 33 |
| White: Ben Seeley 27 | White: Hiroshi Goto 31 | White: T. Kashiwabara 31 |
 |
 |
|
| Black: R. Sperandio 29 | Black: Ben Seeley 32 | Black: Makoto Suekuni 29 |
| White: Ben Seeley 35 | White: Andreas Hoehne 32 | White: E. Caspard 35 |
| Navigation: Main Page > Learn Othello > Book Rose | << previous chapter << - >> next chapter >> |
