Rose: Chapter 3
| Klicke hier für Deutsche Version | |
| Navigation: Main Page > Book Rose | << previous chapter << - >> next chapter >> |
Chapter 3: Frontier discs and walls
In chapter 2, we learned about the value of corners, and the danger of moving to X-squares and C-squares. While knowing this alone might be enough to let you win against a complete novice, it will not get you far against more seasoned competition. In games between players that are both aware of the strategies presented in chapter 2, neither player will voluntarily make the sort of bad X-square and C-squares moves that give up corners for no reason. If you want your opponent to make these moves, then you will have to force him to do so. That is, you want to create a situation where the only moves available to your opponent are bad moves. How to go about doing this is the subject of this chapter, and indeed most of the rest of the book.
 |
 |

|
| Diagram 3-1 | Diagram 3-2 | Diagram 3-3 |
| White to move | Black to move | White to move |
Diagram 3-1 shows the sort of position that often arises in games between an expert (Black) and a novice (White). Many novices choose their moves mainly on the basis of the number of discs that are flipped, with the more discs flipped the better. After all, the object of the game is to end up with as many pieces as possible, so it seems logical to want to take a lot of pieces at every point during the game. Following this logic, the novice chooses to play a3, flipping 7 discs, as shown in Diagram 3-2. The problem with this move becomes apparent after Black replies with a2, resulting in the position shown in Diagram 3-3.
 |
 |

|
| Diagram 3-4 | Diagram 3-5 | Diagram 3-6 |
| Black to move | White to move |
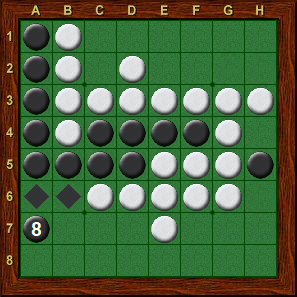
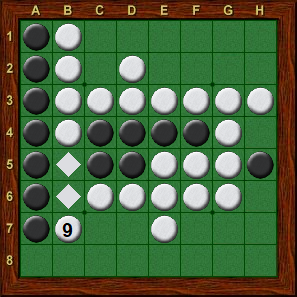
In Diagram 3-3, White’s only legal option is the b2 X-square, which White is obliged to play whether he wants to or not (Diagram 3-4). This immediately surrenders the a1 corner (Diagram 3-5), and Black will eventually gain many stable discs attached to this corner. Further, it will not be difficult for Black to force White to play into another X-square in the near future. For example, suppose the game continues with the sequence in Diagram 3-6, resulting in the position shown in Diagram 3-7. Black can now play a7 (Diagram 3-8), which again leaves White with only one legal move, namely the b7 X-square (Diagram 3-9).
In situations such as Diagram 3-3 and Diagram 3-8, we say that White has run out of moves. More precisely, White has run out of safe moves (moves which do not concede a corner), and now must give Black the corners and many stable discs. As this example demonstrates, flipping too many discs early in the game can often lead to running out of moves. Once a player runs out of moves he is almost certain to lose, because his opponent can force him to make bad moves which give up the corners.
 |
 |
|
| Diagram 3-7 | Diagram 3-8 | Diagram 3-9 |
| Black to move | White to move | Black to move |
 |
 |
|
| Diagram 3-10 | Diagram 3-11 | Diagram 3-12 |
| White to move | Black to move | White to move |
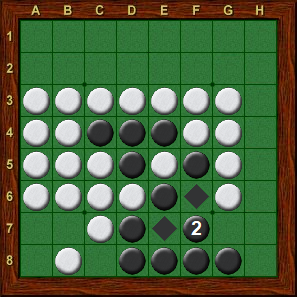
This point is so crucial to understanding the rest of the material in the book that I present another example just to make sure that it is perfectly clear. Starting with Diagram 3-10, White flips as many pieces as possible with g3 (Diagram 3-11), after which Black responds with f7 (Diagram 3-12). Here again, White has run out of moves; both of his remaining legal options, c8 and g7, surrender a corner, and Black can eventually force White to give up the other corners (see Exercise 3-7).
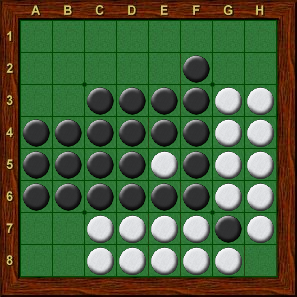
To clarify further, I need to introduce some Othello jargon at this point. Frontier discs are defined as discs that border one or more empty squares. Although technically discs on the edge squares could fit this definition, they are usually not included when speaking of frontier discs. A wall is a connected group of frontier discs of the same color. For example, in Diagram 3-10, the black discs at b3, c3, d3, e3, f3, f4, g4, and g5 are all frontier discs and together they form a wall. Discs which are completely surrounded by other discs, such as e5 in Diagram 3-11, are called interior discs or internal discs. A move which creates many new frontier discs is called a loud move, while a quiet move creates relatively few frontier discs.
The real problem with White’s move in Diagram 3-11 is not that it flips so many pieces, but that it flips the wrong pieces. Of the nine discs flipped, seven (b3, c3, d3, e3, f3, g4, and g5) are frontier discs. This is an extreme example of a loud move, flipping Black’s entire wall. In Diagram 3-10, White can choose between nine legal moves (b2, c2, d2, e2, f2, g2, g3, h4 and h5), while in Diagram 3-12, White has only two options, c8 and g7. By contrast, Black’s options increase from seven in Diagram 3-10 to seventeen in Diagram 3-11.
Remember that you must flip at least one of your opponent’s pieces in order to move. Building a long wall leaves you with nothing to flip, cutting off your access to the squares on the other side of the wall. Meanwhile, the same wall gives your opponent a wide range of choices. Building walls and running out of moves usually go hand-in-hand.
Another example should provide further insight into basic Othello strategy. Diagram 3-13 shows an opening commonly used in expert play, leading to the position in Diagram 3-14. Starting from this position, I used the Othello playing program WZebra (more information on this program appears in the Appendix) to evaluate the position. According to WZebra, set to look 20 moves ahead, White’s best move is e2, and the position is worth +1.73 for white. In other words, WZebra’s estimate is that if both sides play correctly from this point, White will win by roughly 2 discs (33-31).
 |
 |

|
| Diagram 3-13 | Diagram 3-14 | Diagram 3-15 |
| White to move | White +1.73 |
Next, I used the same position as in Diagram 3-15, but set WZebra so that it was White’s turn to move instead of Black’s. You might expect that White will now enjoy a bigger advantage, but WZebra values the position as -8.84 for White (Diagram 3-16). Making it White’s turn to move has made the position much worse for White! If we continue to have White play several turns in a row, while Black does nothing, every White move creates more and more white frontier discs, building walls and eliminating his options. Eventually the position in Diagram 3-18 is reached. White has completely run out of moves, and is at a huge disadvantage. Getting to make extra moves would be great in most games, but not in Othello.
 |
 |

|
| Diagram 3-16 | Diagram 3-17 | Diagram 3-18 |
| White -8.84 | White -10.05 | White -34.63 |
The idea that giving up your turn could be a good thing is so alien that many people never discover it, even after playing Othello for years. Of course, the rules of the game do not allow you to pass your turn whenever you want, and there are some circumstances under which you certainly would not want to pass, such as near the end of the game when you are trying to build as many stable discs as possible. However, it does stand to reason that in situations where passing would be ideal, we should be looking for moves which are as much like passing as possible.
In general, this means that quiet moves, which avoid creating a lot of frontier discs, are better than loud moves. For example, in Diagram 3-19, c5 would be an ideal move. It creates no new frontier discs, and no new options for White. The result is very similar to Black passing, and now White must use up his last remaining safe move (flipping the black disc on g3). In Diagram 3-20, White can make a quiet move to g3. This move gives Black only one new option, namely h2. Since h2 would be a terrible move for Black, again the effect is nearly the same as White passing, and Black will have to use up one of his other remaining options. In Diagram 3-21, Black’s best move is e6. Although this is certainly a quiet move, it is not quite as good as the previous two examples, as it opens up some new safe options for White at d7 and f7.
 |
 |

|
| Diagram 3-19 | Diagram 3-20 | Diagram 3-21 |
| Black to move | White to move | Black to move |
One of the problems with making loud moves is that it often leads to positions where you have no quiet moves available, while at the same time your opponent can make quiet moves. The result is that one loud move leads to a spiral of more and more loud moves, which gives your opponent more are more quiet moves, until you are eventually forced to start giving up corners. A bit more jargon will help to clarify this point. A poison disc is a disc which turns what would otherwise be a quiet move into a loud move. The potentially quiet move which is ruined by the poison disc is said to be a poisoned move.
 |
 |

|
| Diagram 3-22 | Diagram 3-23 | Diagram 3-24 |
| White to move | Black to move | White to move |
For example, in Diagram 3-19 Black has a wonderfully quiet move at c5. However, suppose that Black instead plays d7, as shown in Diagram 3-22. This move may not seem that loud, because it is flipping discs in the middle of the board, but if you look at the result carefully, you will see that it creates five new frontier discs (d2, d4, d5, d6, and d7). White gratefully plays c5 himself (Diagram 3-23), a quiet move made available by Black’s loud move, and now it is Black’s turn to move again. Note how the extra black discs at d6 and d7 are poison discs, ruining many of Black’s potentially quiet moves. If Black plays g4 (Diagram 3-24), it flips f5 and e6 because of the black disc on d7. This sets up another quiet move for White at g5. If Black tries a6 or g6 in Diagram 3-23, the black disc on d6 means that Black would have to flip some of White’s frontier discs on row 6. Black does have one quiet move left in Diagram 3-23, namely c7, but the loud move to d7 has turned a complete rout into a close game.
If the ideas in this chapter were new to you, then I welcome you to the relatively small percentage of players who understand the main “secret” of Othello strategy. Armed with this information you should soon see a dramatic improvement in your play! However, as was the case with the basic strategies mentioned in Chapter 2, once you start meeting opponents who are also aware of the “secret”, then you will have to dig a bit deeper in order to win. The next four chapters, on openings, edge play, endgames, and defense, cover the rest of what I consider to be the fundamentals of Othello strategy.
Exercises
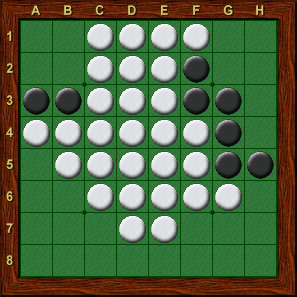
In each diagram, find the best move. Answers you'll find here.
 |
 |

|
| Exercise 3-1 | Exercise 3-2 | Exercise 3-3 |
| Black to move | Black to move | Black to move |
 |
 |

|
| Exercise 3-4 | Exercise 3-5 | Exercise 3-6 |
| White to move | White to move | Black to move |
Exercise 3-7
Set up the position in Diagram 3-12 on a board. Play out the rest of the game for both sides, starting with a White move to g7. Try to find a simple sequence of moves for Black that forces White to concede all 4 corners. Do the same starting with the position in Diagram 3-7.
Exercise 3-8
Starting from Diagram 3-18, play out the rest of the game for both sides. Try to convince yourself that even though Black has only one piece, White’s walls and lack of options give Black the advantage. Hint: do not start with d2! If you find that White wins the game, come back to this exercise after you finish reading the rest of Part I.
| Navigation: Main Page > Book Rose | << previous chapter << - >> next chapter >> |